Set up a paywall
Last updated: October, 2026
Paywalls allow you to charge for your community membership via subscriptions, installments, or one-time payments. You can use a paywall to gate your entire community or specific spaces within it. This gives you control over what content or areas your members can access based on what they pay for.
Create a new paywall
Before you start, make sure your Circle community is connected to a Stripe account. Once that’s set up, you’re ready to create your first paywall.
Click Payments in the left sidebar and then select Paywalls.
Click Create paywall in the top-right corner.
In the next sections, we’ll walk you through each step of the paywall setup process, tab by tab.
Step 1: Product details
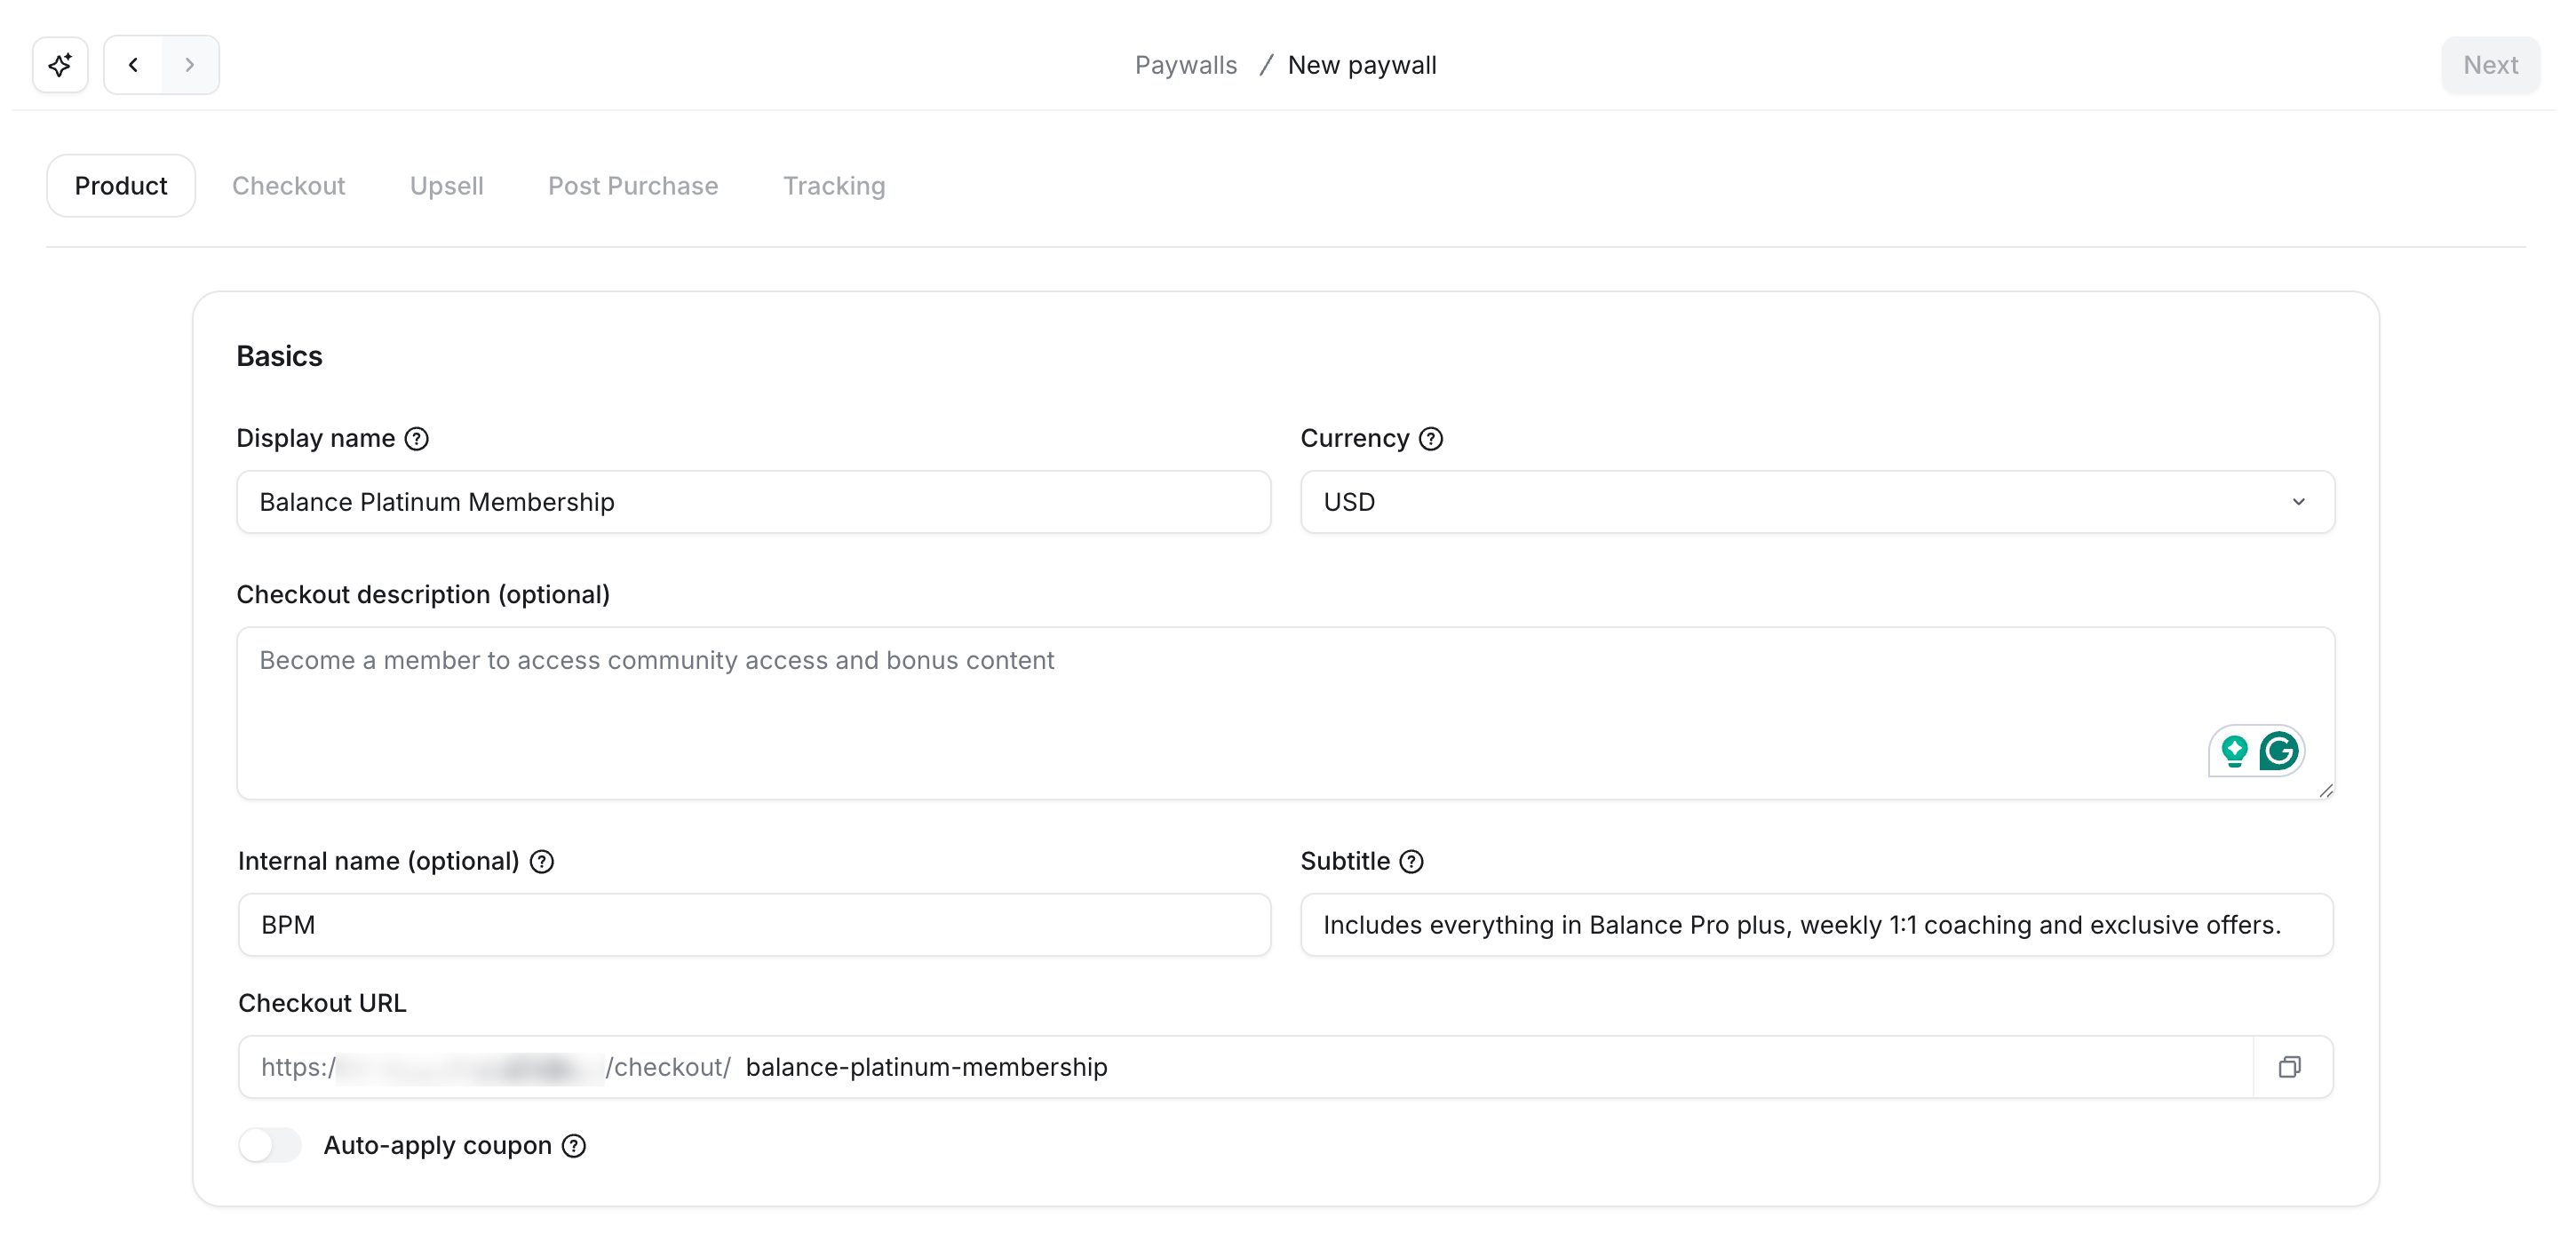
Fill out the following details:
Display name: Provide the name of your paywall (e.g., Basic, Premium, Pro). This is a member-facing paywall name displayed on the paywall checkout page and billing information.
Internal name (optional): You can provide an alternate name to be used by admins for internal reference.
Subtitle (optional): You can enter a brief subtitle that members will see for this plan when they are changing plans within subscription groups.
-
Currency: Select one of the supported currencies from the dropdown menu.
ℹ️ Note: You cannot update the existing paywall to a new currency. You will need to create a new paywall if you would like to start charging users in the new currency.
-
Checkout URL: This field displays the checkout URL, which includes a slug generated from the display name. You can customize the slug to match your preferences for better readability or branding. When shared, this link directs users to the plan’s checkout page. For more information, see the Share checkout URL section in this article.
You can also generate a checkout URL appended with a coupon using the Auto-apply coupon toggle. To learn more about this toggle, see our guide here.
Checkout description (optional): Add additional info about the plan to display on the checkout page.
Step 2: Price options
You can add up to six different pricing options to a single paywall. This lets you offer flexible plans, like monthly, quarterly, or yearly subscriptions, to fit different needs. You can also discount longer-term plans, such as yearly subscriptions, to make them more appealing and encourage users to commit longer.
Add a price
-
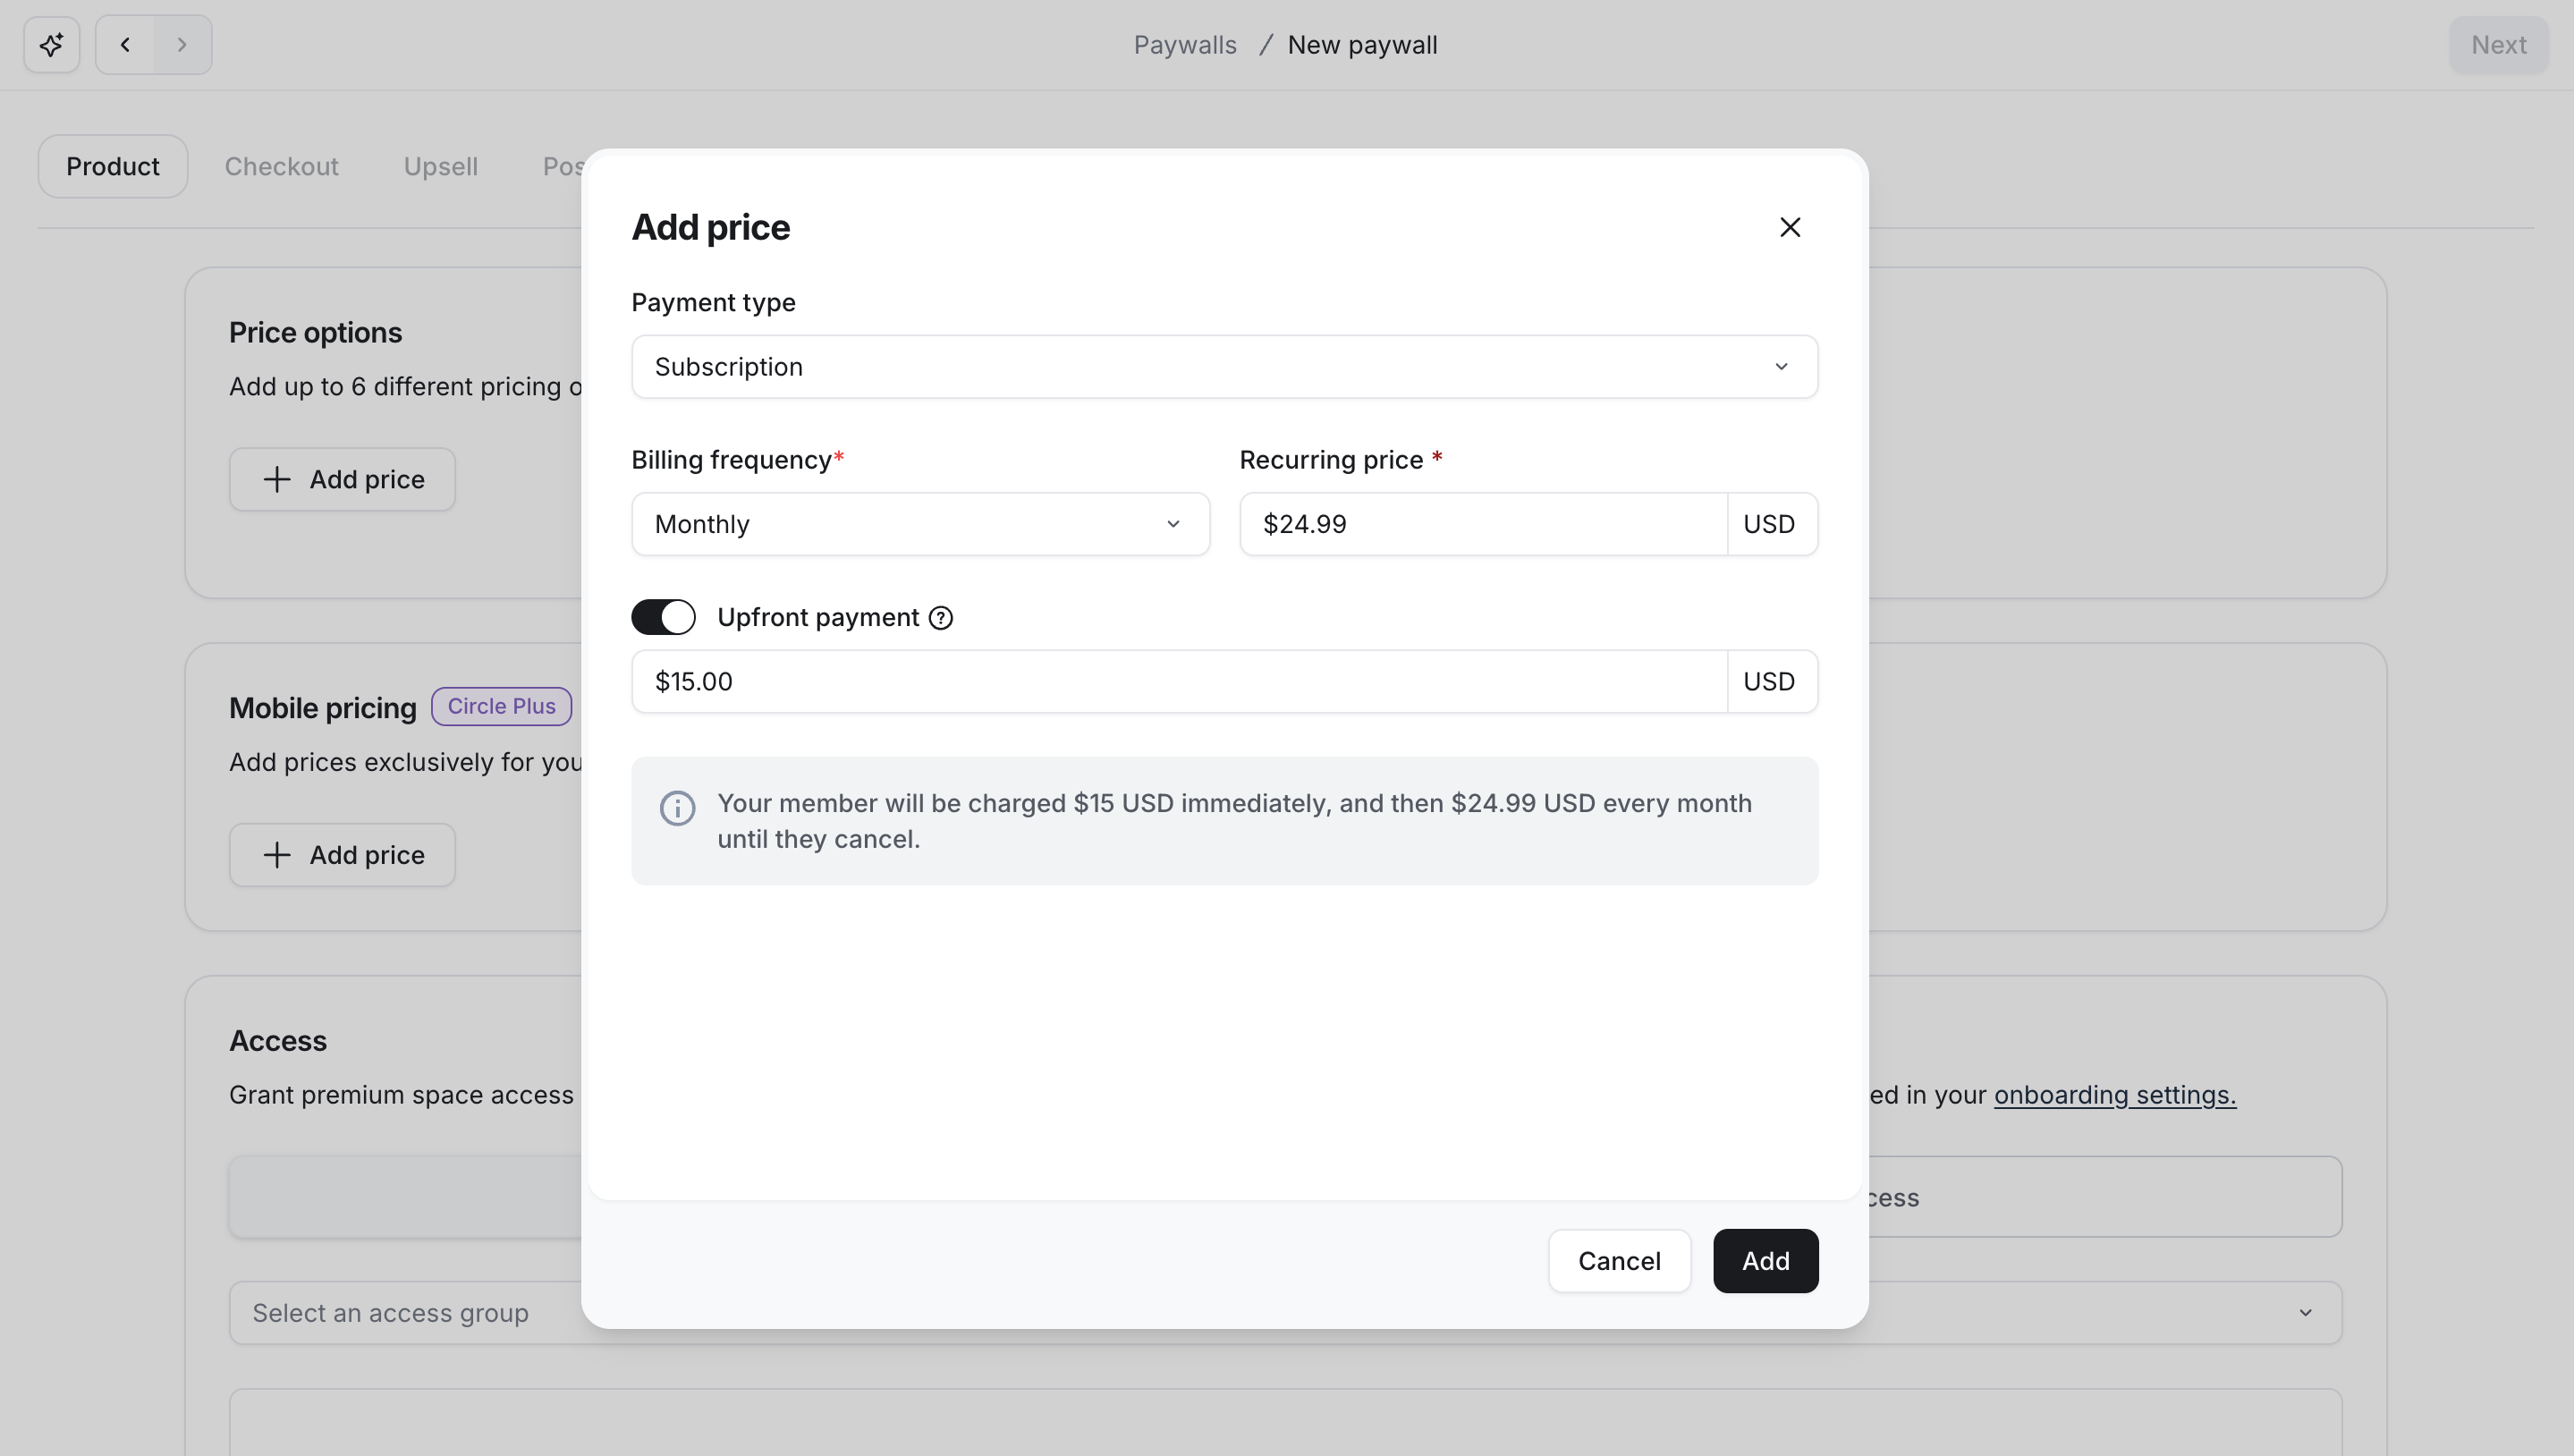
Click Add price in the Price options section.
-
In the Payment type dropdown menu, choose from the following prices:
One-time fee: Charge a one-time fee to grant users lifetime access to the paywalled content, with no recurring payments. Next, enter the one-time charge amount.
-
Subscription: Charge a recurring payment to maintain access to the paywalled content. Recurring options include:
Monthly: Charged every month
Bimonthly: Charged every two months
Annual: Charged once a year
Biennial: Charged every two years
Quarterly: Charged every three months
Biannual: Charged every six months
Biweekly: Charged every two weeks
Weekly: Charged once a week
Daily: Charged once a day
-
Installments: Split a one-time price into equal, scheduled payments, with a total paywall price at a weekly, biweekly, monthly, or quarterly payment frequency. For more information, see Offer installment pricing options for paywalls.
(Optional) When configuring subscription or installment pricing, you can set up an upfront payment, allowing you to charge a distinct initial payment followed by regular payments. For instance, for a monthly subscription paywall, you could charge $50 upfront, then $20 per month thereafter.
Click Add.

Configure additional price settings
Depending on the pricing type, you can enable extra options:
-
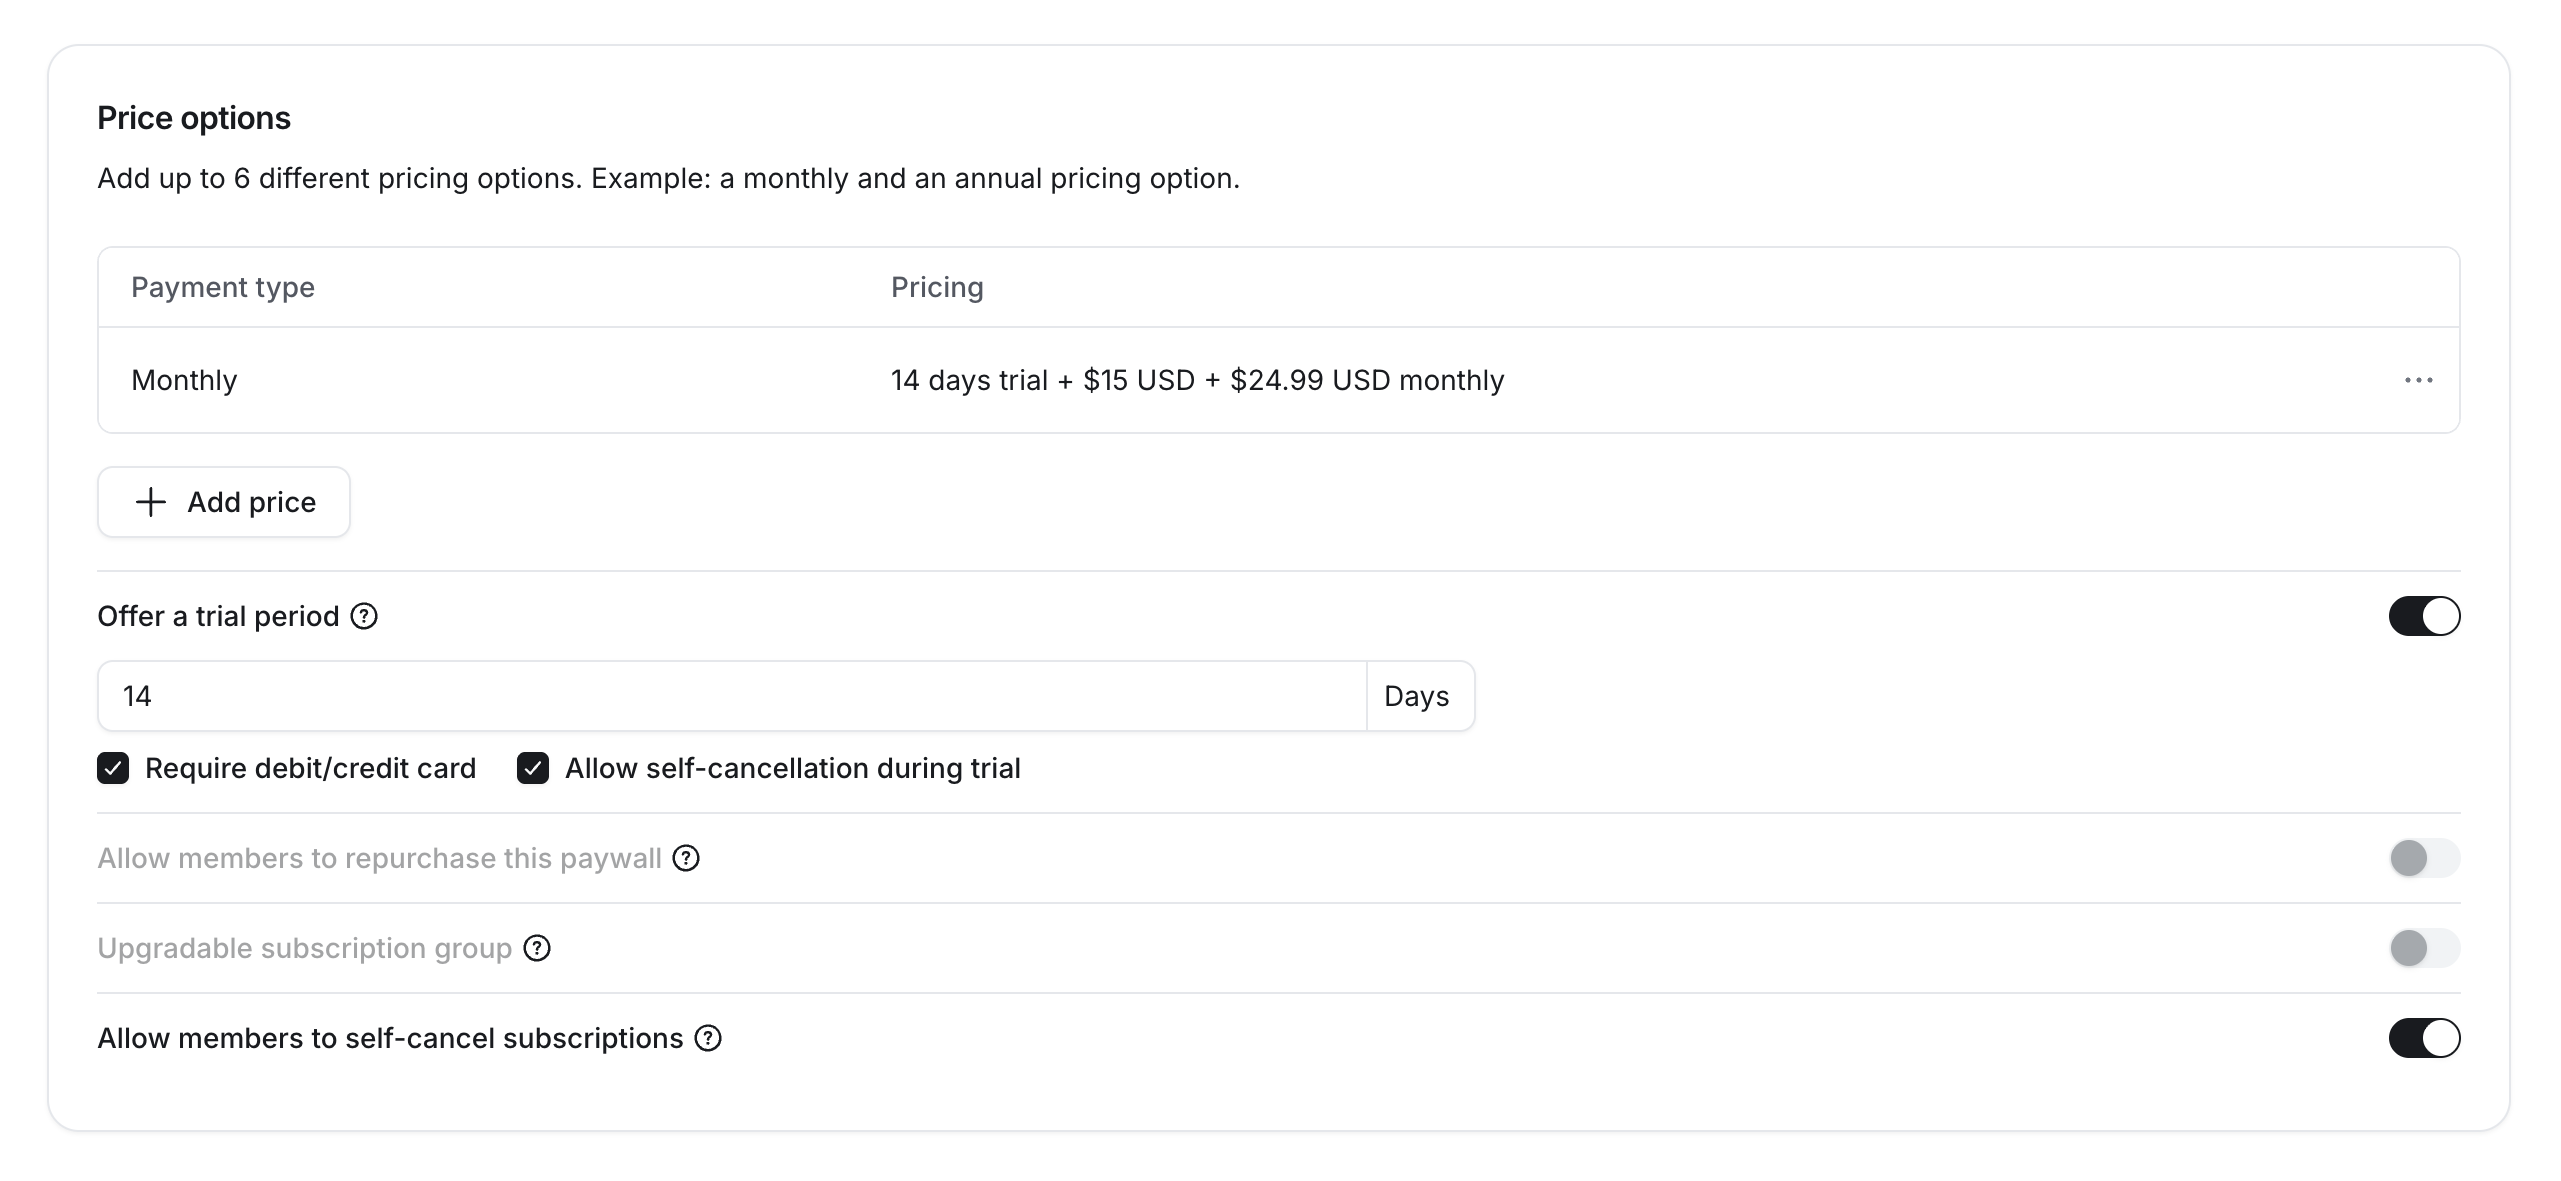
Upgradable subscription group:
Ideal for paywalls with subscription pricing to allow members to upgrade or downgrade between paywalls.
If you’ve created subscription groups, you can enable this toggle and select which subscription group you want to make this paywall a part of.
-
ℹ️ Notes:
You need to create the paywall first. Once created, you can edit the paywall and choose from the available subscription groups.
A paywall can only be added to the subscription group with the same currency. Hence, when selecting a subscription group for the paywall, only subscription groups with the same currency will appear in the dropdown menu.
A subscription group can only include paywalls with the same access type—either Access groups or legacy Space access, but not both. For example, if Subscription group A already has a paywall that uses the legacy Space access option to grant access to spaces, you can only add other paywalls that also use the Space access option. If you try to add a paywall that uses the Access groups option to provide access to spaces, the Subscription group A won’t appear in the list of available groups. You can create a new subscription group and add paywalls that use the Access group options to grant access to spaces.
-
Offer a trial period:
You can offer a free or paid trial for subscription and installment pricing. Enable this toggle to provide a trial of the paywall for up to 730 days.
If you wish to require a payment method when a user starts a free trial, enable the Require debit/credit card toggle.
To allow members to cancel their subscription during the trial, enable the Allow members to self-cancel subscriptions during trial toggle. This toggle applies only to subscription pricing.
💡 Tip: If you are providing a paywall trial via invitation methods or creating a trial paywall subscription for a member directly via their profile, the paywall’s trial duration and debit/credit card requirement won’t apply. Instead, you will be able to provide a custom trial duration that overrides the paywall’s original trial and the debit/credit card requirement configuration for that particular invitation method setup. For more information, see Add members to paywall trial using invitation methods.
-
Allow members to repurchase this paywall:
For paywalls with one-time fee pricing, you can enable this toggle to allow members to buy the same paywall again. For more information, see Allow members to repurchase one-time fee paywalls.
💡 Tip: Installment paywalls are also re-purchasable by default. You do not have to take any steps to enable this for installment pricing; it works independently of the Allow members to repurchase this paywall setting. Once all installments are completed for their previous paywall purchase, members can re-purchase the same paywall again using the checkout page URL.
-
Allow members to self-cancel subscriptions:
Using this toggle, you can control members’ ability to self-cancel their paywall subscriptions.
This feature is exclusive to subscription pricing and can be customized for a specific paywall. Admins can still cancel member subscriptions at any time, regardless of this setting.
Manage pricing options
You can set one price as the preferred option and remove prices you don’t want to offer.
Set a preferred pricing option:
You can mark one of the prices as the preferred option, which means it will be pre-selected when someone visits the checkout page.
Click the More actions (three dots icon) next to the price.
-
Select Make preferred.
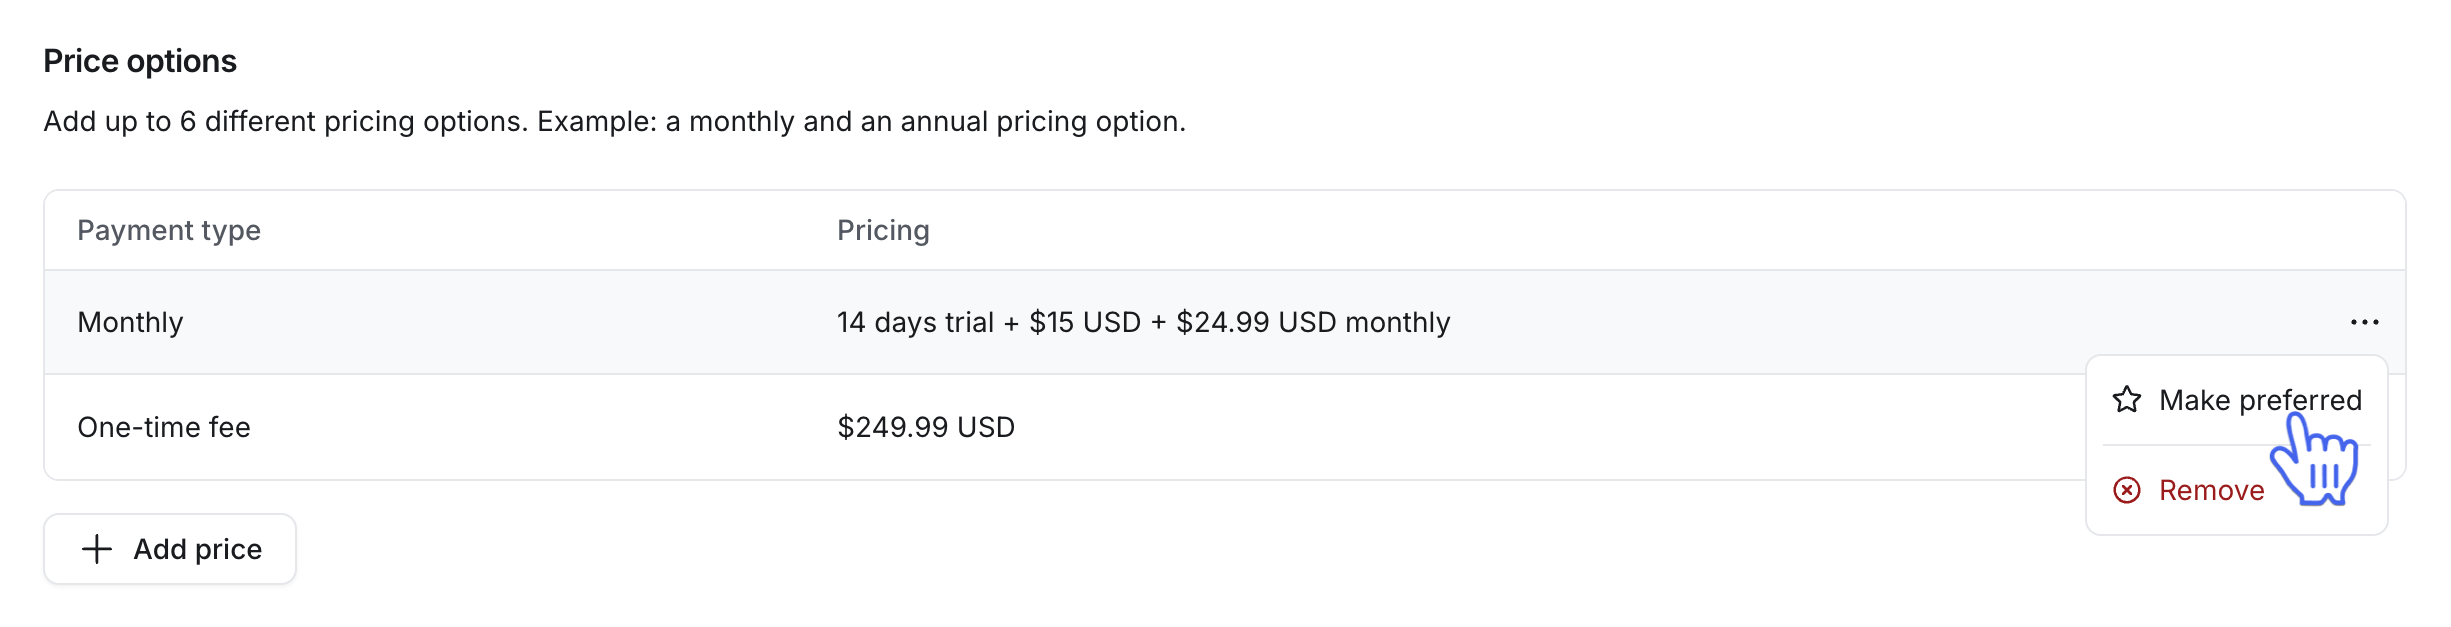
This helps draw attention to the plan you want to promote and can increase the chance that users choose it. You can also configure callouts for each pricing option in the Checkout tab (see the Checkout section below for more information).
Remove a pricing option:
Click the More actions (three dots icon) next to the pricing option.
Select Remove.
When you're done adding and configuring your pricing options, click Next to continue setting up your paywall.
Step 3: Access
This section allows you to configure which community spaces users can access when they purchase the paywall and become members of your community.
Before you set up access
Here are a few important things to keep in mind to make sure members get the right access.
Protecting paywalled spaces: To prevent unauthorized access, set paywalled spaces to private so that only paying members can enter. For detailed instructions on securing these spaces, see Configure important settings prior to setting up a paywall.
Automatic access type conversion: We've implemented some safeguards to manage instances where both types of access are unintentionally provided to the same spaces or space groups via different entry points. To learn about the access conversion rules for spaces that are part of a paywall and that a member already has access to via invite access, see Understanding invite access and paywall access methods.
Impact of default onboarding access: If you have configured access in your community’s onboarding settings, anyone purchasing the paywall will also be added to the spaces and space groups from the onboarding settings.
-
Impact on shared access when multiple paywalls are purchased: If a member purchases multiple paywalls that grant access to the same spaces, their access to those common spaces will persist as long as at least one of those paywalls remains active.
-
For example, James purchases Paywall A and Paywall B in your community.
Paywall A provides legacy Space access to Spaces A, B, and C.
Paywall B provides access to Access group Y, which includes Spaces A, D, E, and F.
This means James is getting access to Space A via both paywall purchases.
Now, if James cancels Paywall B, he will lose access to Access group Y, meaning Spaces D, E, and F will no longer be available to him. However, he will still have access to Space A through Paywall A.
If James later cancels Paywall A as well, he will lose access to spaces he received through Paywall A, including Space A.
-
There are two ways to grant access through a paywall:
Access groups (recommended)
Space access (available only for communities created before January 29, 2025)
Access groups
Access groups help you effectively define which spaces (and space groups) members get access to. This helps you streamline access management and eliminate the need for repetitive manual setups for entry points.
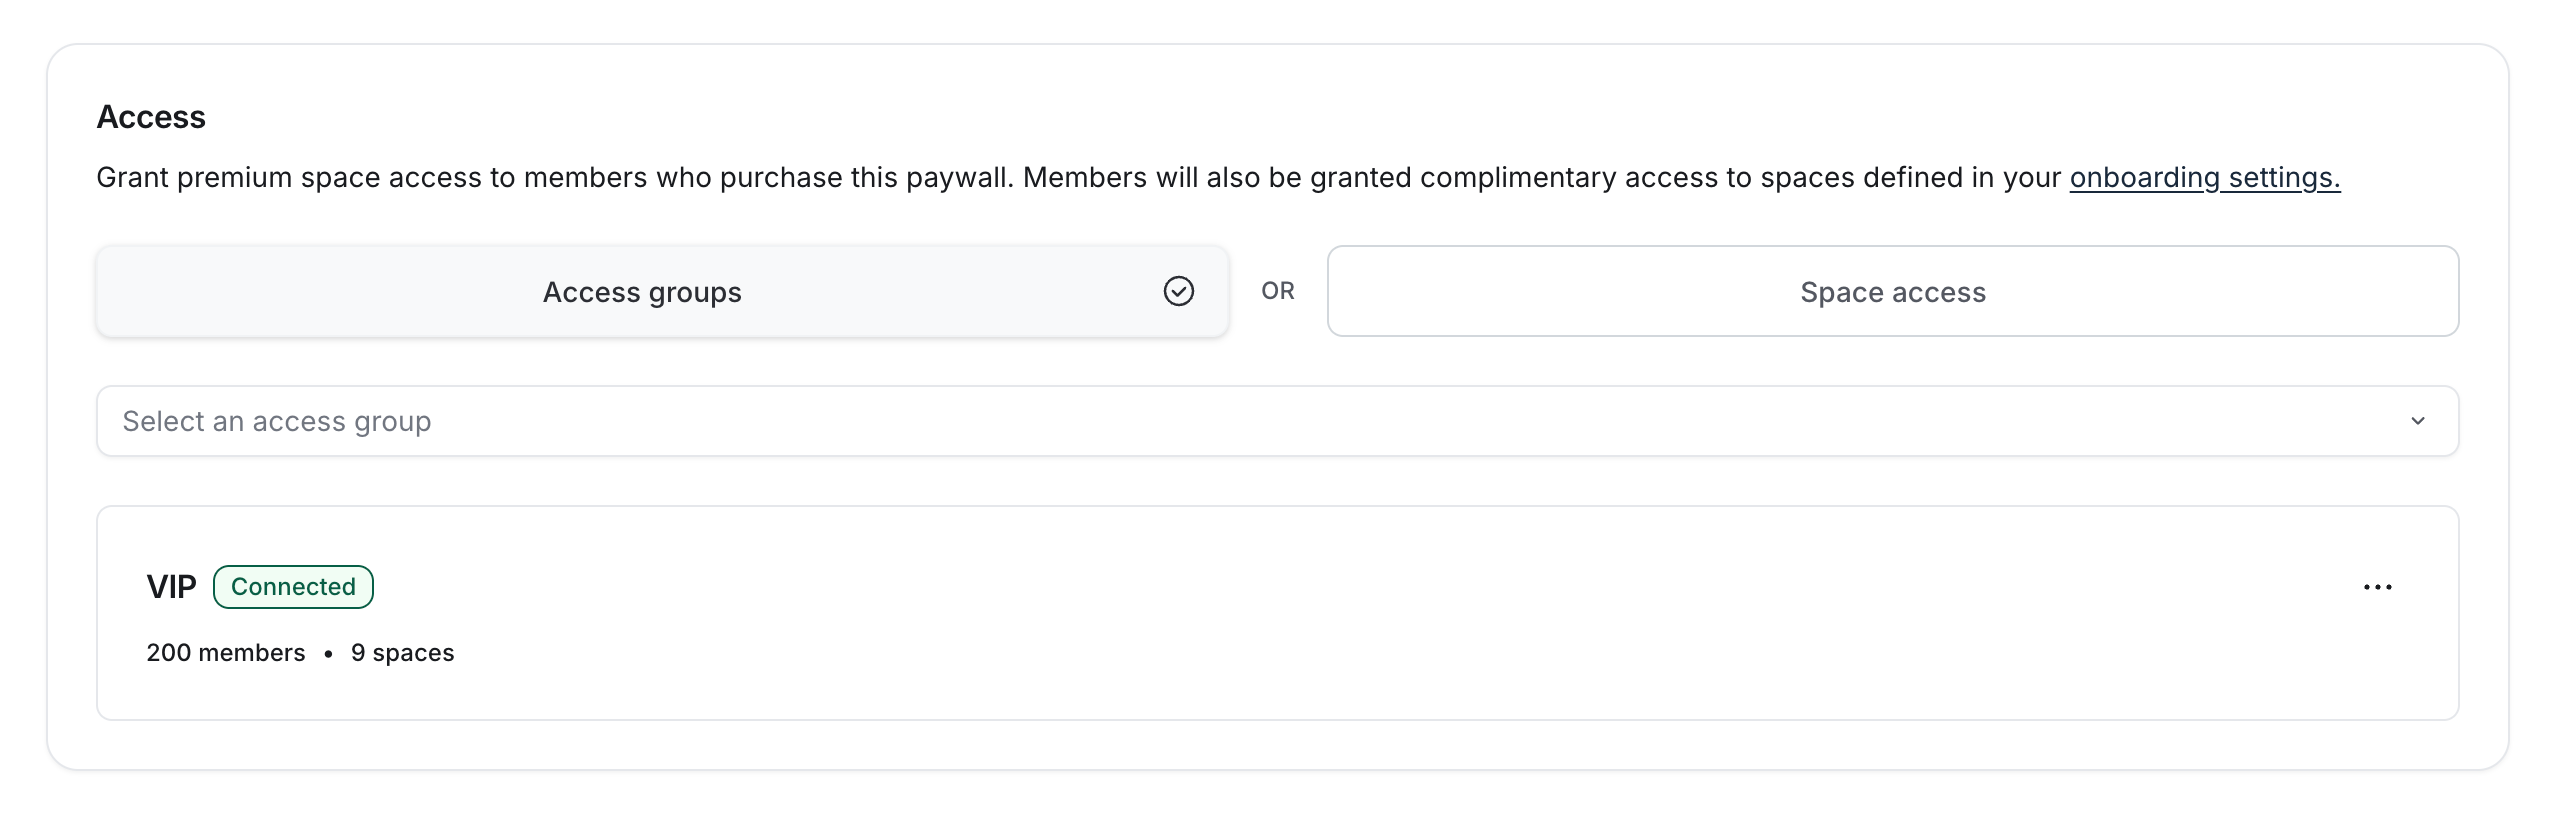
To provide access to spaces using access groups, select the Access groups option and then choose one from the list. You can add more than one access group here to provide members with access to multiple groups.
💡 Tip: If you add an access group by mistake, click the More actions (three dots icon) next to the group and select Remove.
To update the settings of a connected access group, click the More actions (three dots icon) next to the group and select Edit. This opens a new browser tab where you can modify the group settings.
Space access (legacy space access)
For communities created before January 29, 2025, you can manually grant access to specific spaces and space groups instead of connecting access groups.
To use the legacy space access option, select Space access. Here, you have two options:
-
Give access to all spaces: Toggle this option to grant members access to all spaces in your community.
❗Important: If you choose to give access to all spaces, members who sign up for this paywall will be granted access to all the spaces in your community, including private and secret spaces, as well as any space you create in the future.
Provide access to specific spaces and space groups: Choose specific spaces and space groups to include in paywall access.
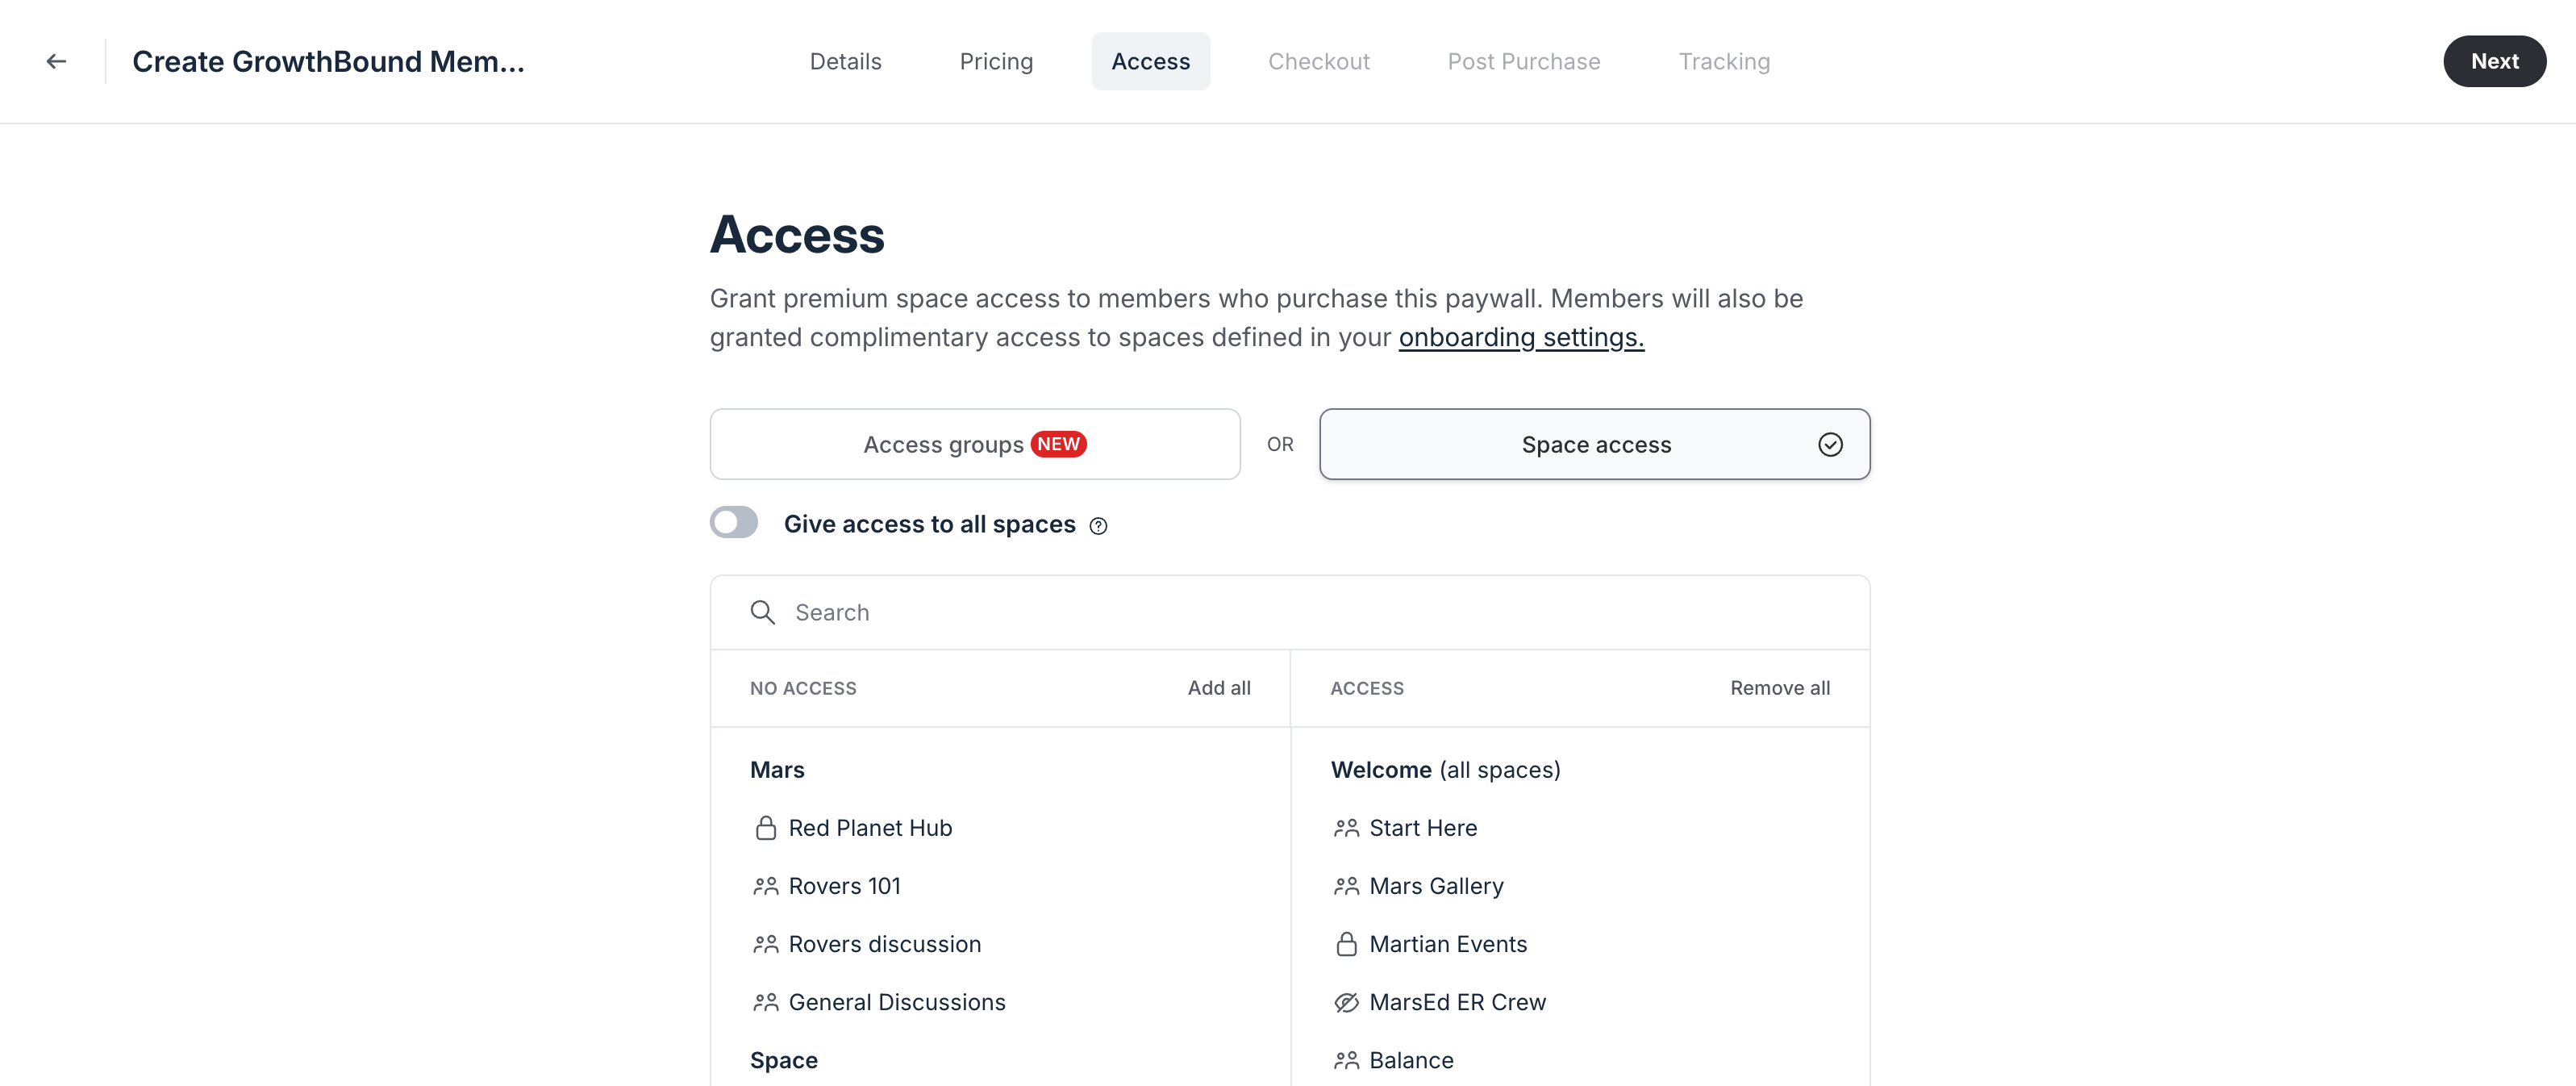
To provide access to select spaces and space groups:
Use the search bar or scroll through the No access column to locate the specific space or space group.
-
In the access form, each space is represented with an icon indicating the space access setting:
👥 A people icon indicates an open space.
🔒 A lock icon indicates a private space.
👁️ A crossed-eye icon indicates a secret space.
-
To provide access:
Hover over the name of the space group or space and click Add to move it to the Access column.
(Optional) To provide access to all current spaces in your community, click Add all next to the No access column header.
ℹ️ If you select a space group with a setting (Managing space access and visibility) that enables members to gain access to any future spaces, it will also apply when you add the space group to paywall access.
If you accidentally add a space or space group to the Access column, hover over it and click Remove.
Once you have reviewed the Access column, click Next.
Step 4: Checkout
The Checkout tab lets you customize your paywall page. You can add a cover image, badges, and testimonials to make it more visual, trustworthy, and aligned with your brand. These small visual details can make a big difference in how confident and motivated someone feels before they pay.
You can also preview how the page will appear on different screen sizes. Use the preview pane on the right side to switch between desktop, tablet, and mobile views. This helps you make sure your page looks polished on any device.
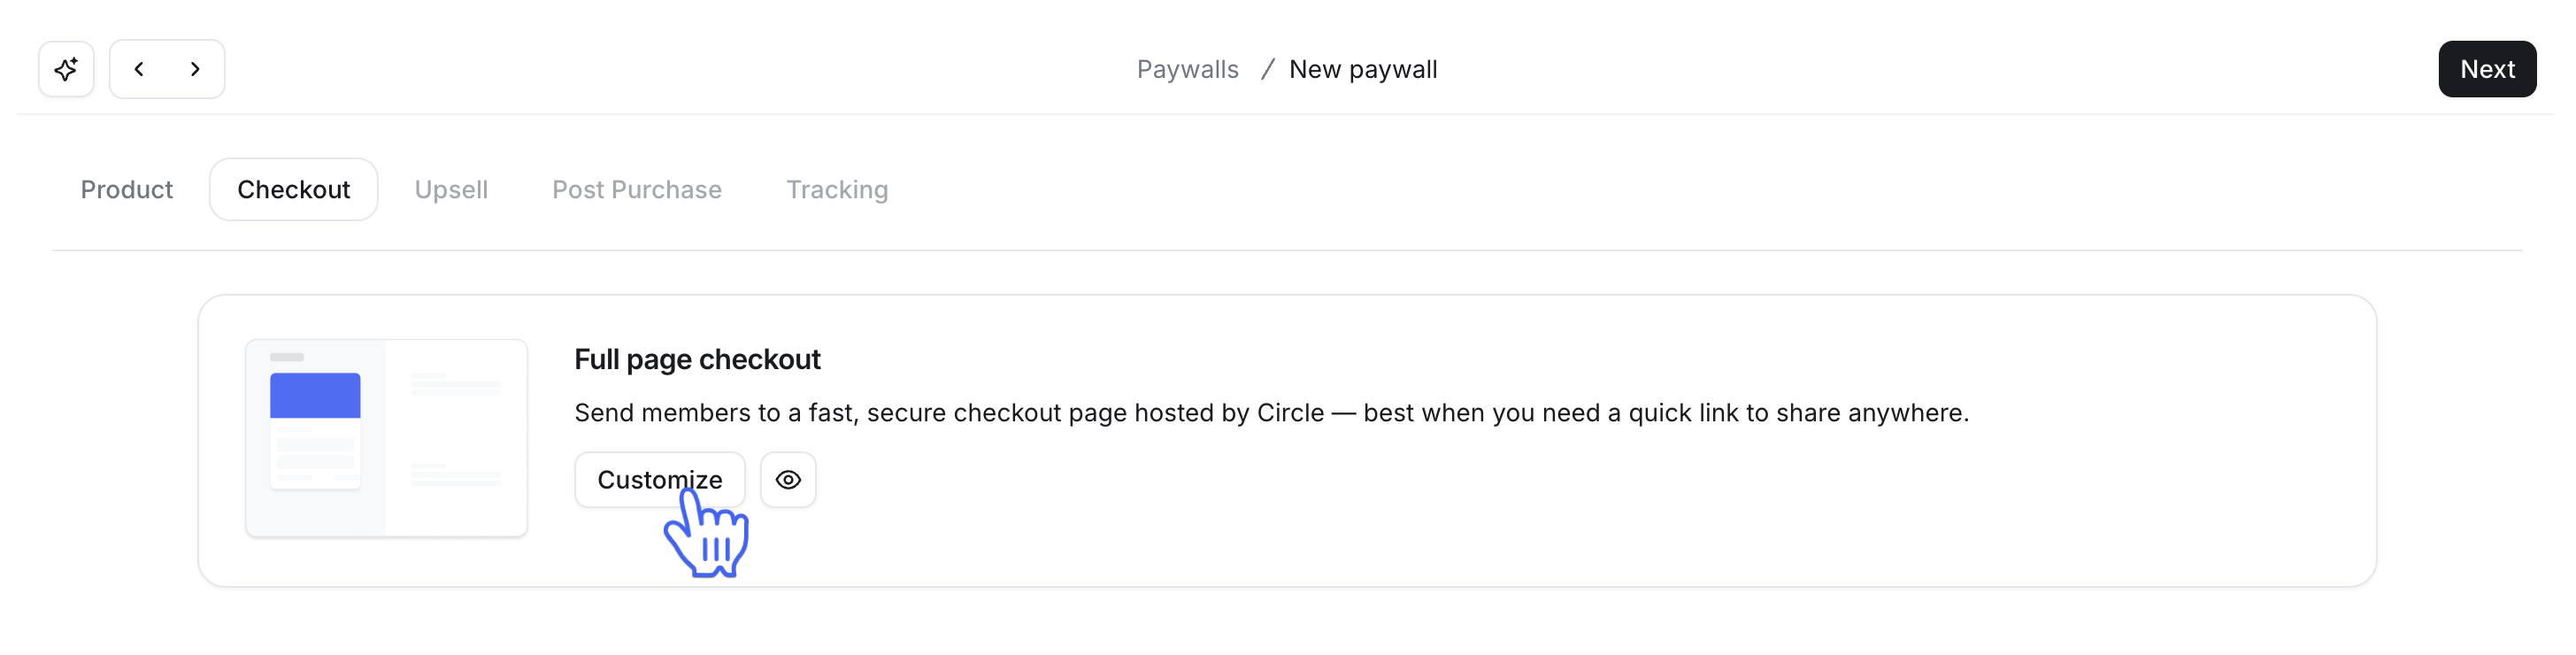
To get started, click Customize in the Full page checkout section.
Cover image
The cover image sets the tone for your paywall. It’s the first thing users see at the top of the description, and it’s also used as a preview image when your paywall is shared on social media or messaging apps. A strong visual helps grab attention, build brand recognition, and create a more polished experience.
To add a paywall cover image, follow these steps:
Click Add image.
-
In the upload dialog, choose one of the options:
Upload: Select an image from your computer. Recommended size: 540 × 303 px.
Unsplash: Pick a free image from the Unsplash library.
Embed: Paste a direct image link.
-
To adjust the image, you can:
Click and drag the image to fit within the allowed dimension.
Use the slider at the bottom of the dialog to zoom in or out on the image.
Click Save changes.
Badges
Badges are a great way to highlight key benefits of your offer in a quick, visual way. They help answer the question: “Why should I buy this?” right at the moment when someone’s considering a purchase.
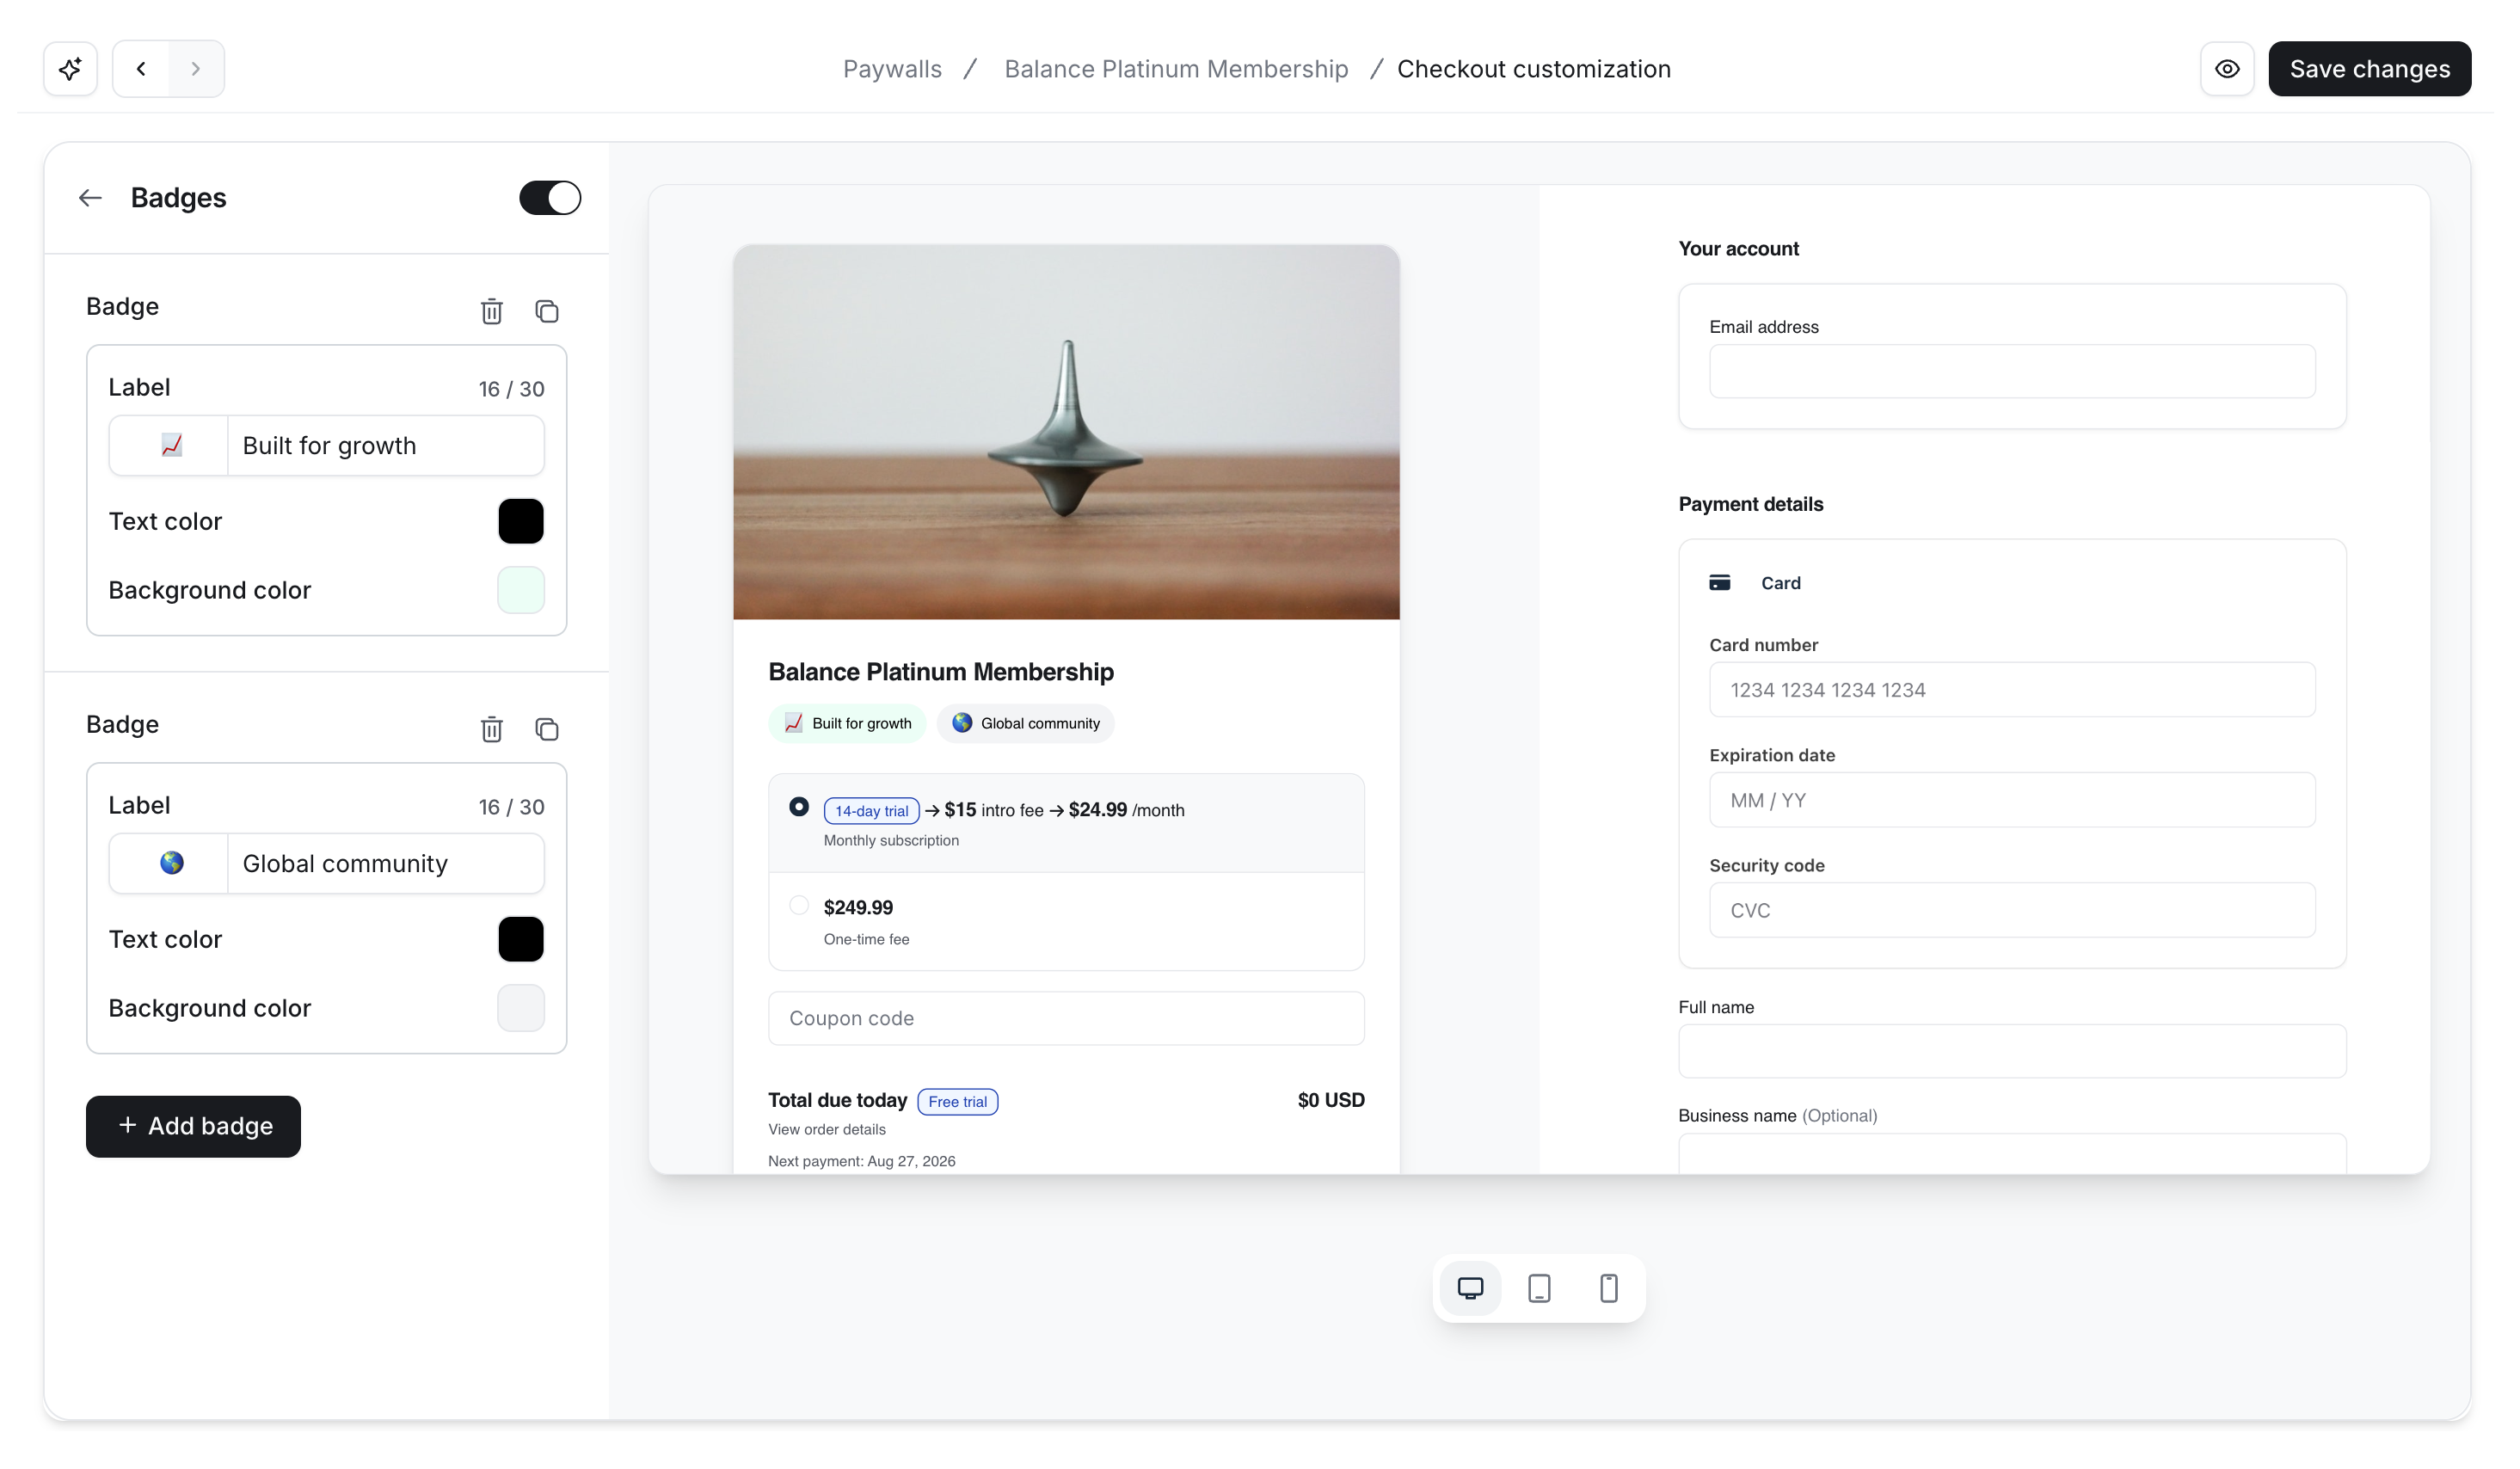
Use them to showcase selling points such as guarantees, popularity, limited-time offers, or standout features. You can add up to 5 badges on your checkout page. They appear below the paywall description.
To add badges, follow these steps:
Click Badges in the Product details section.
Turn on the Show badges toggle.
-
For each badge, you can set:
Emoji: Choose from built-in options or add a custom one. You can paste an embed link or upload an image with a recommended size of 280 x 280 px.
Text: Write a short message (max 30 characters). Keep it focused and benefit-driven, such as “30-Day Guarantee”, "Exclusive access," or "Save with yearly plan.”
Text and background color: Click the color swatches to choose from available color options.
Badges will appear in the order you created them, so add them in the preferred order. To add more badges, click Add badge at the bottom of the last badge.
Managing badges
You can manage each badge with the icons in the top right corner:
Duplicate a badge using the copy icon.
Delete a badge by clicking the trash icon.
Benefits
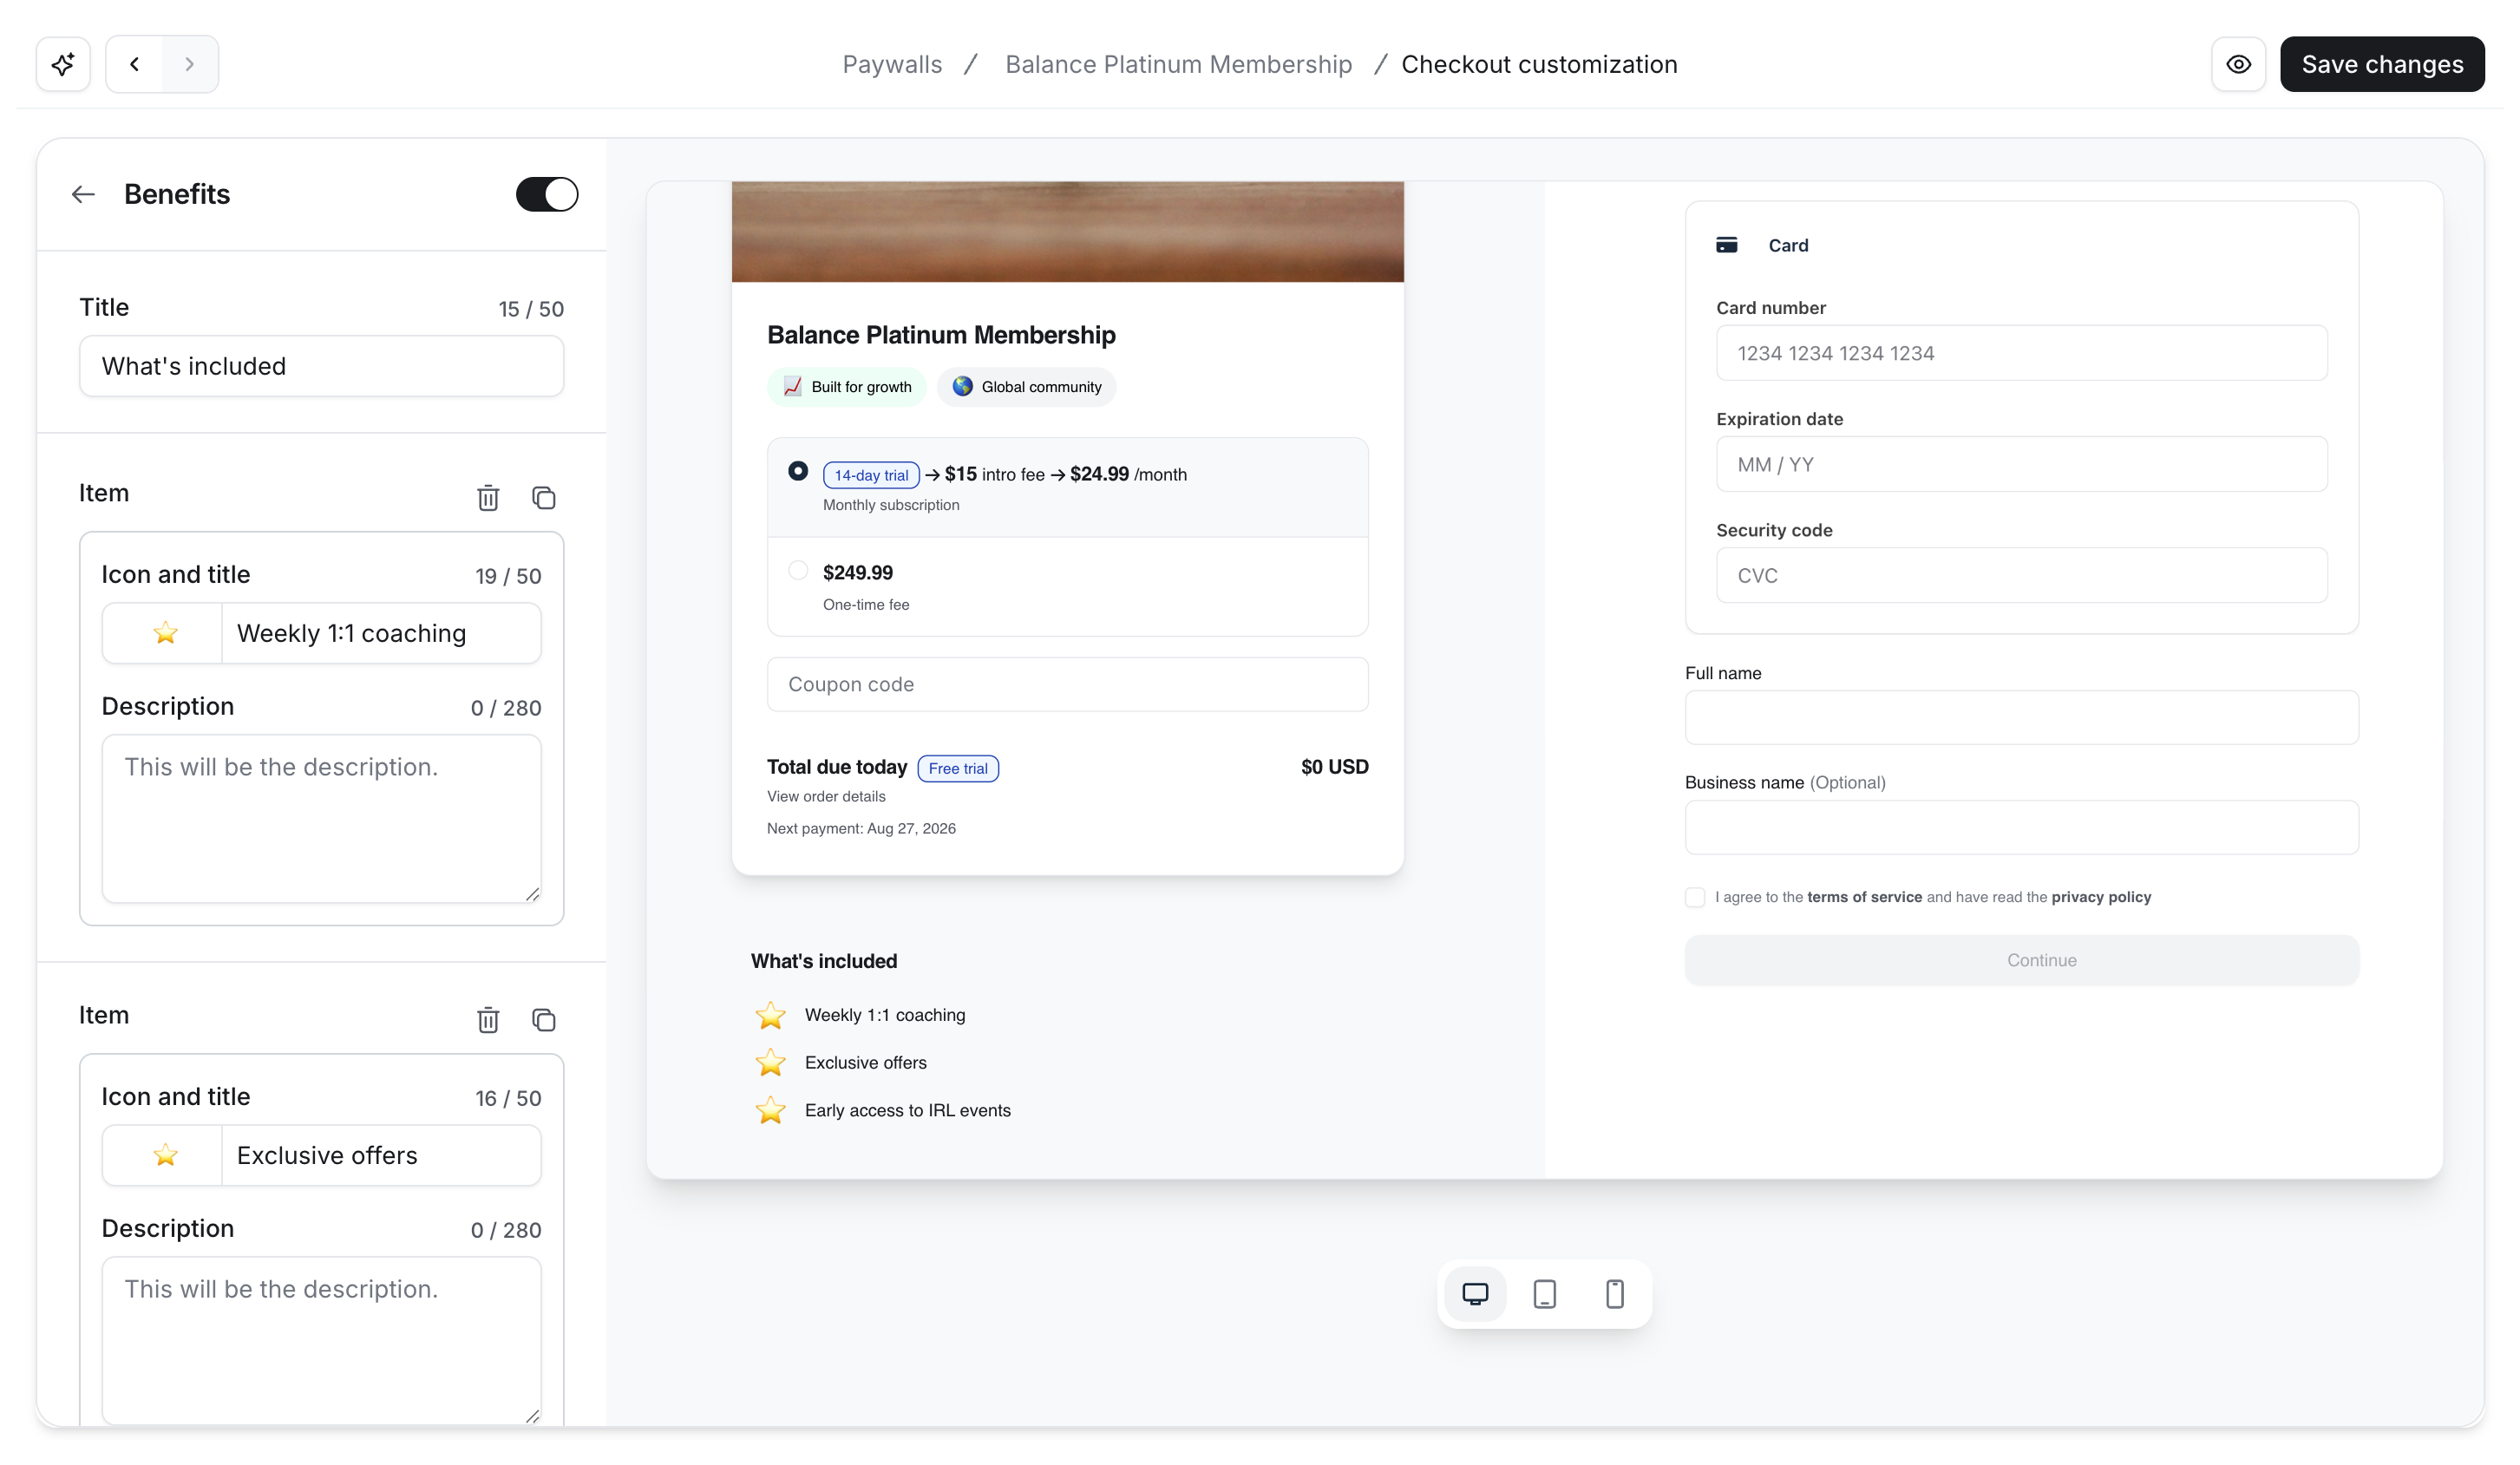
The Benefits section helps you highlight what members will get when they join. Use this to list key features, perks, or experiences your membership includes, such as access to private courses, workshops, exclusive content, or coaching.
These benefits appear at the bottom of the order details. You can add up to 10 benefits to your checkout page.
To set up benefits, follow these steps:
Click Benefits in the Product details section.
Turn on the Show benefits toggle.
In the Title field, enter a heading for the section (e.g., “What’s included” or “Your membership perks”).
-
For each benefit item, customize the following:
Icon: Choose from built-in options or add a custom one. You can paste an embed link or upload an image with a recommended size of 280 x 280 px.
Title: Add a short, clear title (up to 50 characters). For example: ✅ Weekly live calls, 🎯 Goal tracking tools.
Description: Add a short explanation (up to 280 characters) to provide more context. This could explain how the benefit works, or why it’s valuable to the member.
Benefit items appear in the order you create them, so we suggest adding them in order of priority to highlight what matters most. To add more benefits, click Add item at the bottom of the last item.
Managing benefits
You can manage each benefit item with the icons in the top right corner:
Use the Duplicate icon to quickly copy an item.
Use the Trash icon to delete a benefit.
Testimonials
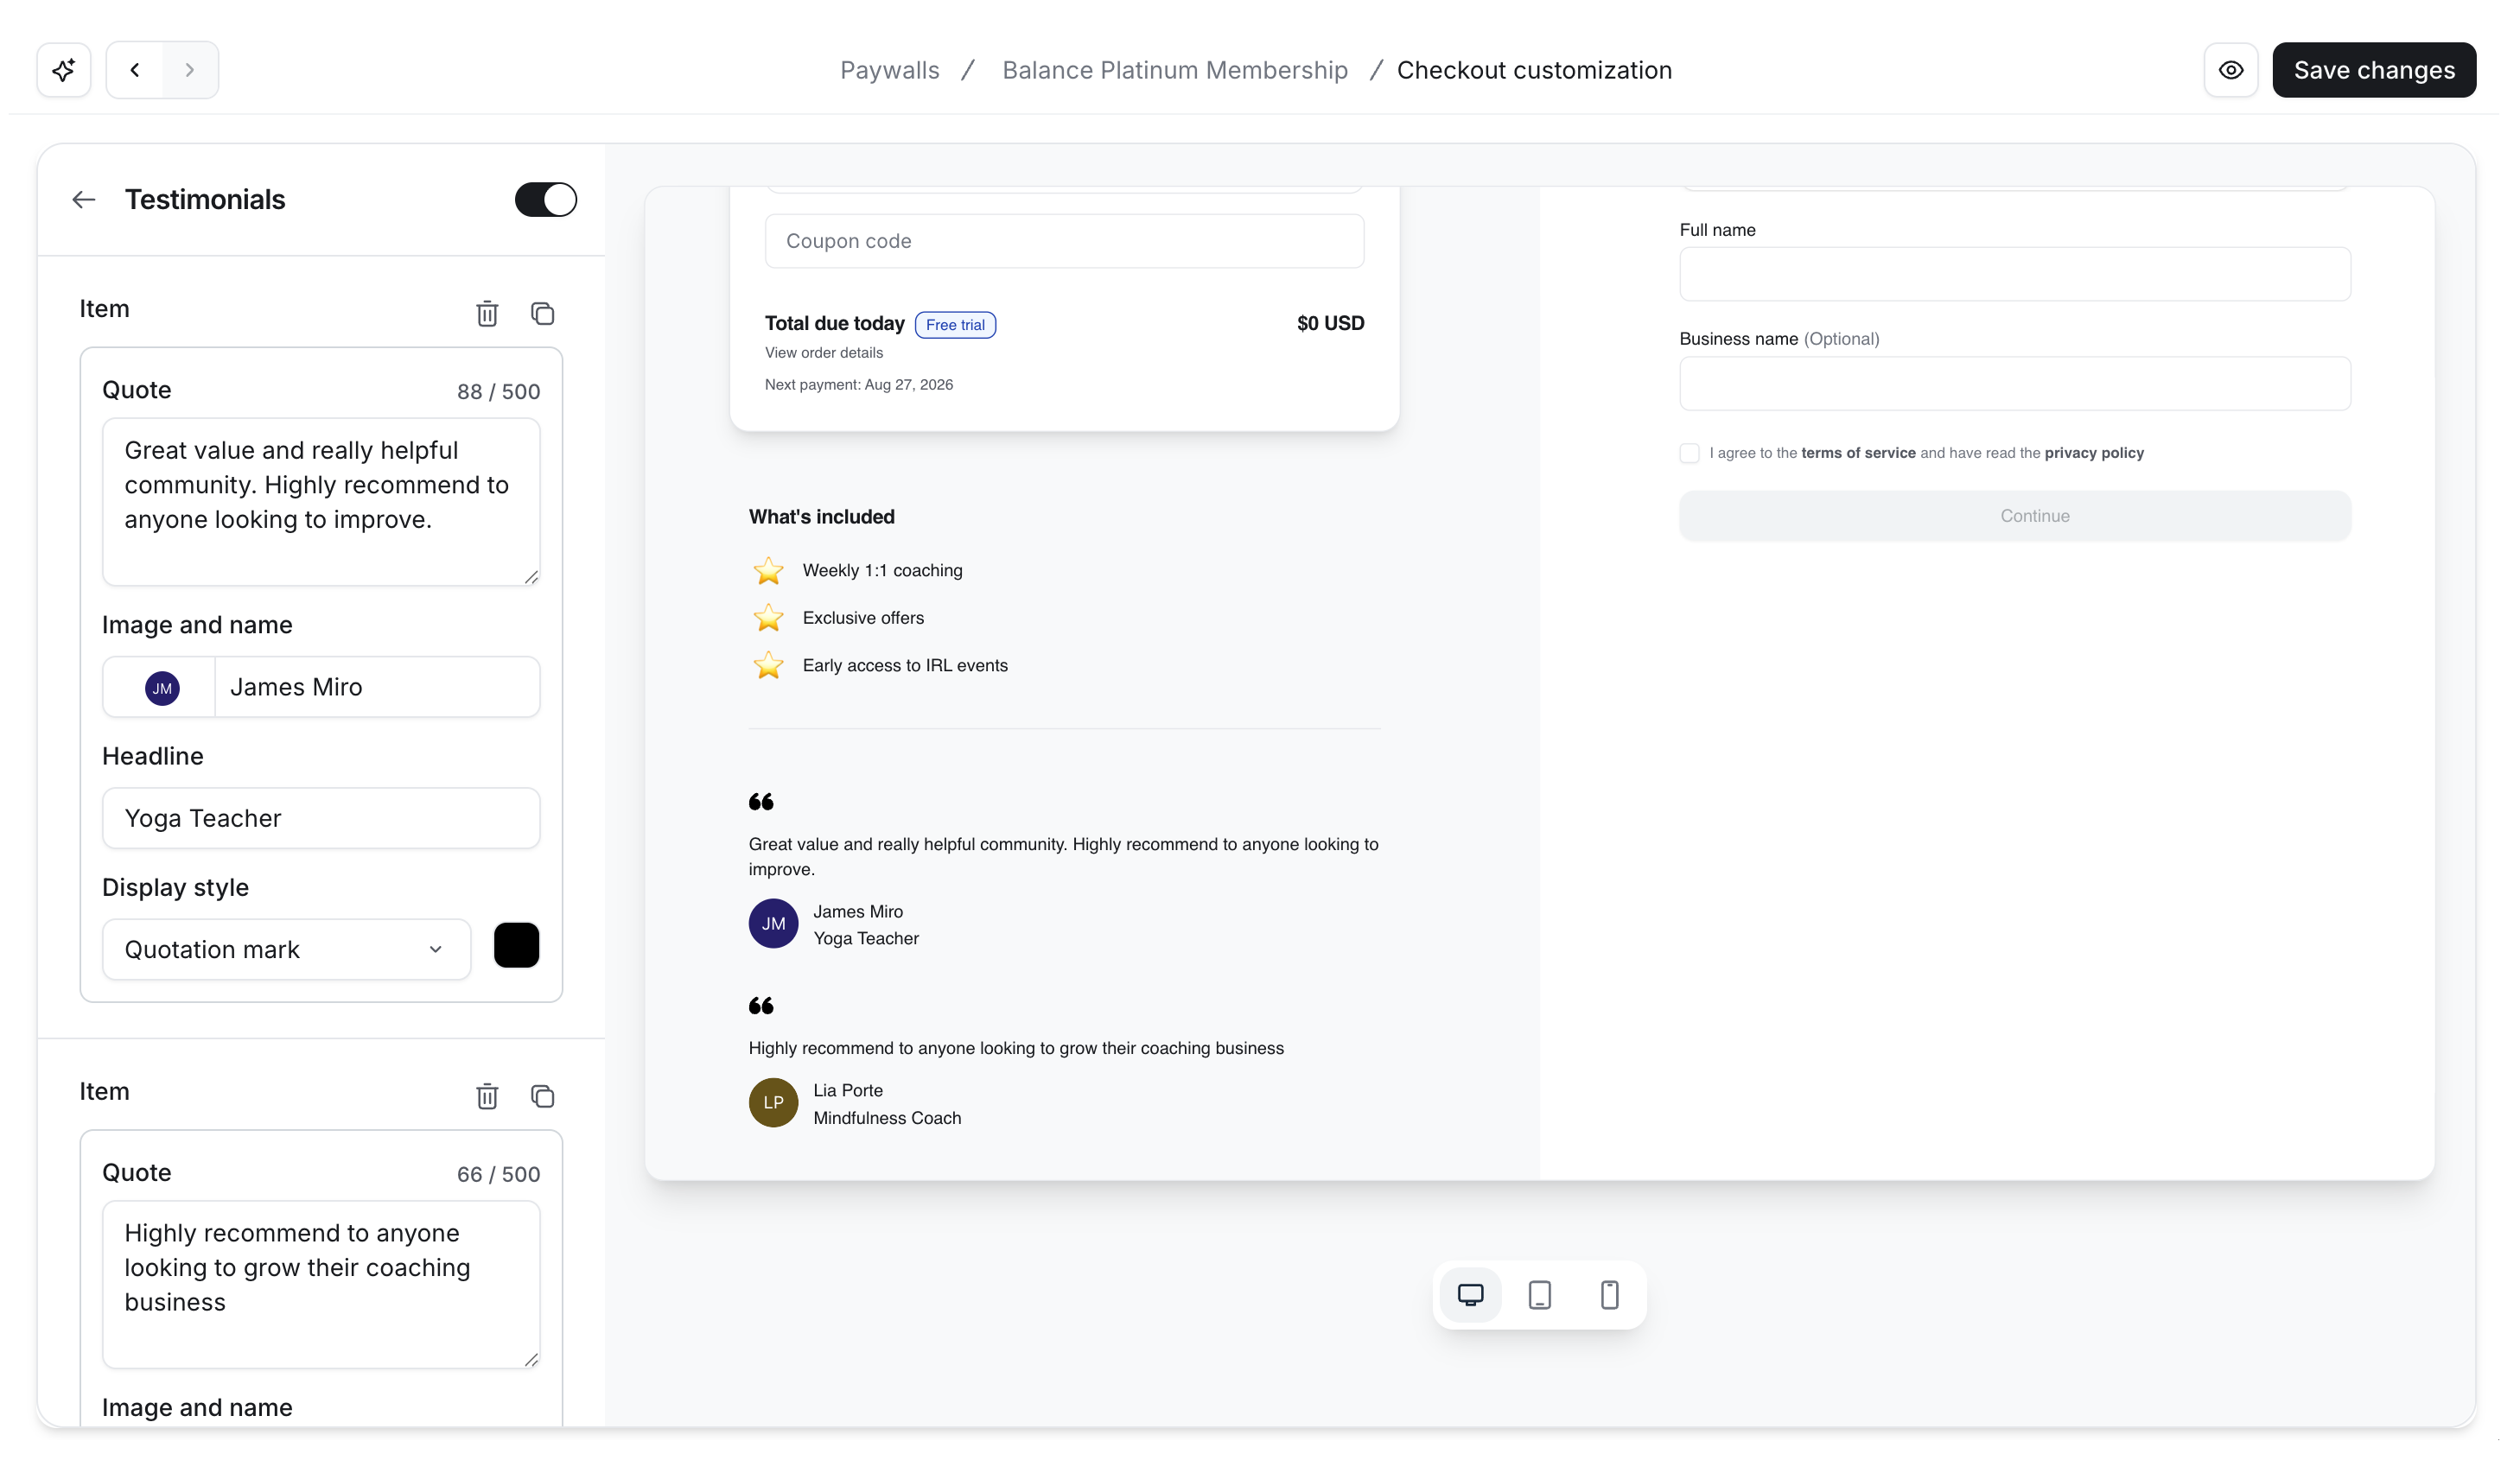
Testimonials add credibility. They show potential buyers that others trust your product and have had a positive experience. Adding a few strong quotes can reduce hesitation and increase conversions. You can display up to 10 testimonials at the bottom of the order details.
To add a testimonial, follow these steps:
Click Testimonials in the Product details section.
Turn on the Show testimonials toggle.
-
For each testimonial, fill in the following:
Quote: Add a quote from the user (up to 500 characters). Keep it specific and personal, something that reflects what they loved about your product or how it helped them.
Image and name: Click the image thumbnail to upload a photo of the person. A face adds authenticity, so try to use a real avatar if you have one. We recommend an image size of 300 x 300 px. Enter the name of the person who gave the testimonial.
Headline: Add a short title or role for the person.
-
Display style and color: Use the dropdown menu to choose how the testimonial should appear:
Stars for ratings-based feedback. If you choose this style, it will automatically show five stars.
Quotation marks for a more narrative-style quote.
Then choose a color for the stars or quotes using the color picker. Pick something that fits your brand or stands out visually on the page.
Testimonials appear in the order you create them, so we suggest adding them in the preferred order. To add more testimonials, click Add item at the bottom of the last item.
Managing testimonials
You can manage each testimonial with the icons in the top right corner:
Duplicate it using the copy icon, which is useful if you're reusing the same layout or structure.
Delete a testimonial using the trash icon if you want to remove it.
Countdown price lock
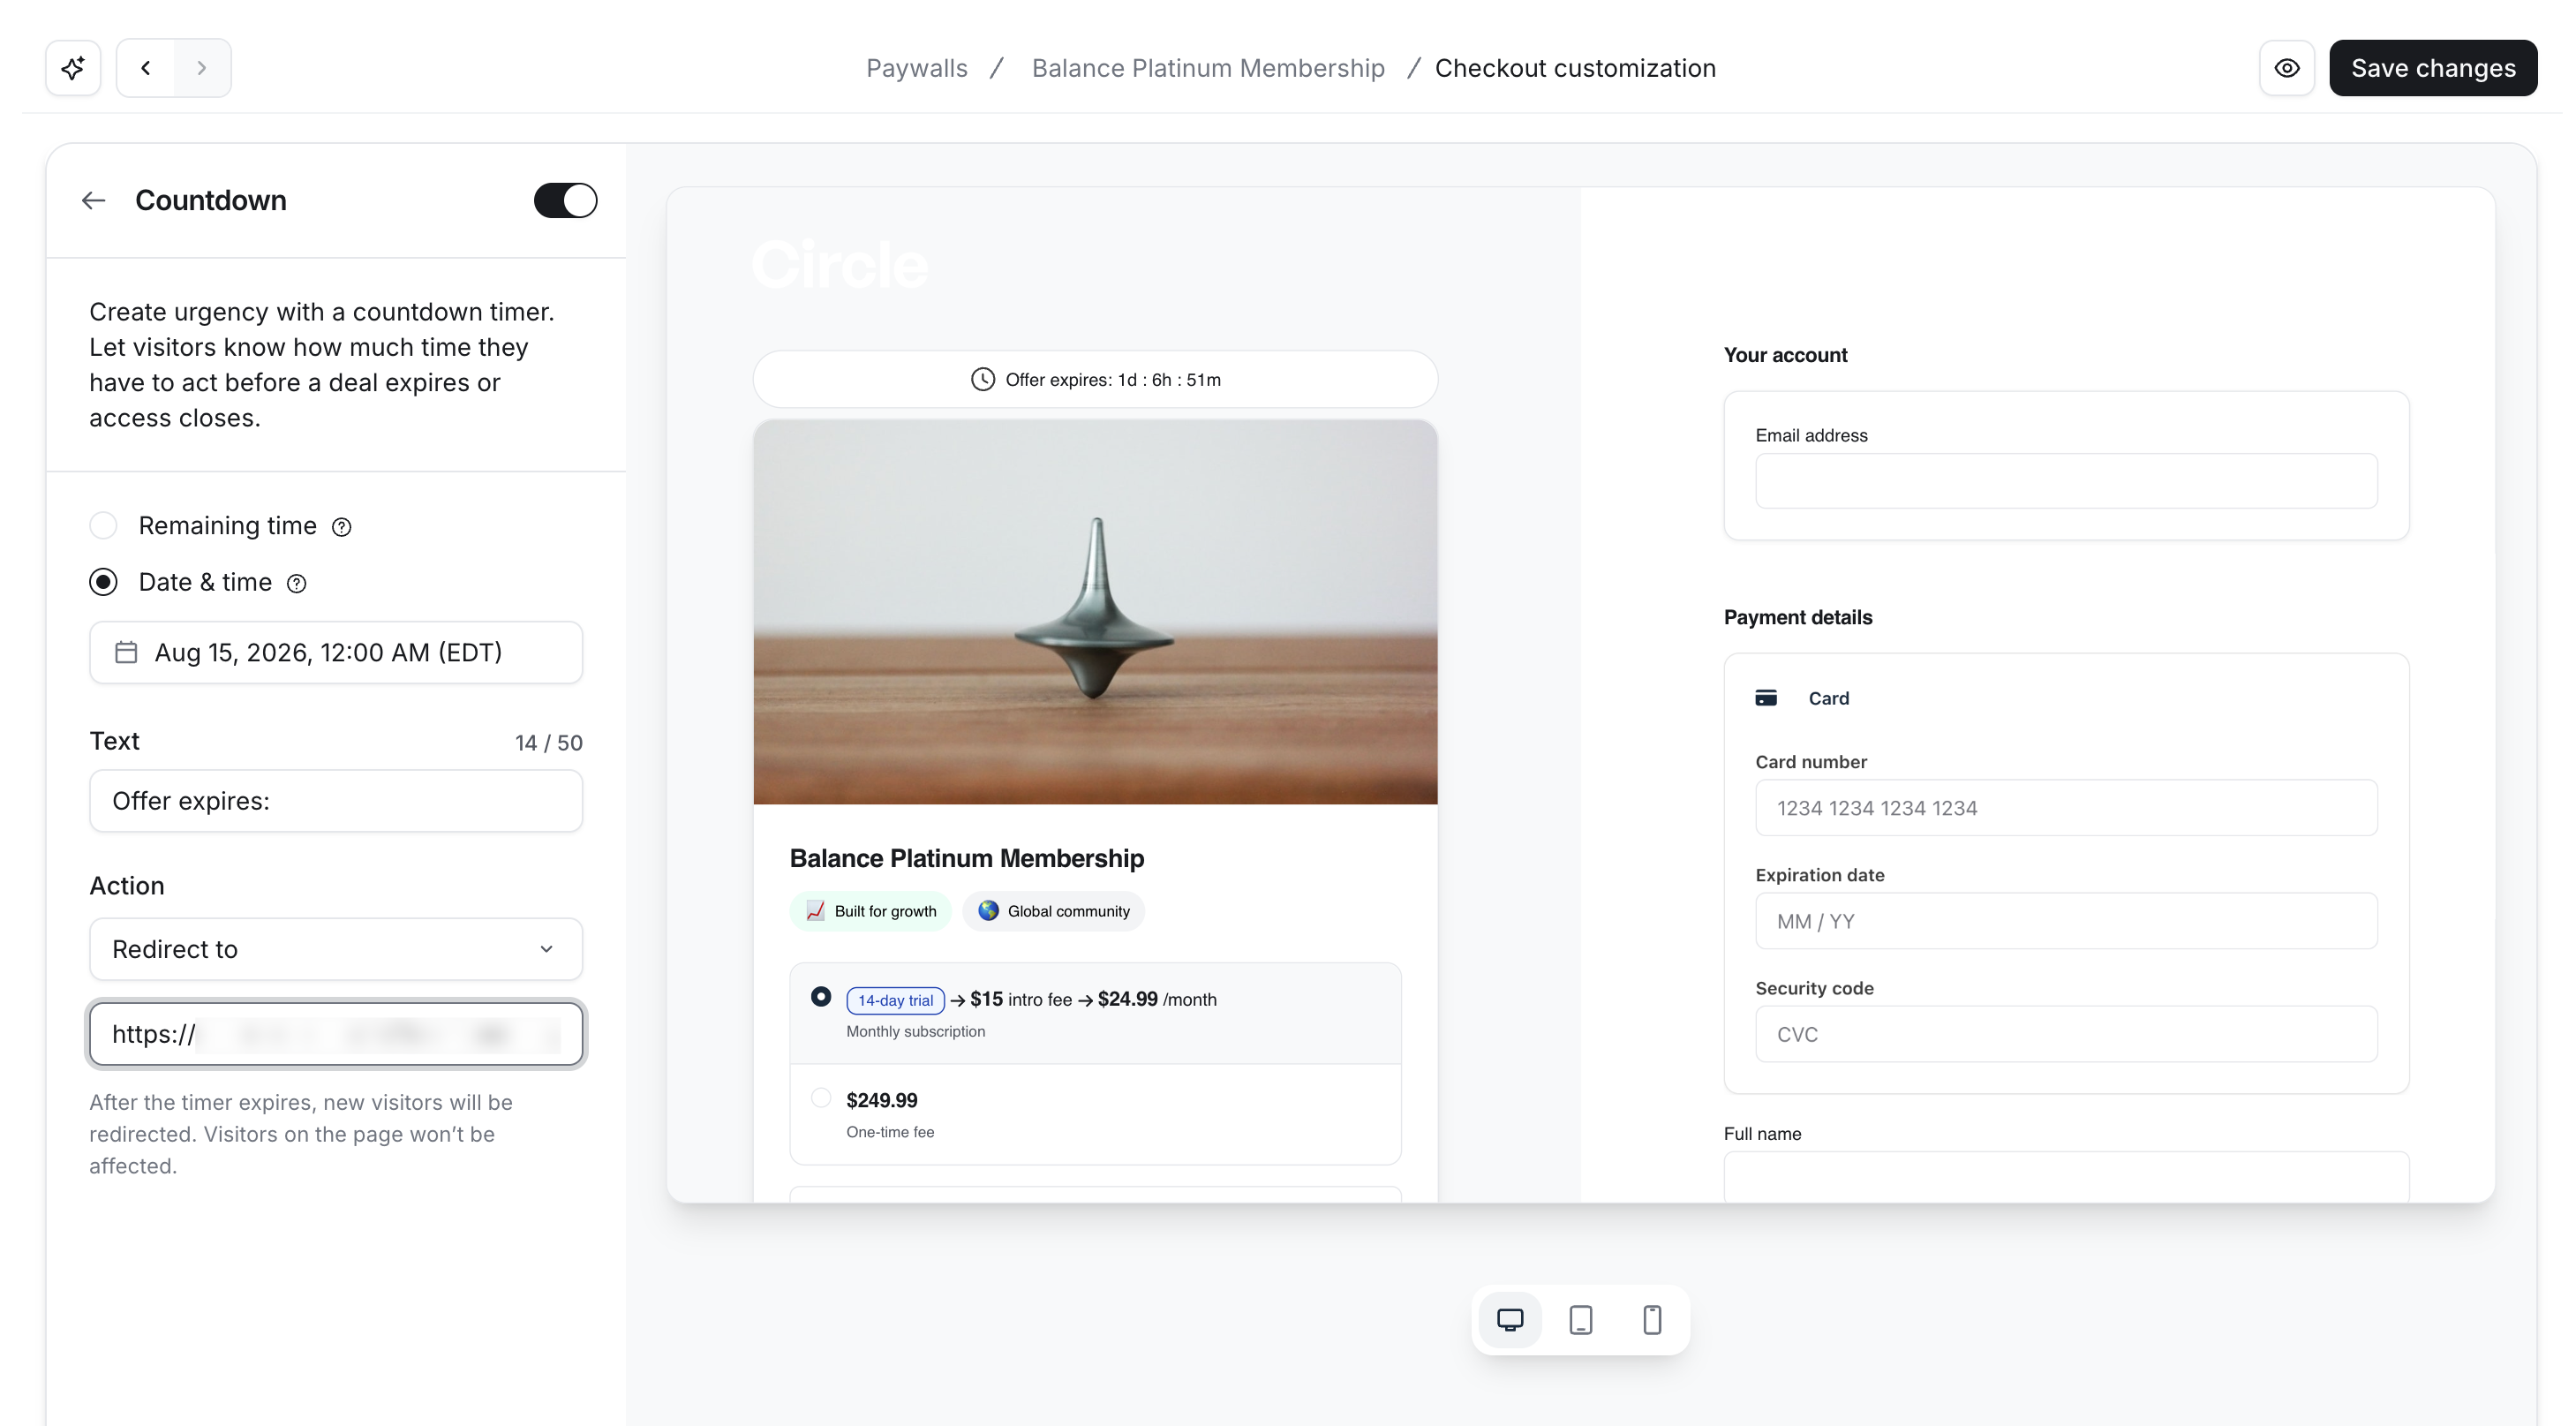
You can add a countdown timer to your paywall checkout page to create urgency and encourage quicker purchases. The countdown appears at the top of the paywall cover image/description on the left, letting visitors know how much time they have before the deal expires.
To set it up, follow these steps:
Click Countdown price lock in the Price features section.
Turn on the Show countdown toggle.
-
Set up the following:
-
Countdown: Choose from one of the following countdown options:
Remaining time: Set a timer (up to 60 minutes) that runs for each unique visitor. When this option is set, a cookie (with a one-week expiry) is stored for the unique visitor. As long as the visitor uses the same browser and device, the countdown continues.
Date & time: Set a fixed expiration for everyone based on your computer’s timezone. Click the date selection field to choose a date and time. All visitors will see the same countdown to the chosen date and time.
Text: Enter the message (up to 30 characters) that appears in the countdown banner along with the timer.
-
Action: When the timer runs out, you can decide what happens:
Do nothing: The countdown disappears, but the checkout remains active.
-
Redirect to: Send visitors to another URL, such as a general pricing page or a paywall checkout URL with higher prices.
-
❗ Important notes:
If a visitor is already on the checkout page when the timer expires, they can complete their purchase without interruption.
When the expiration action is set to Do nothing, visitors can continue purchasing the paywall even after the countdown has ended.
-
The Redirect action only takes effect in the following cases:
A visitor already on the checkout page refreshes the page after the timer has expired. Alternatively, they leave and come back after expiration.
Any new visitors arriving after expiration are redirected automatically.
To move visitors to higher pricing after expiration, set the redirect URL to another paywall that offers the same offering at a higher price. This way, new visitors are automatically redirected, and anyone already on the page will be redirected as soon as they refresh.
Callouts
Price callouts let you add short, eye-catching labels next to each price option on the checkout page. They’re a great way to show users why a plan is valuable, whether that’s a discounted price, popularity, or who it’s best for.
Set up callouts:
Click Callouts in the Price features section.
-
Configure the following:
Callout color: Click the color swatch to pick a text color from the palette, or enter a custom color code. This color is used for all callout labels. If you highlight a callout (see below), this same color will appear as the badge background.
-
Callouts: Each price you’ve added to the paywall has a field where you can write a short message (up to 30 characters). For example, “Save 10% with bi-annual”, “Most popular”, or “Best value.”
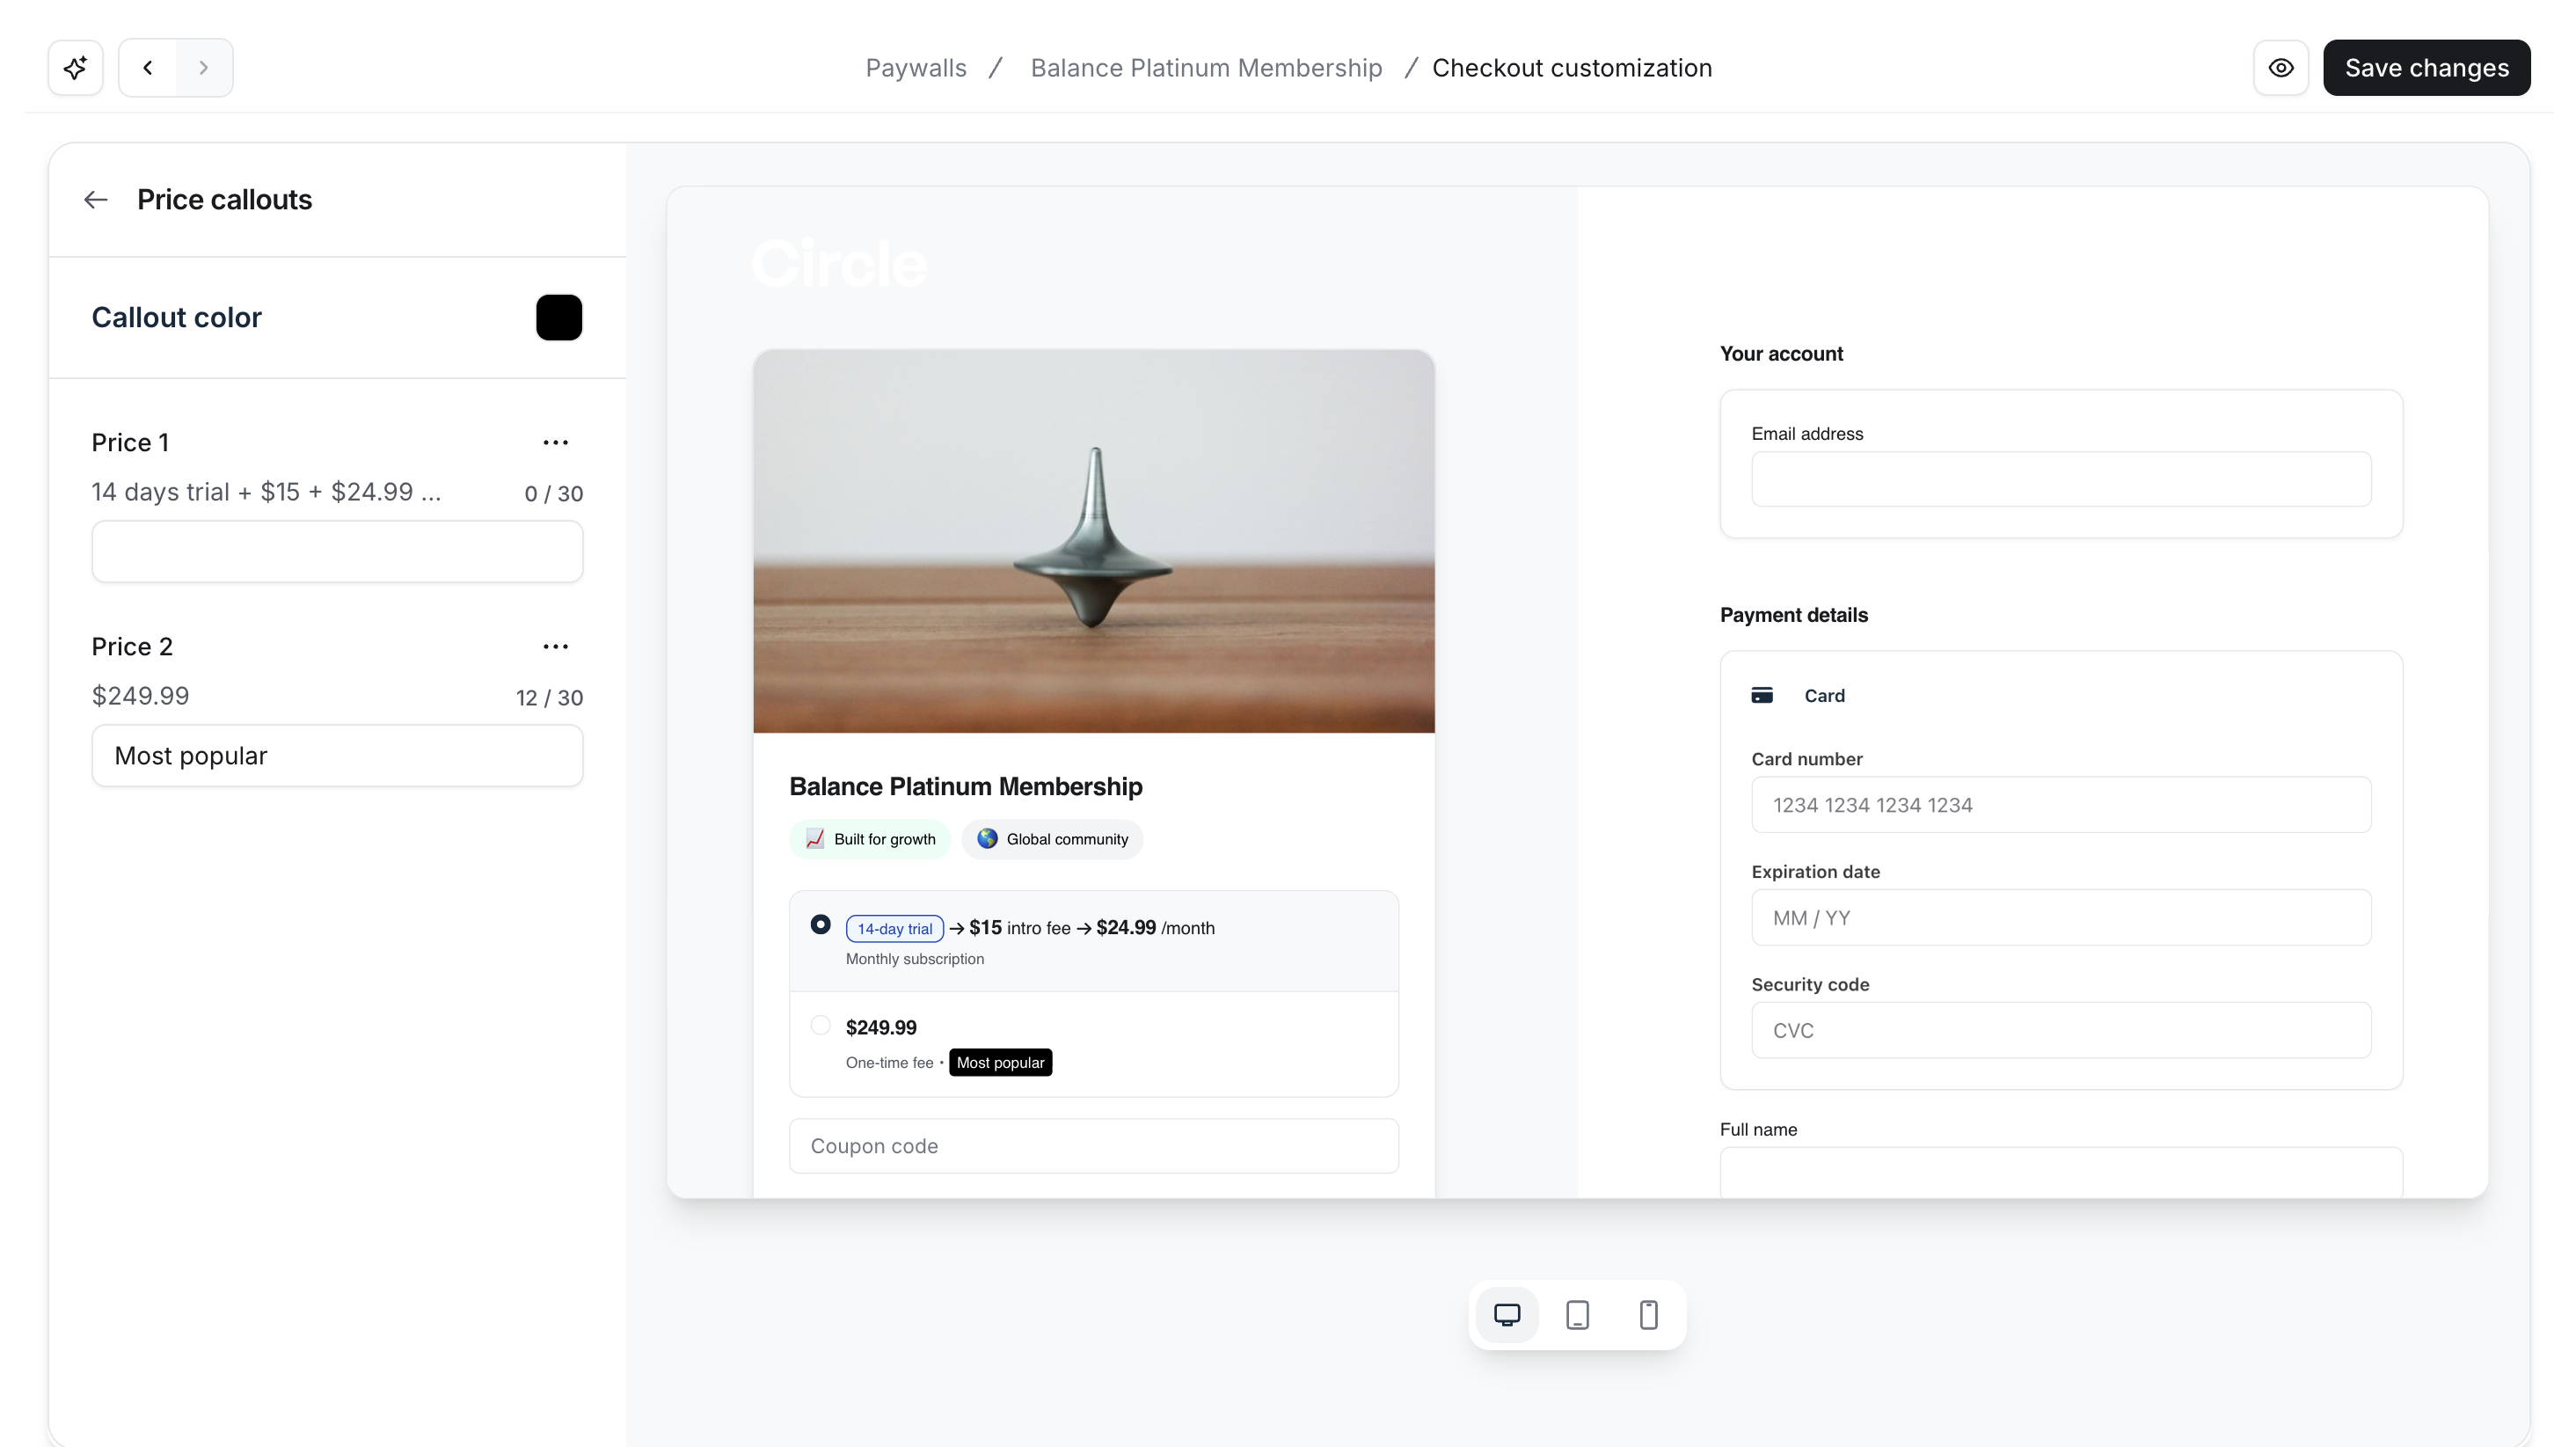
These callouts will appear directly next to the paywall price on the checkout page, making it easier to quickly see the value and compare options.
Highlight a price callout:
In addition to setting up callouts, you can highlight one price to guide users toward your most common or best-value option.
To highlight a callout:
Click the More actions (three dots icon) next to the pricing option.
Select Highlight.
The highlighted callout will display with a badge. The badge background uses your chosen callout color, and the text color is automatically adjusted so it’s always easy to read.
If you want to remove the highlight, click the More actions (three dots icon) next to the pricing option and select Remove highlight. To switch the highlight to another plan, just highlight the new one; this will automatically remove it from the previous callout.
Reduced prices
The reduced-price option helps create a sense of urgency and highlights savings by using strikethrough pricing. This option displays a reduced price next to the higher original amount to indicate a discount.
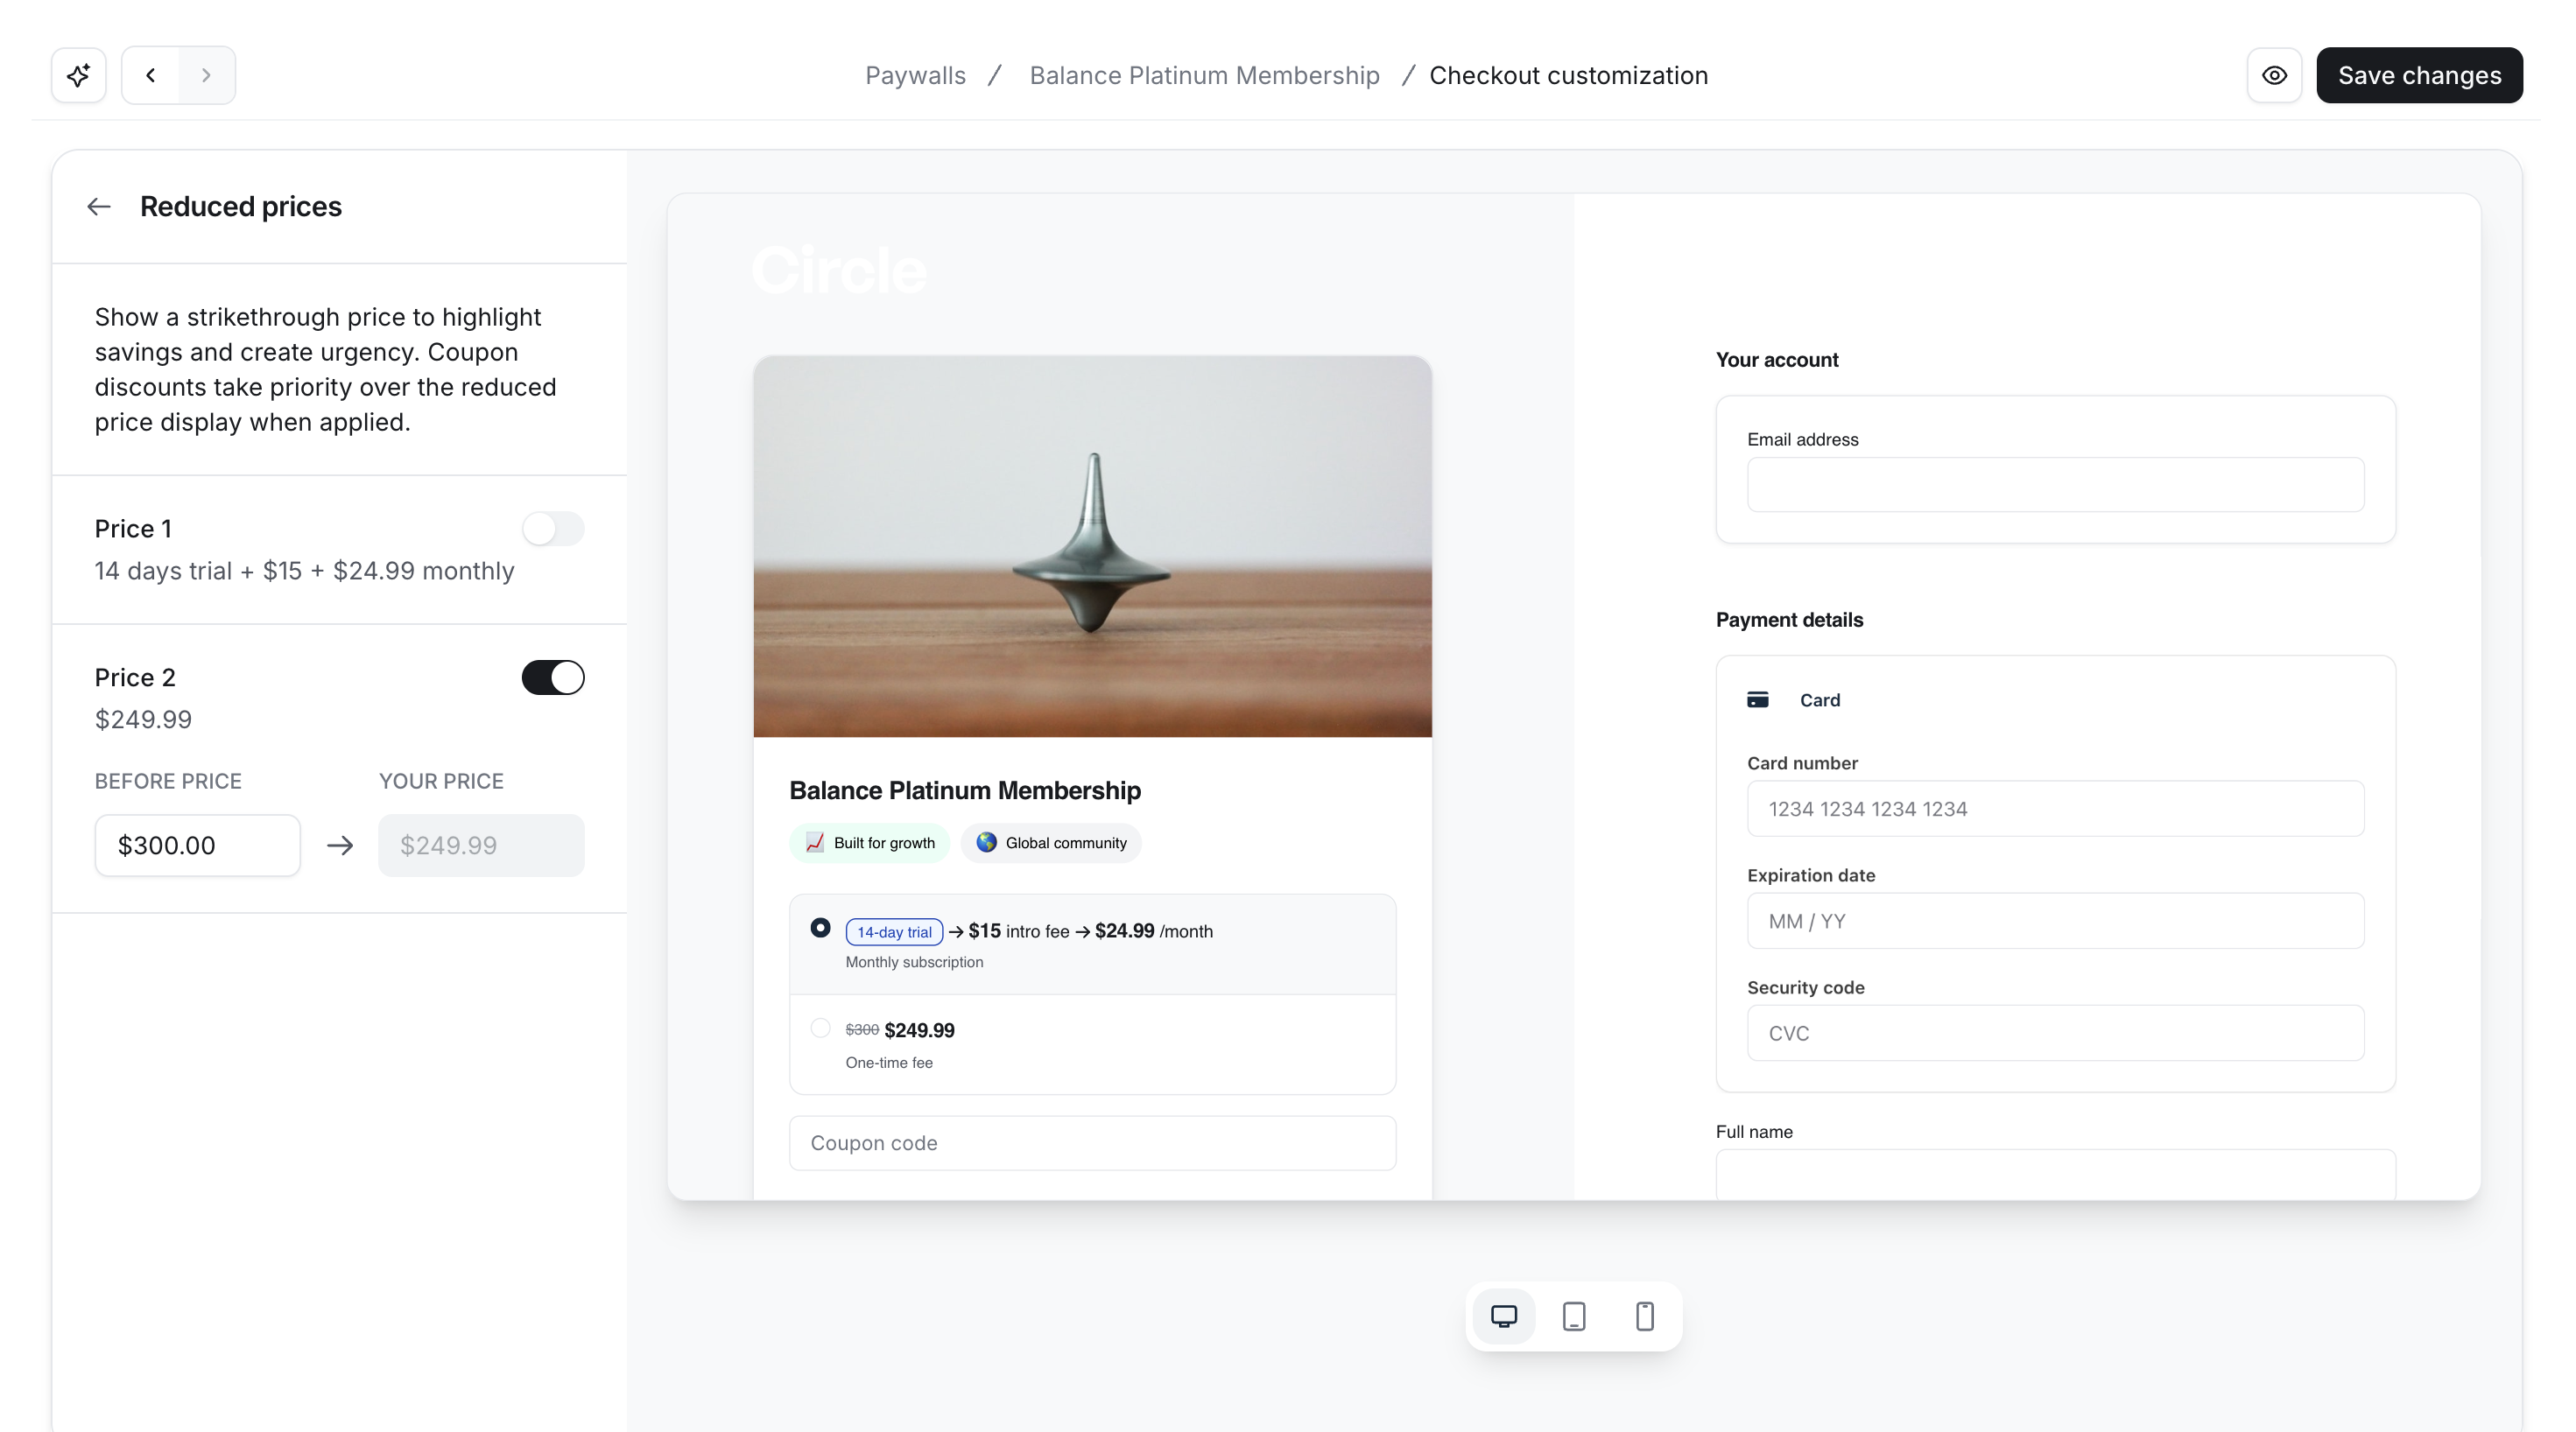
Set up strikethrough pricing
Click Reduced prices in the Price features section.
-
Toggle on the pricing option you’d like to include and enter the higher amount in Before price.
ℹ️ Note: Your price is the price you set up for that pricing option. It cannot be updated in this section.
Click Save in the top right corner.
❗️ Important: When a coupon is applied, the reduced price is automatically disabled on the checkout page, ensuring the exact discounted price is shown.
Step 5: Upsells
Upsells let you offer your audience more value after they complete checkout. The upsell offer appears after the purchase and before the thank-you page, so members can accept it in one step.
❗️Important: For subscriptions that include a trial, a credit card is required upfront for members to see the upsell page.
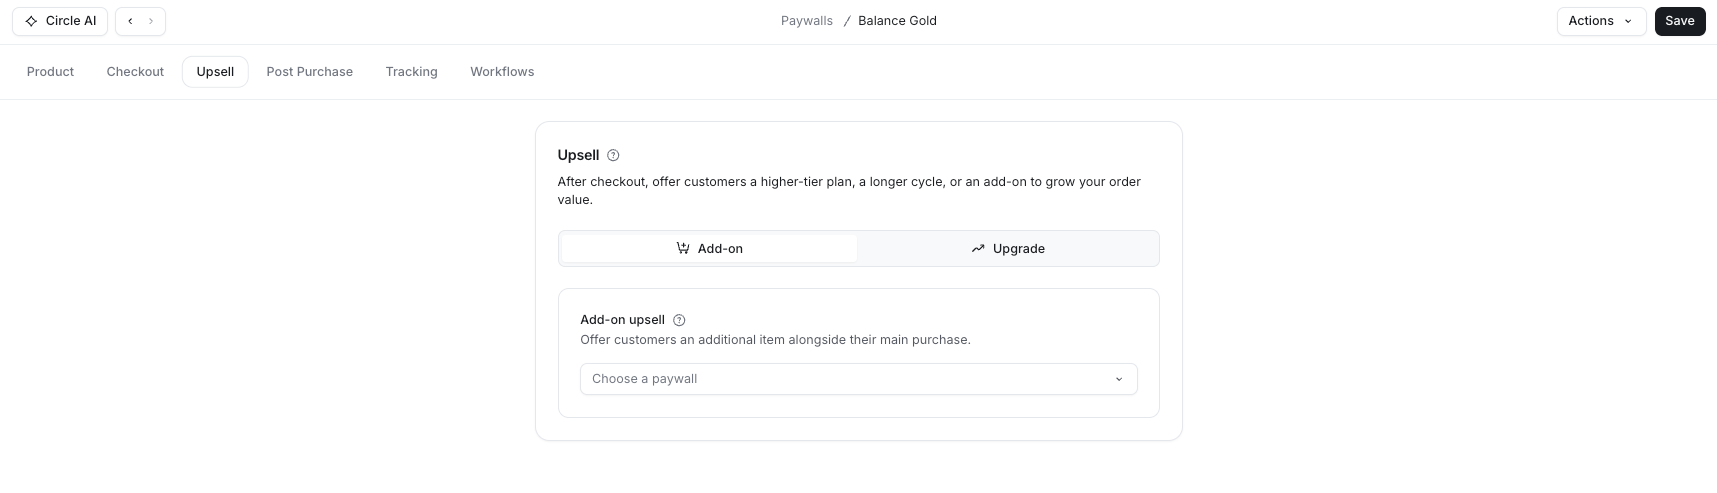
Upsells can be delivered as add-ons or Upgrades:
Add-on: Offer members an additional item alongside their main purchase. Use this to pair products, such as offering a premium course with a subscription or adding a recurring subscription to a one-time purchase.
Upgrade: Offer members a higher-tier plan or a longer billing cycle. Circle handles the plan swap, the subscription change, and charges the price difference immediately.
📚 To learn more about upsells, see Get to know upsells.
Step 6: Post purchase
These settings let you customize what happens after a user completes a purchase or starts a trial and becomes a member. You can thank them, guide them to a specific page, or send an email, all to help create a smoother, more welcoming experience.
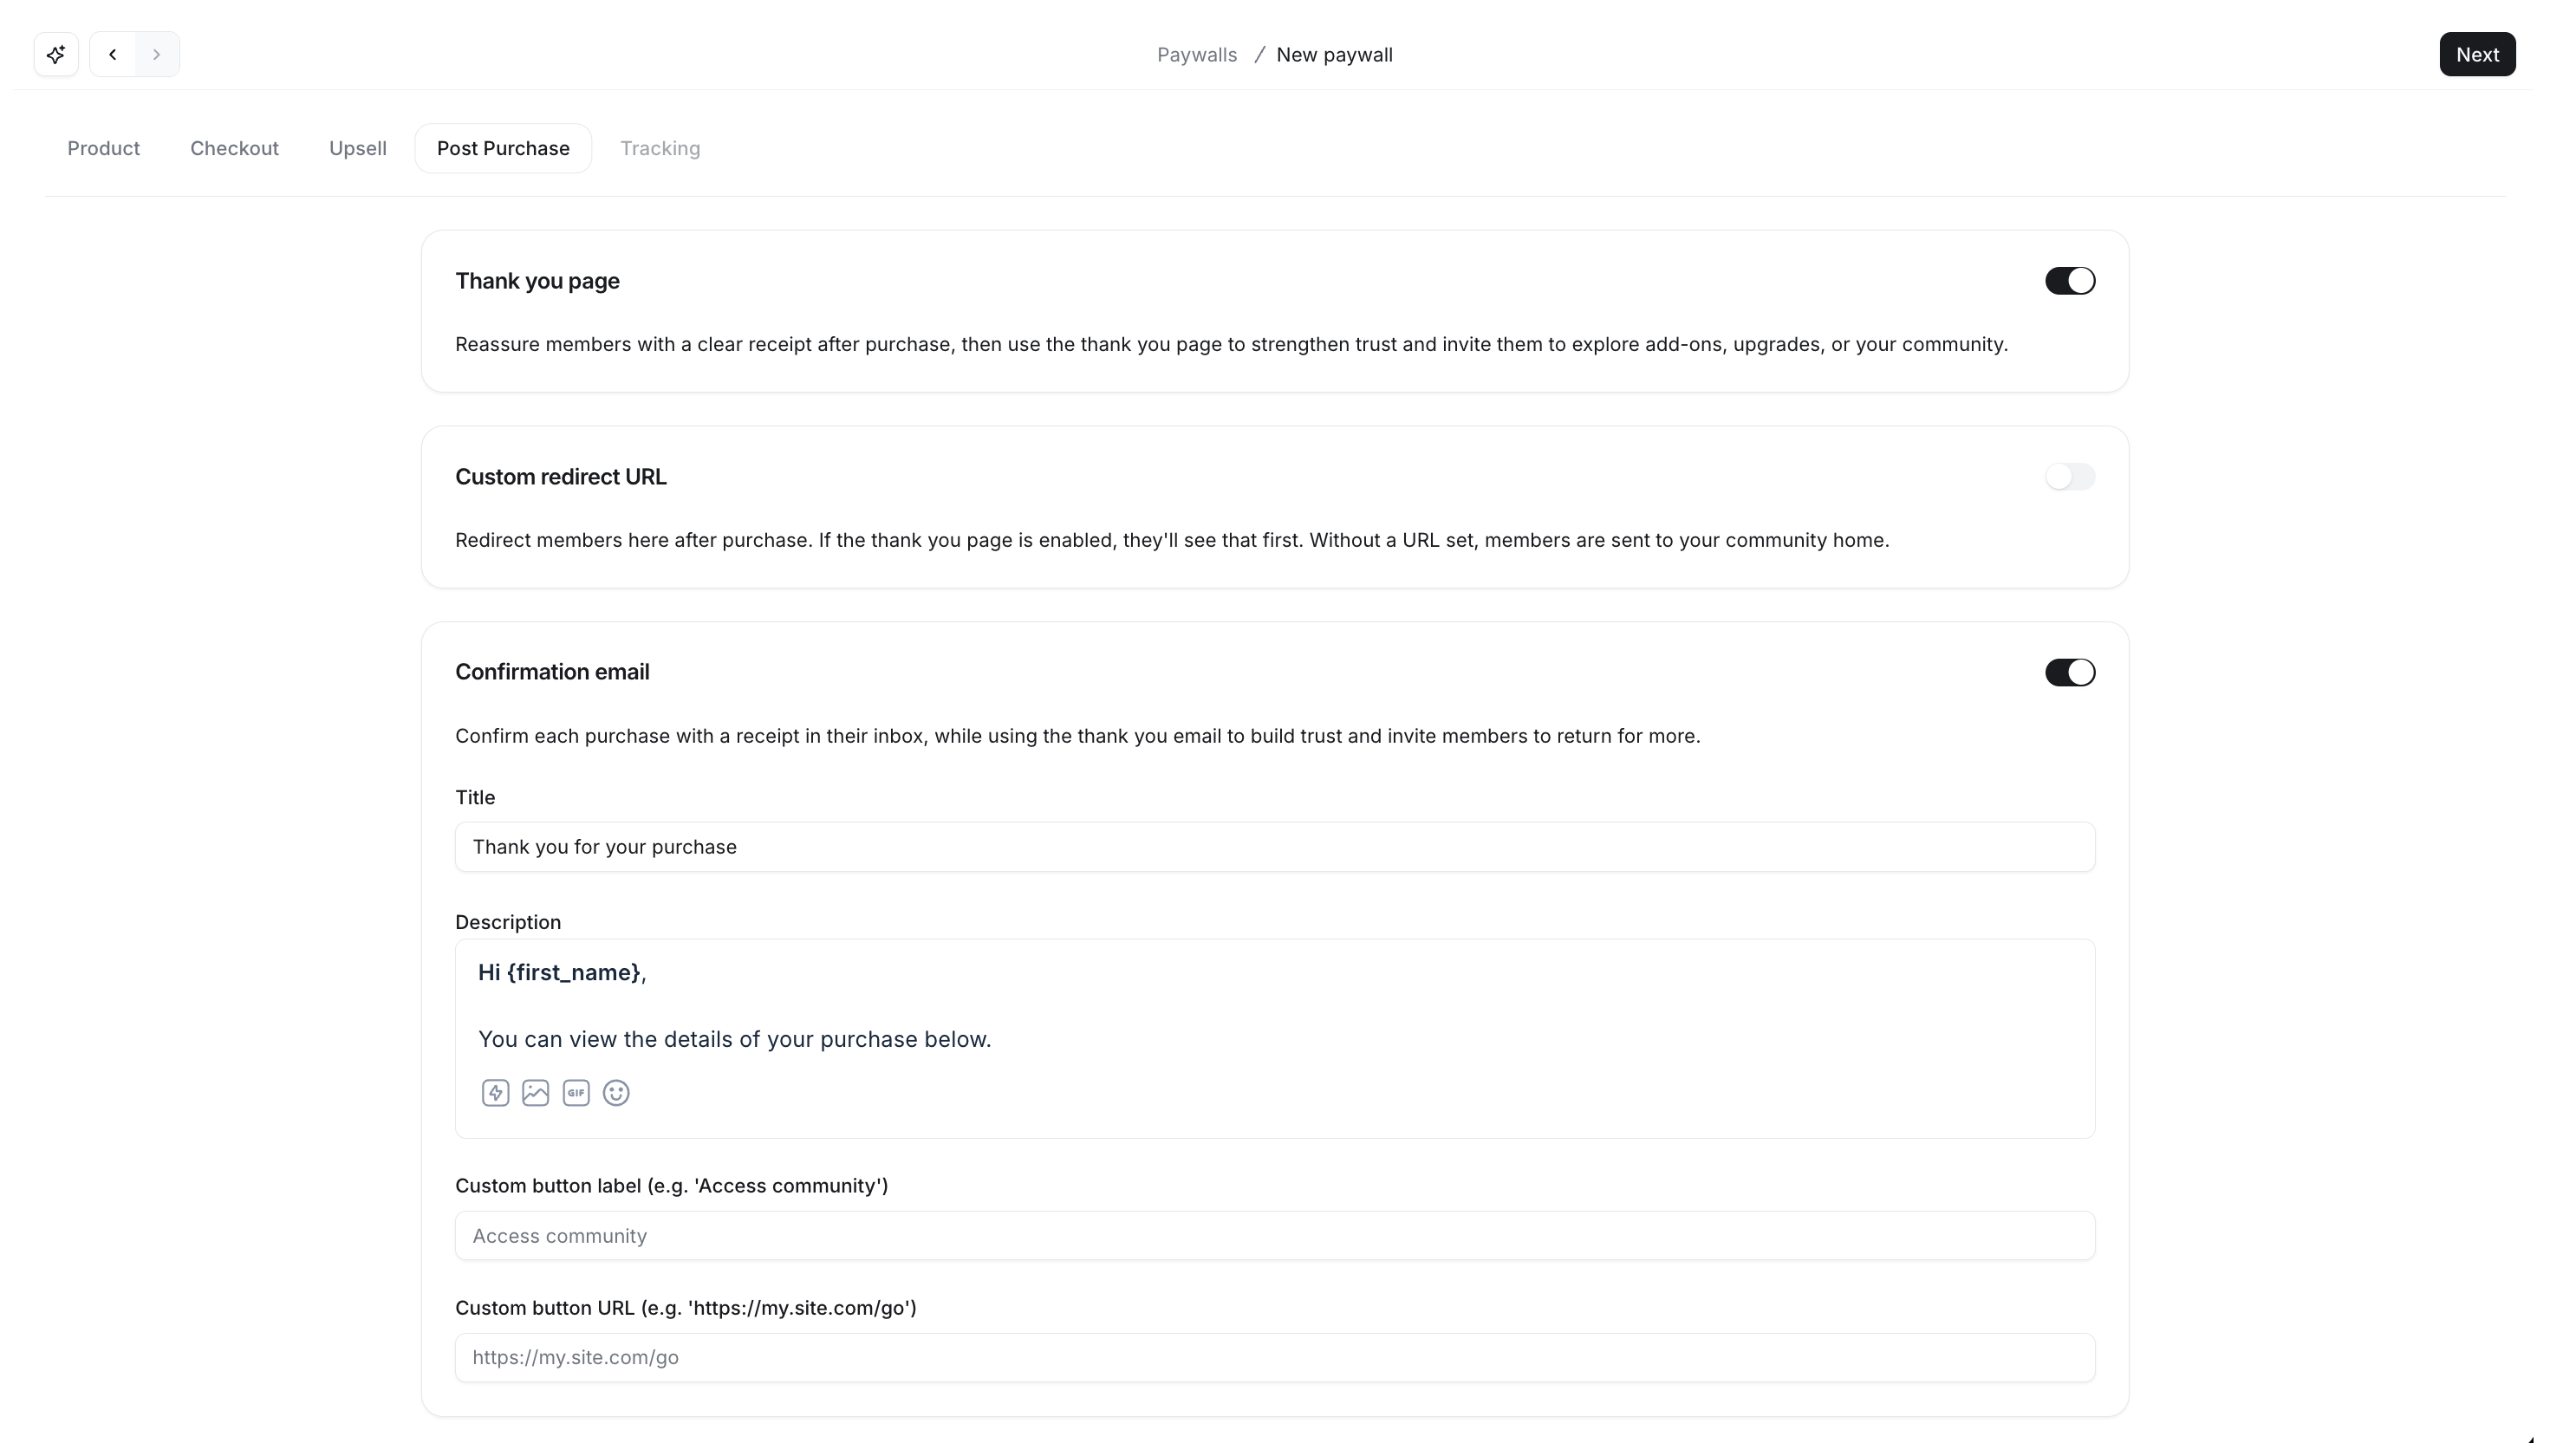
You can enable and set up the following options:
Thank you page
Send members to a default thank you page after they’ve purchased a paywall. This page is automatically created by Circle. It confirms the payment was successful successful, including any add-ons, and welcomes the member to your community. Note that this page cannot be customized.
Custom redirect URL
If you'd like to send members to a specific page after checkout (instead of or after the thank you page), you can enable this toggle and enter a custom redirect URL.
This can be a URL from your community (e.g., a welcome space, announcement page, or onboarding guide) or any external website.
Send a confirmation email
You can also send a personalized email to users when they purchase a paywall or start a trial.
Title: Write a short, friendly subject line. You can personalize this with dynamic variables (see below).
Description: Write a thank-you message to welcome your new member. You can explain what to expect next and link to helpful resources. You can use the bottom toolbar to access the command menu, add images, GIFs, and emojis.
Custom button label: Add a call-to-action text, for example, “Visit Community,” “View Welcome Guide,” or “Start Learning.”
Custom button URL: Add the link you want the button to take members to. This could be a space in your community or any external page.
Use dynamic variables to automatically personalize your email. These variables pull in specific details about the member or purchase.
Here are the available variables:
{first_name} – The member's first name.
{paywall_display_name} – The name of the paywall they purchased.
{price_label} – The pricing they selected (e.g., “$10/month”).
{community_name} – Your community’s name.
{future_payments_sentence} – A sentence explaining future payments, depending on the plan.
{community_url} - The link to your community.
Using these variables makes your emails feel more personal and keeps them up-to-date, even if you later change paywall names or pricing.
Step 7: Tracking
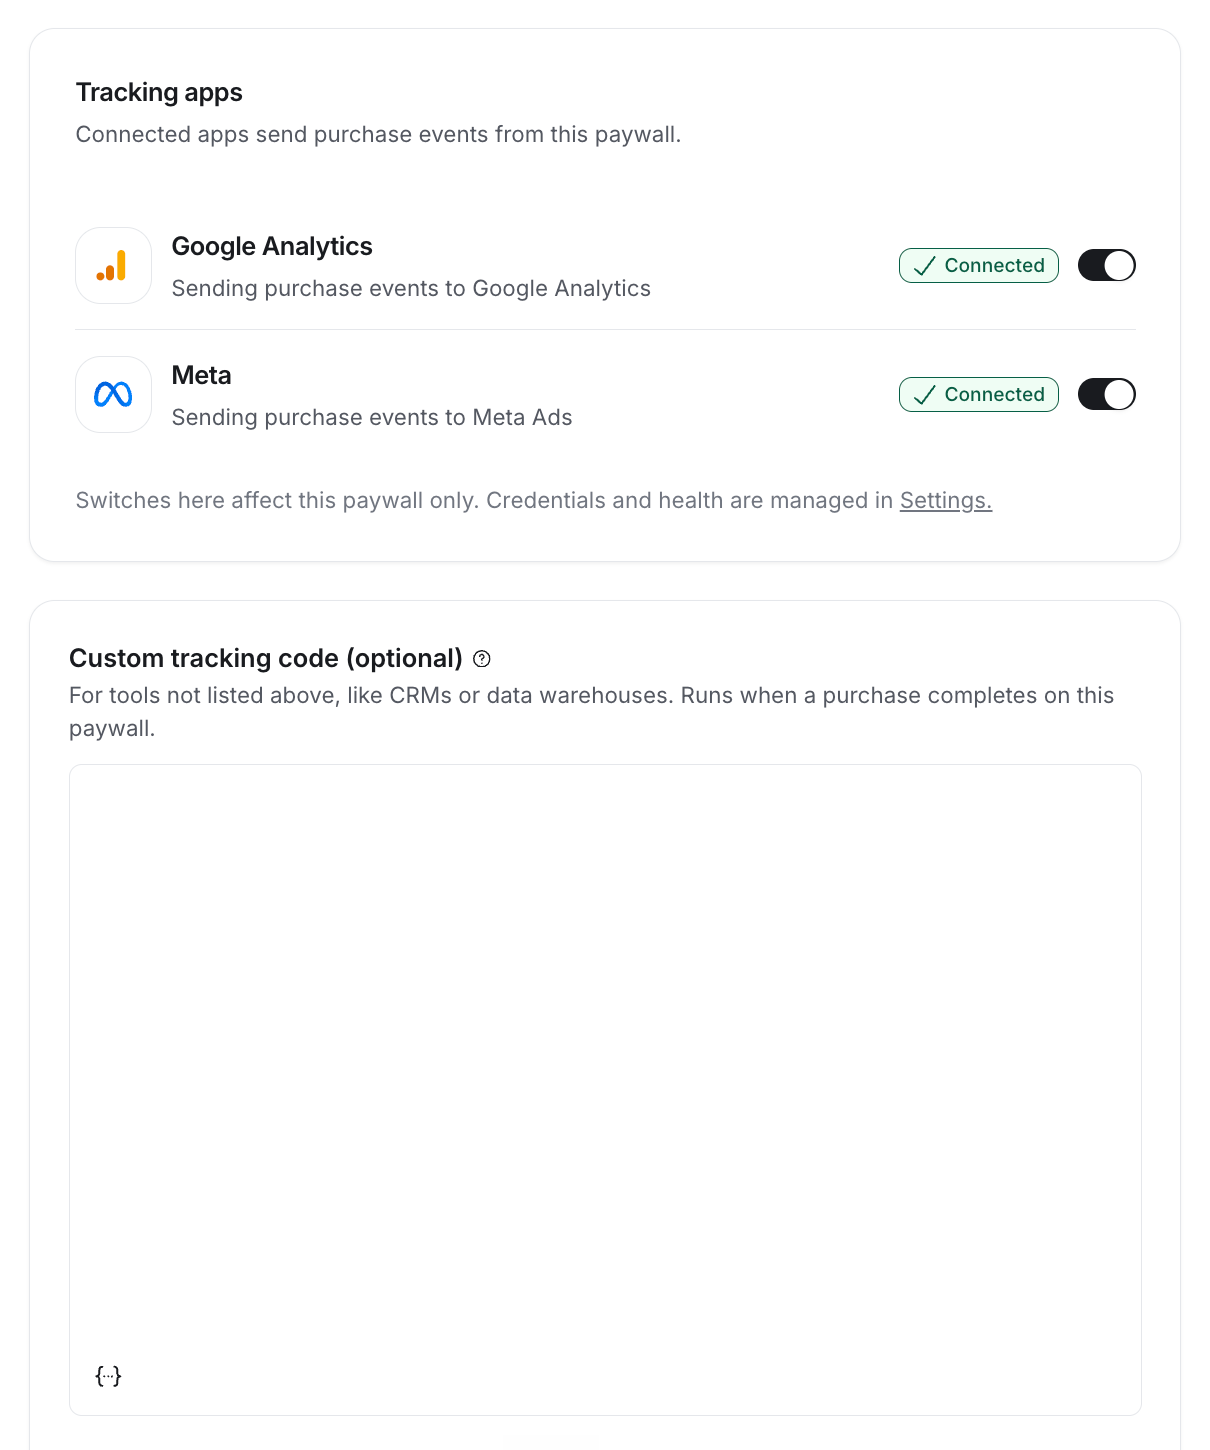
If you’d like to track successful payments or trigger analytics events, the Tracking tab in your paywall settings controls how this paywall sends purchase events.
-
Tracking apps: Turning a toggle off prevents this paywall from sending events to that platform, without disconnecting it elsewhere.
ℹ️ Note: Credentials and connection health are managed through Settings→Conversion tracking.
-
Custom tracking code (optional): You can also add your own JavaScript for tools not listed above. Use this option if you advertise on a platform that native tracking doesn’t cover yet (such as LinkedIn, Pinterest, Reddit, or Snap), or you need more control over what gets tracked.
🚨 Warning: This is an advanced feature, and we recommend working with your developer to ensure the correct setup.
📚 To learn more about conversion tracking, see Add conversion tracking to paywalls.
Step 8: Save or publish your paywall
Once you’ve finished setting up your paywall, you have two options:
Save as draft: Click Save draft if you're not ready to launch yet. Your paywall will be saved in Draft status, and you can return to edit or publish it later. It won’t be visible or accessible to users until it is published.
Publish: Click Publish to make the paywall live. Its status will change to Active, and users will be able to view and purchase it.
You can archive your paywall at any time if you decide to deactivate it after it has been published. To learn more, see Archive or delete a paywall.
Set up Stripe’s failed payment configuration
If you’re using subscription or installment paywalls, Stripe’s failed payment settings help manage what happens when a member’s payment fails.
You can configure:
A retry schedule (how many times and how often Stripe should retry the payment).
To cancel the subscription if all retries fail.
Various emails, such as upcoming renewals, failed card payments, and expiring cards.
This helps Circle integration know when to automatically revoke a member’s access to any spaces gated by the paywall.
📚 To learn more about managing Stripe’s failed payment configuration for payment retries and cancellations, see the following articles:
Automatically remove member's paywall access upon cancellation or failed payments
Automatically remove member's access from paywalled content after trial ends
Test paywall experience (optional)
Once you have published the paywall, you can test the user experience. We suggest doing this, especially if you are publishing your first paywall. This will help you experience the paywall checkout flow as a user and give you an opportunity to make any changes before you share it with your members.
💡 Tip: To verify and experience the space access exactly as a new member would when they purchase a specific paywall, you can utilize the “View as” feature. For more information, see Preview your community’s paywall access.
📚 To learn more about how to do test transactions and how the checkout flow works, see the following articles:
Share the checkout URL
Once your paywall is live, you can start sharing the checkout link with your audience. You can post this link on your pages, website, email newsletter, social channels, or anywhere you invite users to join the membership.
To copy the link:
Go to the Paywalls page.
Click the Copy link icon beside the paywall entry.

💡 Tip: You can share a paywall checkout URL with discounted pricing, by creating a checkout URL appended with the coupon code. When users click the link and navigate to the checkout page, the coupon will be automatically applied, ensuring a seamless discount experience.
📚 For detailed information, see Onboard members to your community via paywalls.