Get to know access groups
Last updated: August, 2026
Managing access to spaces in your community can quickly become complex, especially as your membership grows and uses diverse entry points. Access groups simplify how you manage space access in your community.
About access groups
To understand access groups, it helps to think about entry points. The different ways people can join your community. These include invitation links, manual invites, paywalls, or public sign-ups.
Before access groups, configuring access for each entry point was a manual, repetitive process. Access groups simplify this by streamlining access management and eliminating the need for repetitive setup.
Think of them like digital passes that simplify which community spaces members get access to when they use particular entry points. They’re versatile enough to support different membership structures and multiple entry points in your community. Here's how they work:
Create one or more access groups that define which spaces (and space groups) members get access to. You can add as many spaces and space groups to the access group as you need.
When inviting someone, configuring onboarding access, or setting up paywalls, simply select the access group. You can even select multiple access groups.
When members join via one of these entry points, they automatically receive access to the right spaces based on the linked access groups.
Key things to know about access groups
Access groups are designed for access configuration only: They configure pre-defined access to spaces and space groups. They do not affect the underlying access and visibility settings of spaces and space groups
User roles: Roles like moderator or admin are not tied to access groups. You can assign roles either when inviting a member or by updating their account at any time.
Flexibility with manual space grants: In addition to using access groups, you can still manually grant access to individual spaces directly through a member's account. This lets you accommodate unique access needs or exceptions beyond the access group setup.
Availability
Access groups are available on all Circle community plans.
Set up access groups
To create an access group, follow these steps:
Click Audience in the left sidebar, then select Access groups.
Click New access group in the top-right corner of the Access groups page.
Add Internal name. This name appears across your community, including in entry point configurations, making it easier to identify.
Optionally, add a brief description of this access group. Descriptions are helpful for managing multiple groups because they clarify the purpose or type of access that this group provides.
Once ready, click Create access group.
From here, you can define the spaces or space groups to include in the access group and add members to give them the access defined in that group.
What makes access groups a game-changer
Access groups make space access management more flexible, efficient, and centralized.
Setup and usability
Creating an access group is simple, thanks to an intuitive setup interface. Beyond the setup itself, access groups offer several benefits:
Reusability: Set up an access group once and use it across multiple entry points, eliminating repetitive setups.
Flexibility: Assign multiple access groups to a single entry point to handle tiered or overlapping access. Access groups can also be directly linked to a member's account for added convenience.
Clarity and transparency: Easily view a detailed list of members who have received access through an access group, whether via access group setup or a member’s account.
Centralized management
Access groups let you quickly adapt access strategies as your community grows and changes:
Dynamic updates: You can update space access configurations within an access group, and changes automatically apply to all current and future members. This ensures seamless transitions without manual intervention or complex workarounds.
-
Member management: You can manage member access directly from the access group setup. This includes:
Removing members from the access group to revoke their access from spaces and space groups that are part of the group.
Adding members to grant them access to spaces that are part of the access group.
Using access groups: setup examples
Access groups provide exceptional flexibility and scalability for managing access to spaces in your community. Below are some common use cases to illustrate their potential.
Basic access
Access groups are effective even for straightforward access setups with one or two entry points. Their reusability and centralized management make them especially valuable as your access strategies evolve.
For example, as a community admin, you want to use only two secure entry points for your community:
Invites: Offer free access to specific community spaces, including all free spaces and selected premium spaces, through invitations.
Paywalls: Restrict access to community spaces for others unless they purchase a paywall. This would include access to all premium spaces.
To achieve this, you can create two distinct access groups: one for invitees and another for paywall subscribers. Link each access group to its respective entry point.

Overlapping access
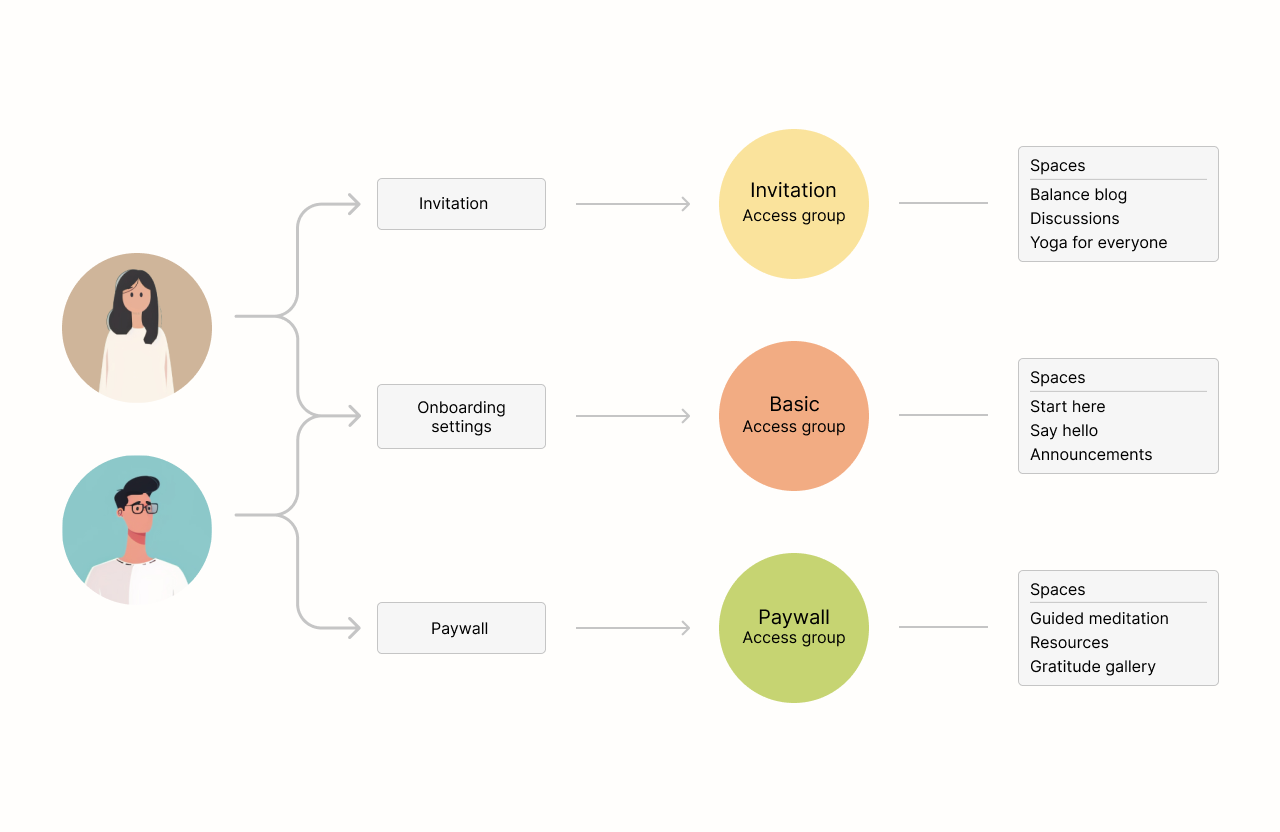
Access groups make it easy to manage shared spaces across diverse membership options. Linking multiple access groups to each entry point ensures precise access configuration without added complexity.
For example, say you have spaces that all members can access, while reserving premium spaces for specific entry points. Here's how you can structure it using access groups:
Basic access for all members: Create an access group with spaces everyone can access, no matter how they join.
Exclusive access for invites: Set up an access group for spaces reserved for invited members.
Paywall-specific access: Create an access group for spaces exclusive to members who purchase a paywall.
Once your access groups are ready, link them to the relevant entry points:
Basic access group: Since this group grants everyone access to shared spaces, add it to your onboarding settings or to entry points alongside their dedicated access groups.
Invitation access group: Use this group when inviting members to your community.
Paywall access group: Add this group to your paywall configuration, ensuring only paying members get access to exclusive content.
Tiered access
Access groups simplify tier-based access, letting you scale your strategies without manual configuration.
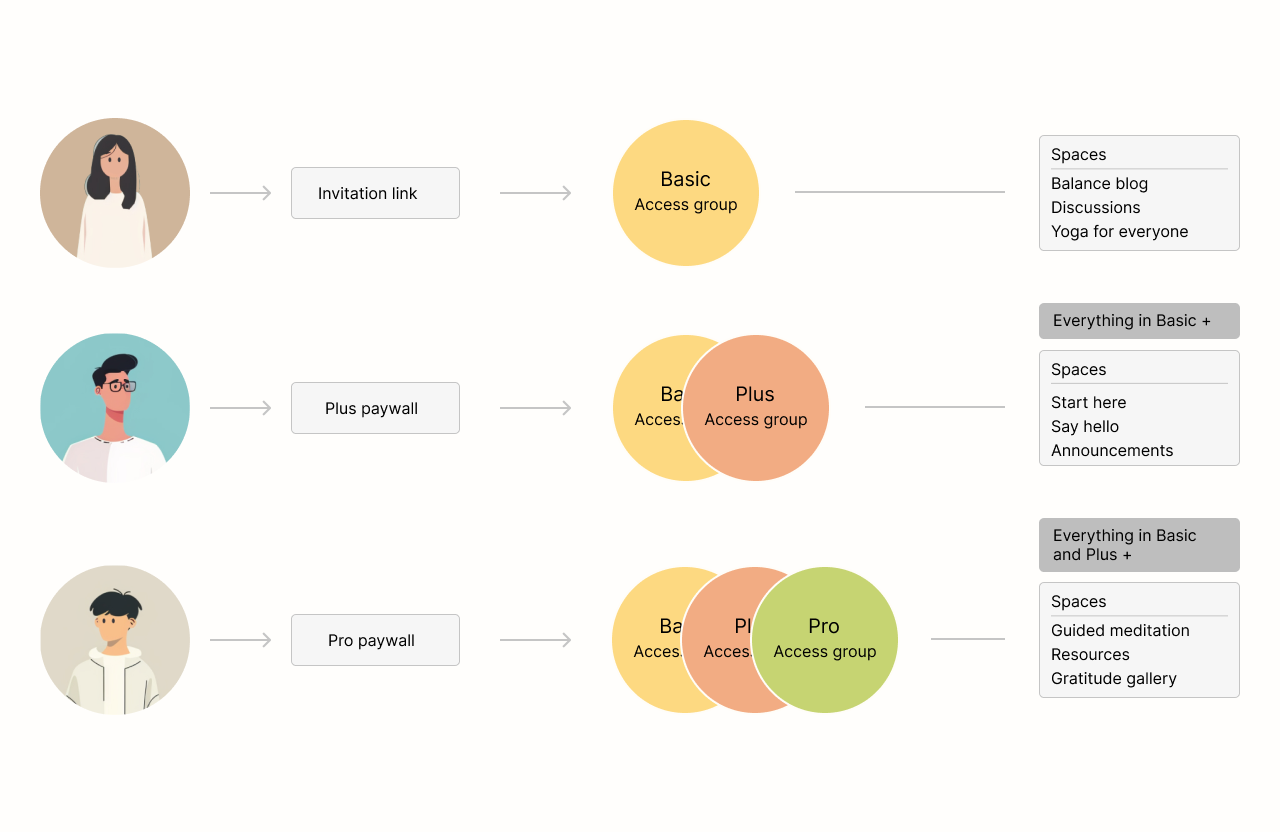
Here’s an example of how you can structure tiered access using access groups:
-
Free tier: Provide free, introductory spaces for new members who join via an invitation link.
Create a “Basic” access group and add the introductory spaces to it.
Link this access group to the invitation link, so new members automatically get access to those spaces.
-
Plus tier: Members who purchase a paywall unlock both the Basic tier's spaces and premium spaces exclusive to the Plus tier.
Create a “Plus” access group containing these premium spaces.
Link both the “Basic” and “Plus” access groups to the paywall you created for the Plus tier. This ensures Plus members get the Basic tier content, plus the exclusive spaces.
-
Pro tier: Pro members get everything from the Basic and Plus tiers, plus exclusive spaces only available to them.
Create a “Pro” access group for these exclusive spaces.
Link the “Basic,” “Plus,” and “Pro” access groups to the paywall you created for the Pro tier. This will automatically provide seamless access across all tiers.
By structuring access this way, you ensure each tier builds on the previous one, creating a streamlined system for managing access.
Automating access groups with workflows, APIs, and Zapier
Streamline and automate access group management with a range of triggers, actions, and endpoints designed to help you reduce manual work. Depending on your needs, you can leverage these capabilities through Circle workflows, Admin API v2, or Zapier to handle essential tasks efficiently.
Circle workflows
You can automate tasks or perform bulk actions for your community audience using triggers, audience rules, and actions related to access groups. Available options include:
Triggers: Activate workflow actions based on triggers such as “Added to access group” or “Removed from access group.”
Audience rule: Define the audience for bulk actions based on whether they are a member of a specific access group.
Actions: Set up actions such as adding or removing members from an access group.
With these, you can build powerful automations. For example, you can create an email onboarding journey for members once they join an access group:
Use the "Added to access group" trigger and select the relevant access group.
Add delay actions in between to space out other actions.
Include "Send an email" actions to deliver tailored onboarding guides that encourage members to explore content within spaces that are part of the access group.
Layer in additional actions such as adding members to events, subscribing them to paywall trials, or applying tags.
Admin API v2
Admin API v2 offers various endpoints related to access groups that are ideal for integrating with your custom systems. Available API endpoints include:
Add member to access group
Remove access group member
List access group community members
Show access group community member
List community member’s access groups
📚 You can access our API v2 documentation here.
Zapier
Zapier lets you set up access group-related zaps that trigger actions across your connected tech stack with ease. Available options include:
Adding member to an access group based on a trigger event.
Removing member from an access group based on a trigger event.
Automating various actions whenever a new space group is created using the New access group trigger event.
Before you start: Essential access group guides
Whether you're setting up groups for the first time or refining your approach to access, we recommend the following resources to help you understand and use access groups effectively.