Offer paywall trials
Last updated: August, 2026
Offer a free or paid trial for your community's paywalls, allowing members to fully experience the exclusive membership content before committing to paid membership. This article covers how to offer a trial with a paywall.
Understanding paywall trials
Paywall trials can be an effective strategy to increase your membership base and reduce the entry barrier for new members. By offering access to your exclusive content during a trial period, potential members can assess the benefits of becoming a paid member.
Additionally, you can collect valuable feedback from members during their trial period, which can be used to improve your community content.
You can configure free and paid trials for subscription and installment pricing in your paywalls.
Free trial
With free trials, you can allow members to enjoy the perks of membership without any initial purchase or commitment. For example, you can provide a 14-day free trial for a paywall following a monthly subscription of $20.
Free trials can be set for subscription and installment pricing with or without upfront payments. You can enable the setting to require members to provide their payment information when they start a trial.
Paid trial
Paid trials can help you increase your revenue while still offering a taste of what your community is all about. You can set up a paid trial using an upfront payment configuration in both subscription and installment pricing.
For instance, you can set up a paywall with an upfront payment of $20 for a trial period of 30 days. Once the trial expires, members can pay four monthly installments of $50 to gain lifetime access to your premium content.
ℹ️ Note: Adding a trial to the existing paywall will only apply to new member subscriptions.
Additionally, if you change the trial duration of an existing paywall, all members who signed up prior to the change will remain on the number of trial days that were applied when they signed up.
Setting up a free trial
To set up a free trial:
Click the community name or logo in the top-left corner and select Paywalls.
If you are setting up:
A new paywall: Click Create paywall and start by adding details to a paywall using the guide here.
An existing paywall: Hover over the paywall, and click the More actions (three dots) icon and select Edit.
In the Price options section in the Product tab, configure the following:
-
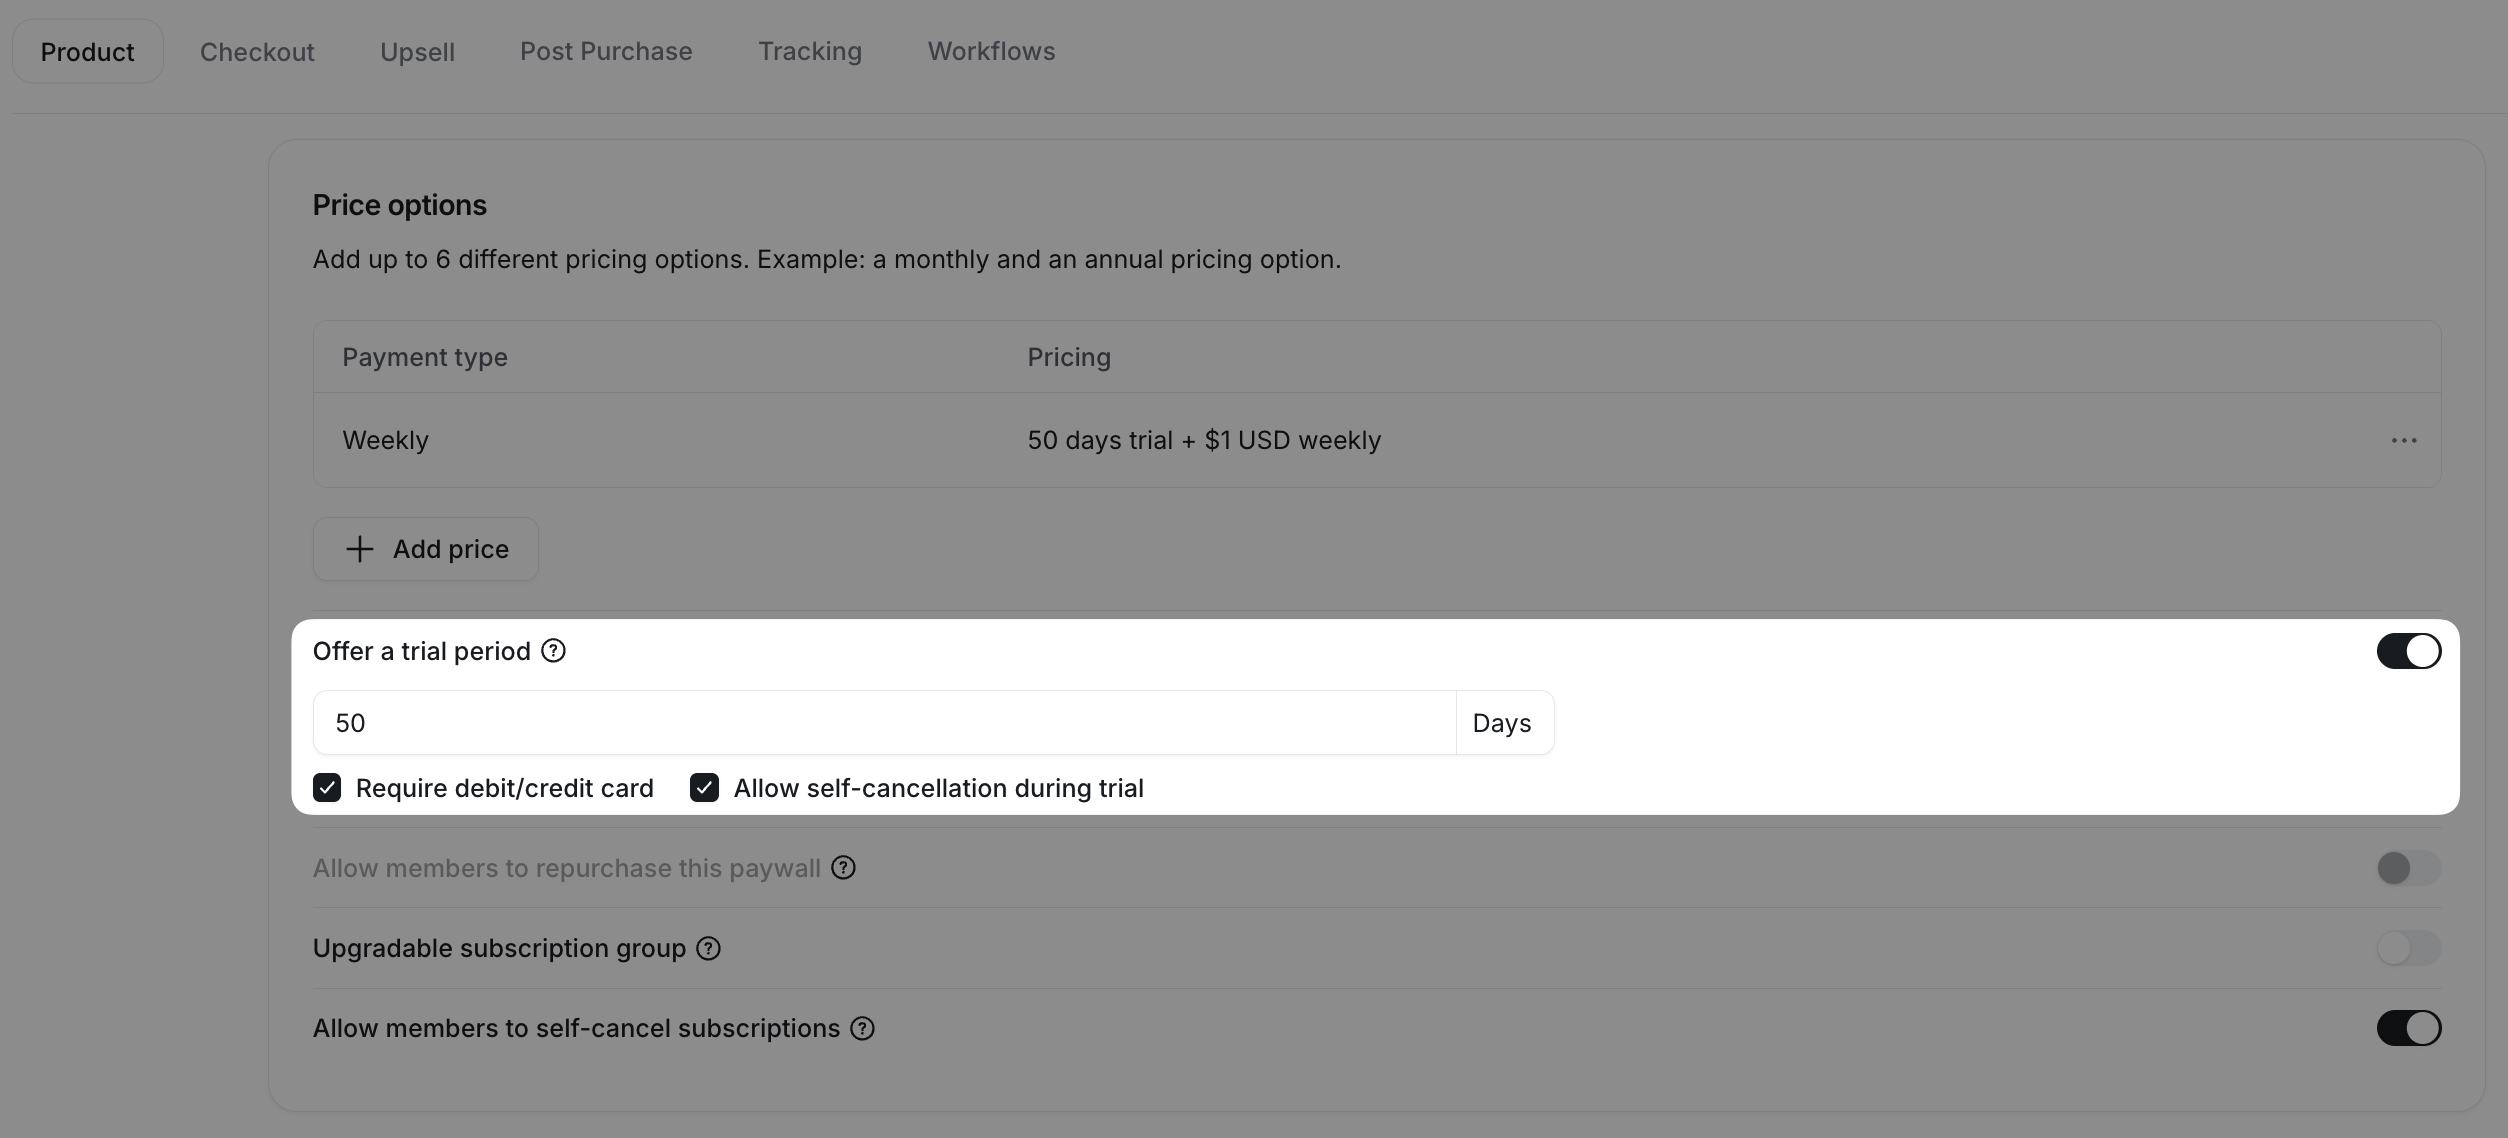
Trial: Enable the Offer a trial period toggle. Add the preferred number of days for the trial. You can add up to 730 days of trial duration.
Require debit/credit card: Enable this toggle to require members to provide a payment method when signing up for a trial. Their card will be saved as a payment method, and they’ll be charged for their membership automatically when the free trial ends.
Allow self-cancellation during trial: Enable this toggle to let members cancel their subscription at any time during the trial period. This setting applies only to subscription pricing. Admins can still cancel member subscriptions at any time, regardless of this setting.
ℹ️ Note: If you are creating a new paywall or haven't already added any prices to an existing paywall, add a sample subscription price first by clicking Add price. This will make the settings section appear on the pricing tab. You can then remove the sample price later if you don't need it.
-
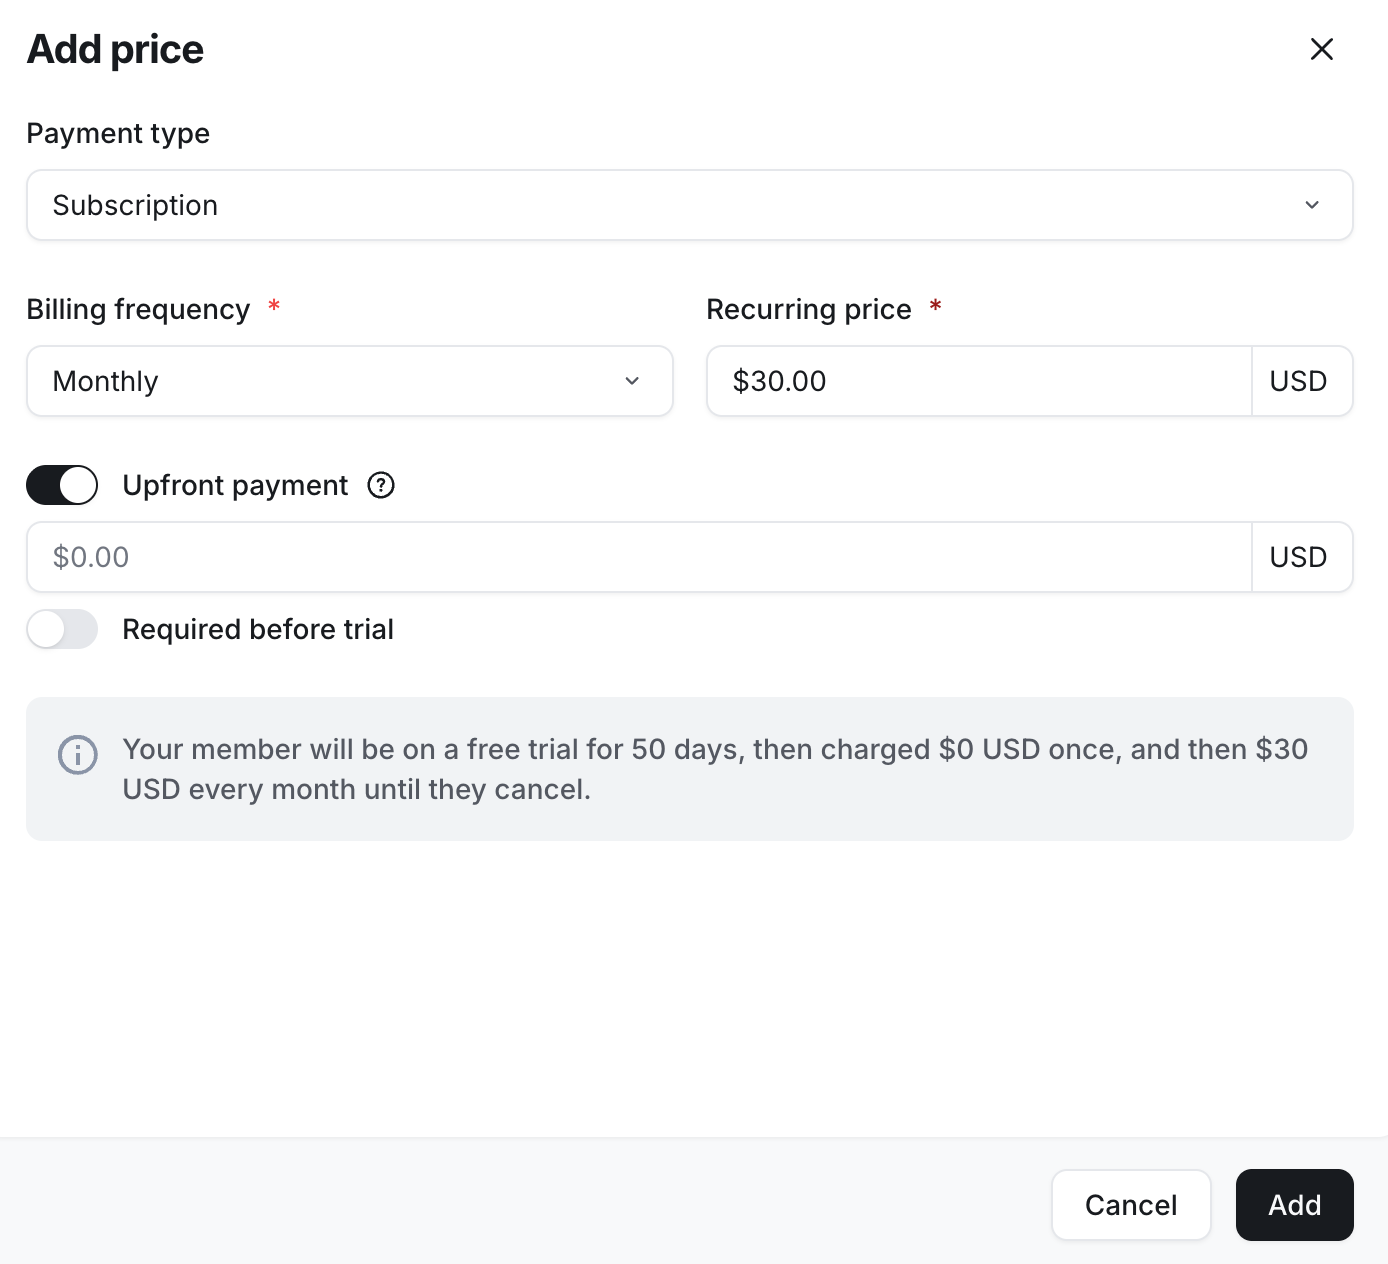
Price: To add a price for a free trial, click Add price.
In the Add price dialog, set up your pricing structure.ℹ️ Note: If you are adding a price with upfront payment, turn off the Required before trial toggle to ensure that members receive a free trial. If you have already added a price with an upfront payment, you’ll need to ensure that the payment requirement toggle is turned off. If you are unsure, you can add a new price.
Click Add.
Once you have reviewed the pricing setup:
If you have added the price to a new paywall, continue with the remaining setup by clicking Next in the top-right corner.
If you have added the price to an existing paywall, click Save in the top-right corner to apply your changes.
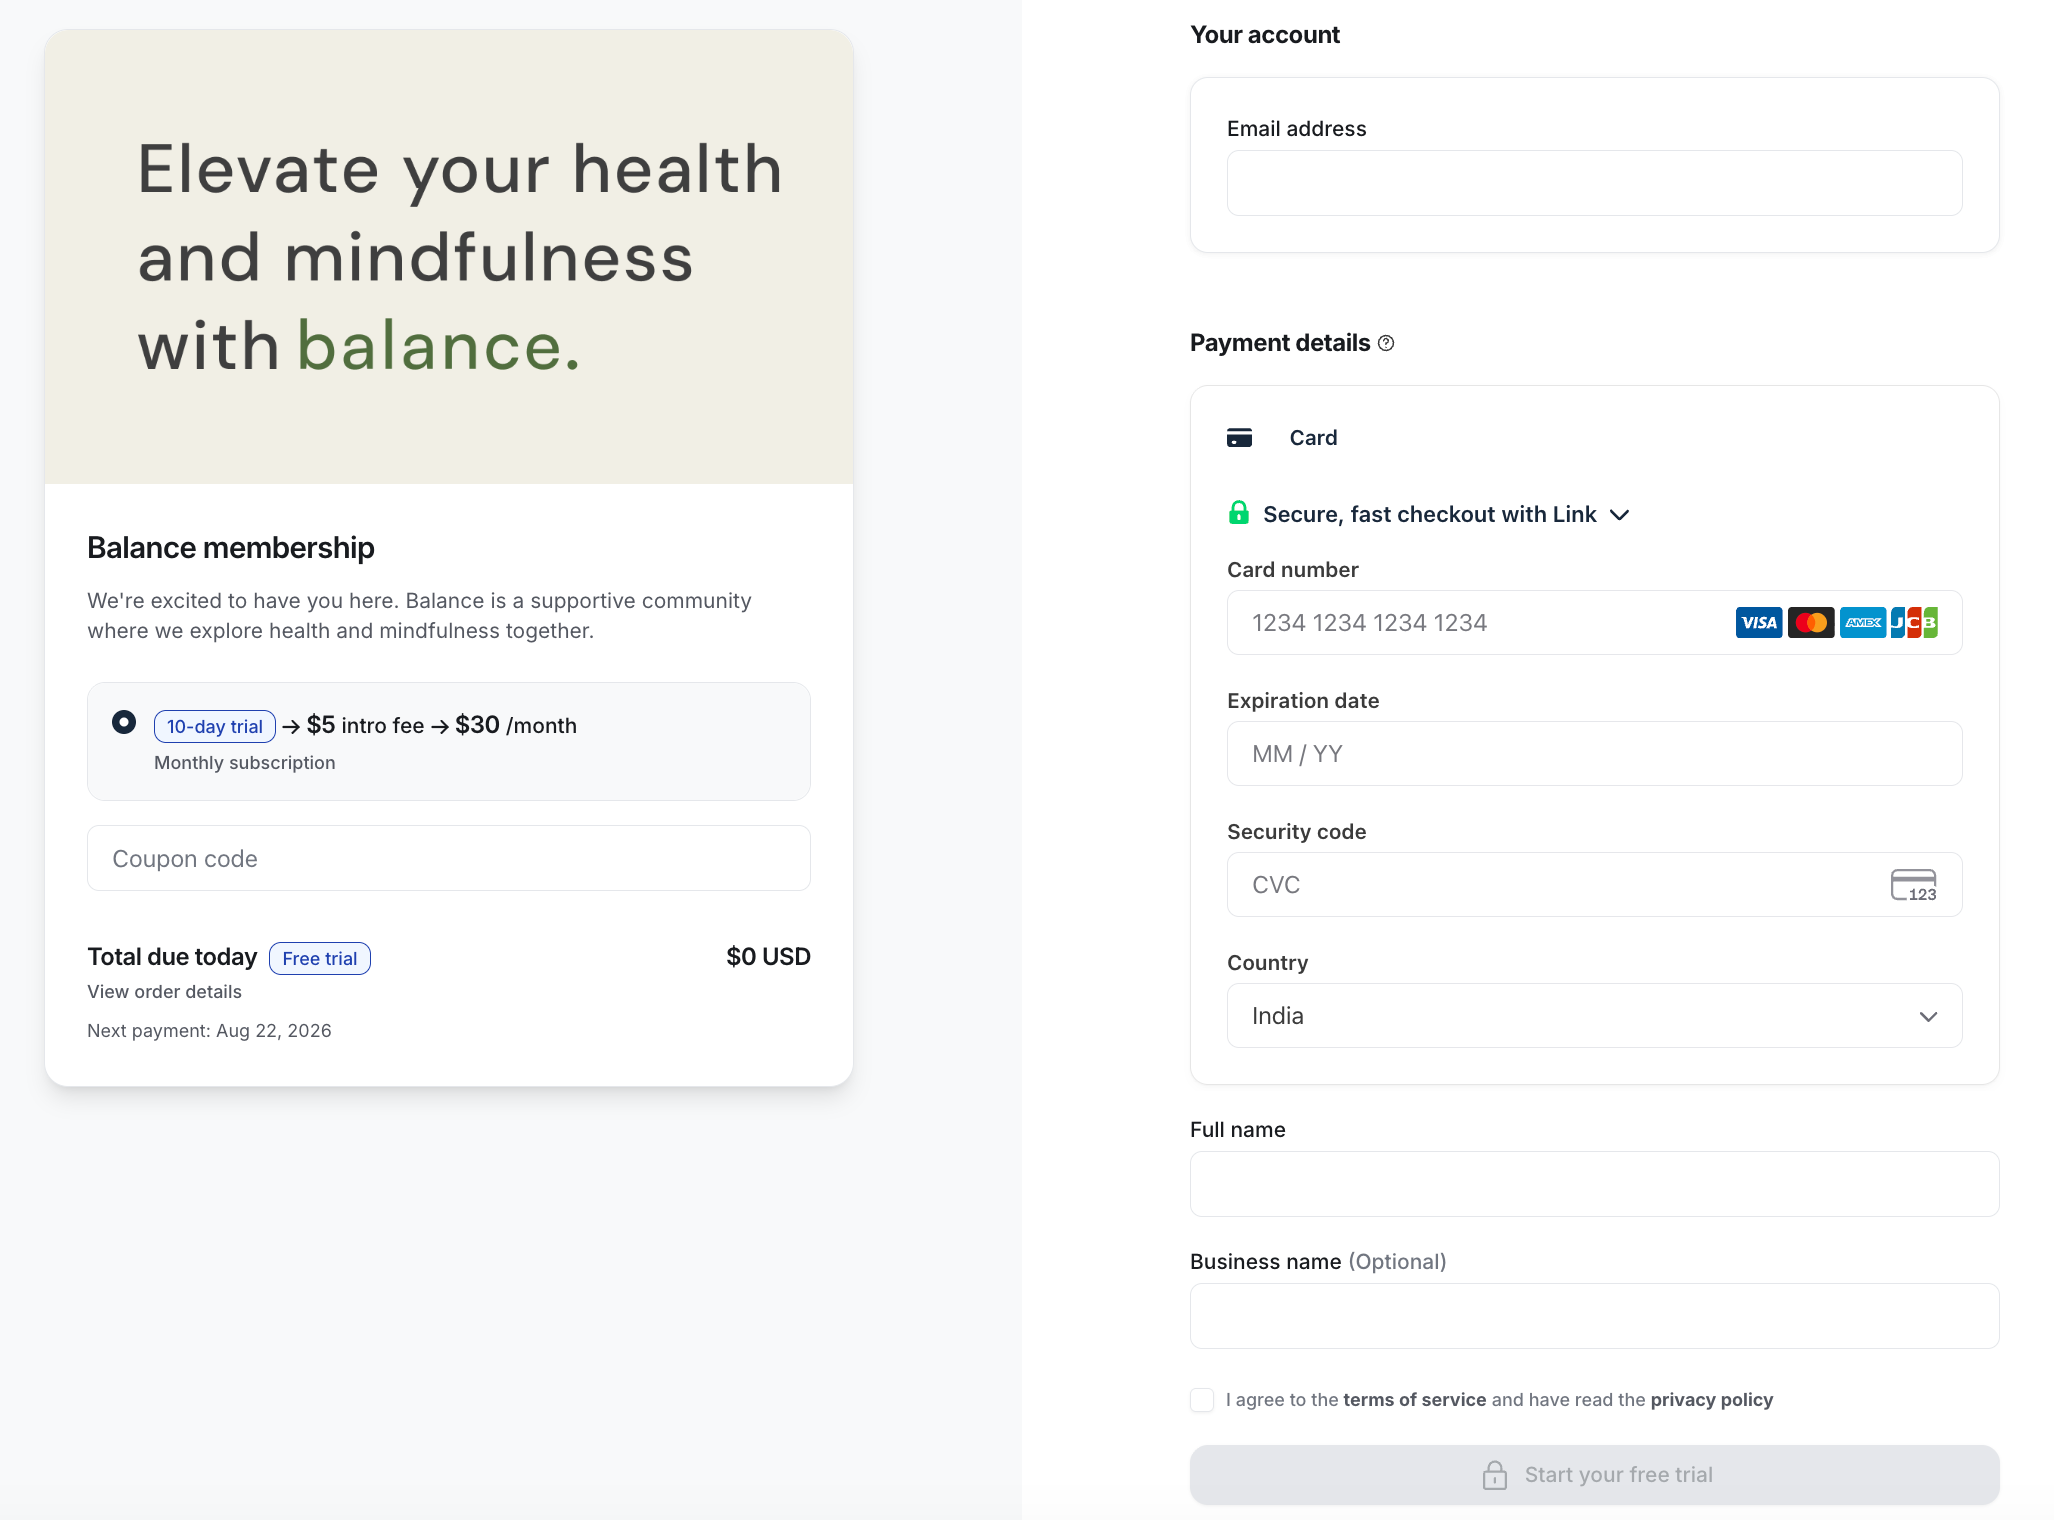
You're all set! On the paywall checkout page, members can see all the essential information, including free trial duration and future payment amounts.
Additionally, members can apply a coupon code for potential discounts. If tax collection is enabled, members must enter their billing address. Moreover, there’s an option to include their Tax ID directly on the checkout page.
What happens at the end of a free trial period?
The events to charge your members occur based on your configuration for payment method requirements. Let's look at what happens when the Require debit/credit card option is enabled or disabled for a free trial period.
💡 Tip: Here are our member-focused articles on managing their subscriptions and payments that you can use to share the information:
Require debit/credit card enabled
If this option is enabled:
Members will be automatically charged at the end of their trial unless they cancel their trial paywall before the renewal.
Members can update their payment method before renewal if they prefer a different one.
If members do not want to continue the trial, they can cancel it anytime, and their paywall access will be revoked.
📚 For details on failed subscription charges, check out our guide on Understanding the cancellation process for failed payments.
Require debit/credit card disabled
When this option is disabled:
-
Members must enter their payment details to continue using their paywall membership after the trial ends. They can do so any time during their trial by following these steps:
Click your profile icon in the community header and select Billing.
Click Add payment method under the Payment methods tab.
Existing members who have previously added a payment method while purchasing another paywall will be automatically charged using the same method unless they choose to update it through their billing settings.
If members do not want to continue the trial, they can cancel it anytime, and their paywall access will be revoked.
🔔 Notifications: Members will also receive a reminder email and an in-app notification 3 days before the end of the trial if they haven't added a payment method.
If no payment method has been added by the end of the trial period, the member’s subscription status will be updated to Past Due, and the member will be asked to add their payment details in order to regain access to the paywall.
If the member fails to provide a valid payment method within the retry schedule you have set in your Stripe account, the subscription status will be updated to Canceled, and access to paywalled content will be revoked.
📚 To learn more about implementing a stricter policy around failed payment to revoke member access to paywalled content one day after the end of the trial (this is the earliest option), see Automatically remove member's access from paywalled content after trial ends.
Setting up a paid trial
To set up a paid trial:
Select Payments in the left sidebar, then select Paywalls.
If you are setting up:
A new paywall: Click New paywall and start by adding details to a paywall using the guide here.
An existing paywall: Hover over the paywall, and click the More actions (three dots) icon and select Edit.
In the Price options section in the Product tab, configure the following:
-
Trial: Enable the Offer a trial period toggle. Add the preferred number of days for the trial. You can add up to 730 days of trial duration.
Require debit/credit card: Since we will charge members for the paid trial using upfront payments, the Require debit/credit card setting will be overridden automatically.
Allow self-cancellation during trial: Enable this toggle to let members cancel their subscription at any time during the trial period. This setting applies only to subscription pricing. Admins can still cancel member subscriptions at any time, regardless of this setting.
ℹ️ Note: If you are creating a new paywall or haven’t already added any prices to an existing paywall, please add a sample subscription price first by clicking Add price. This will make the settings section appear on the pricing tab. You can then remove the sample price later if you don’t need it.
-
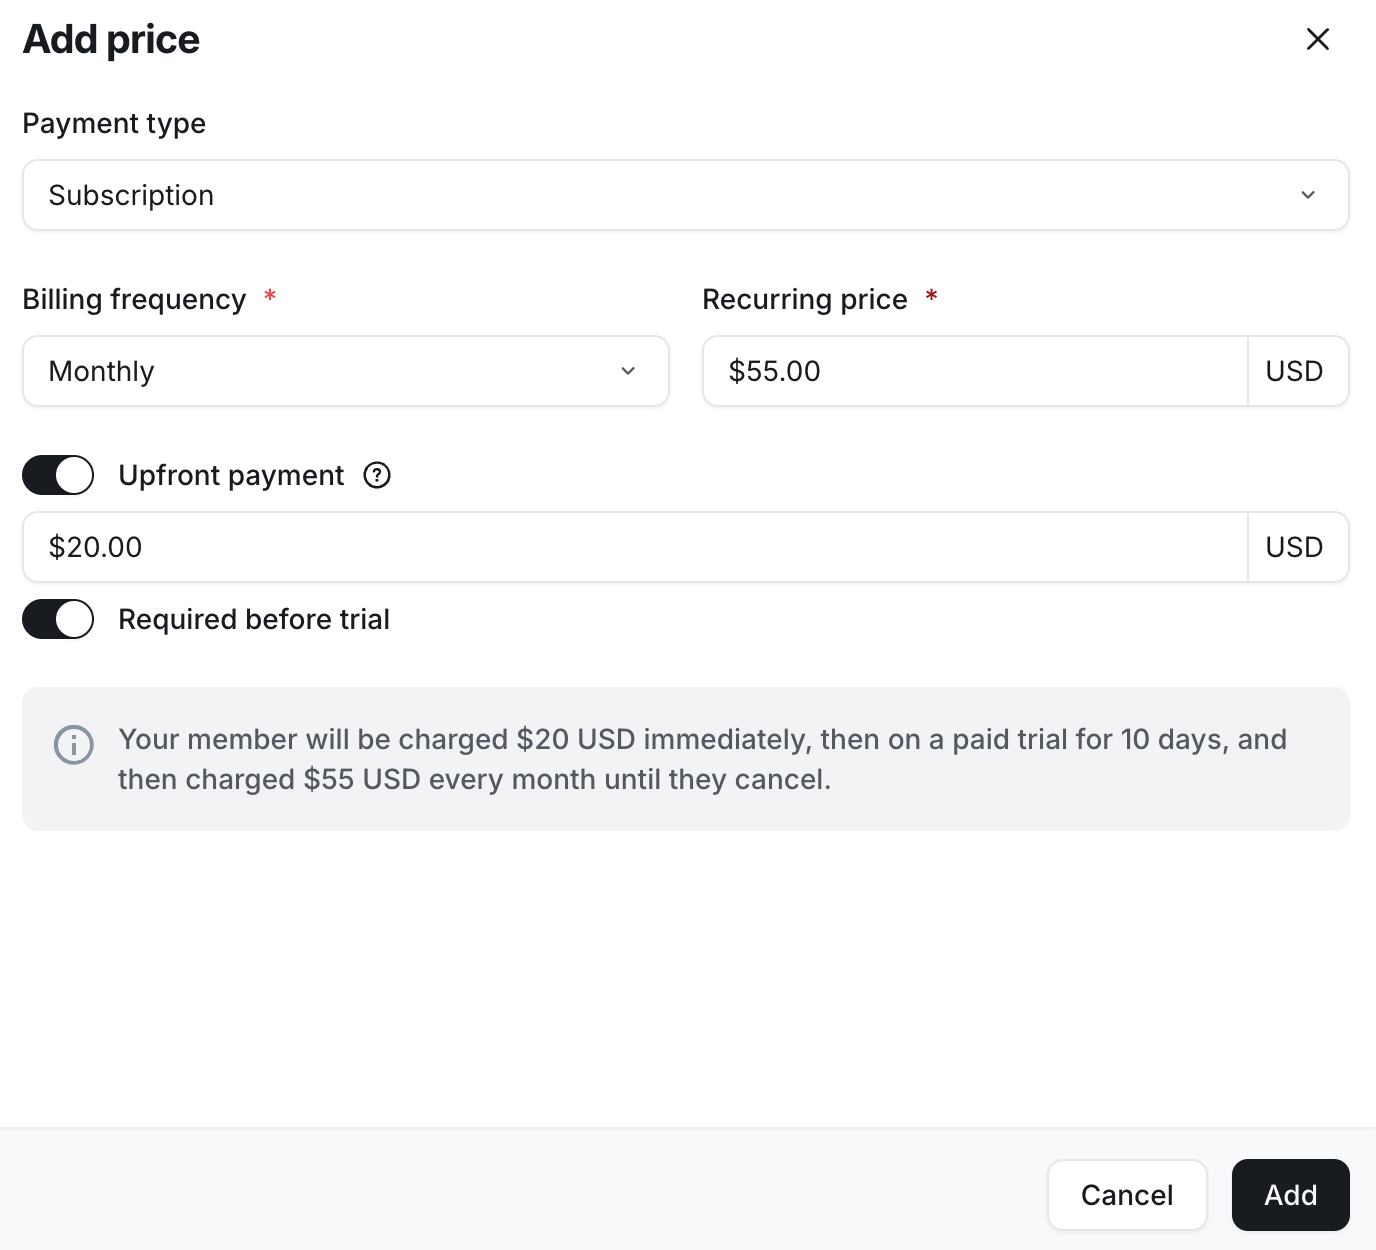
Price: To add a price for a paid trial, click Add price.
In the Add price dialog, set up your pricing structure.
Enable the Upfront payment toggle and enter the desired amount you would like to charge for the paid trial.
-
Turn on the Required before trial toggle to charge members with an upfront payment amount for the paid trial.
Click Add.
Once you have reviewed the pricing setup:
If you have added the price to a new paywall, continue with the remaining setup by clicking Next in the top-right corner.
-
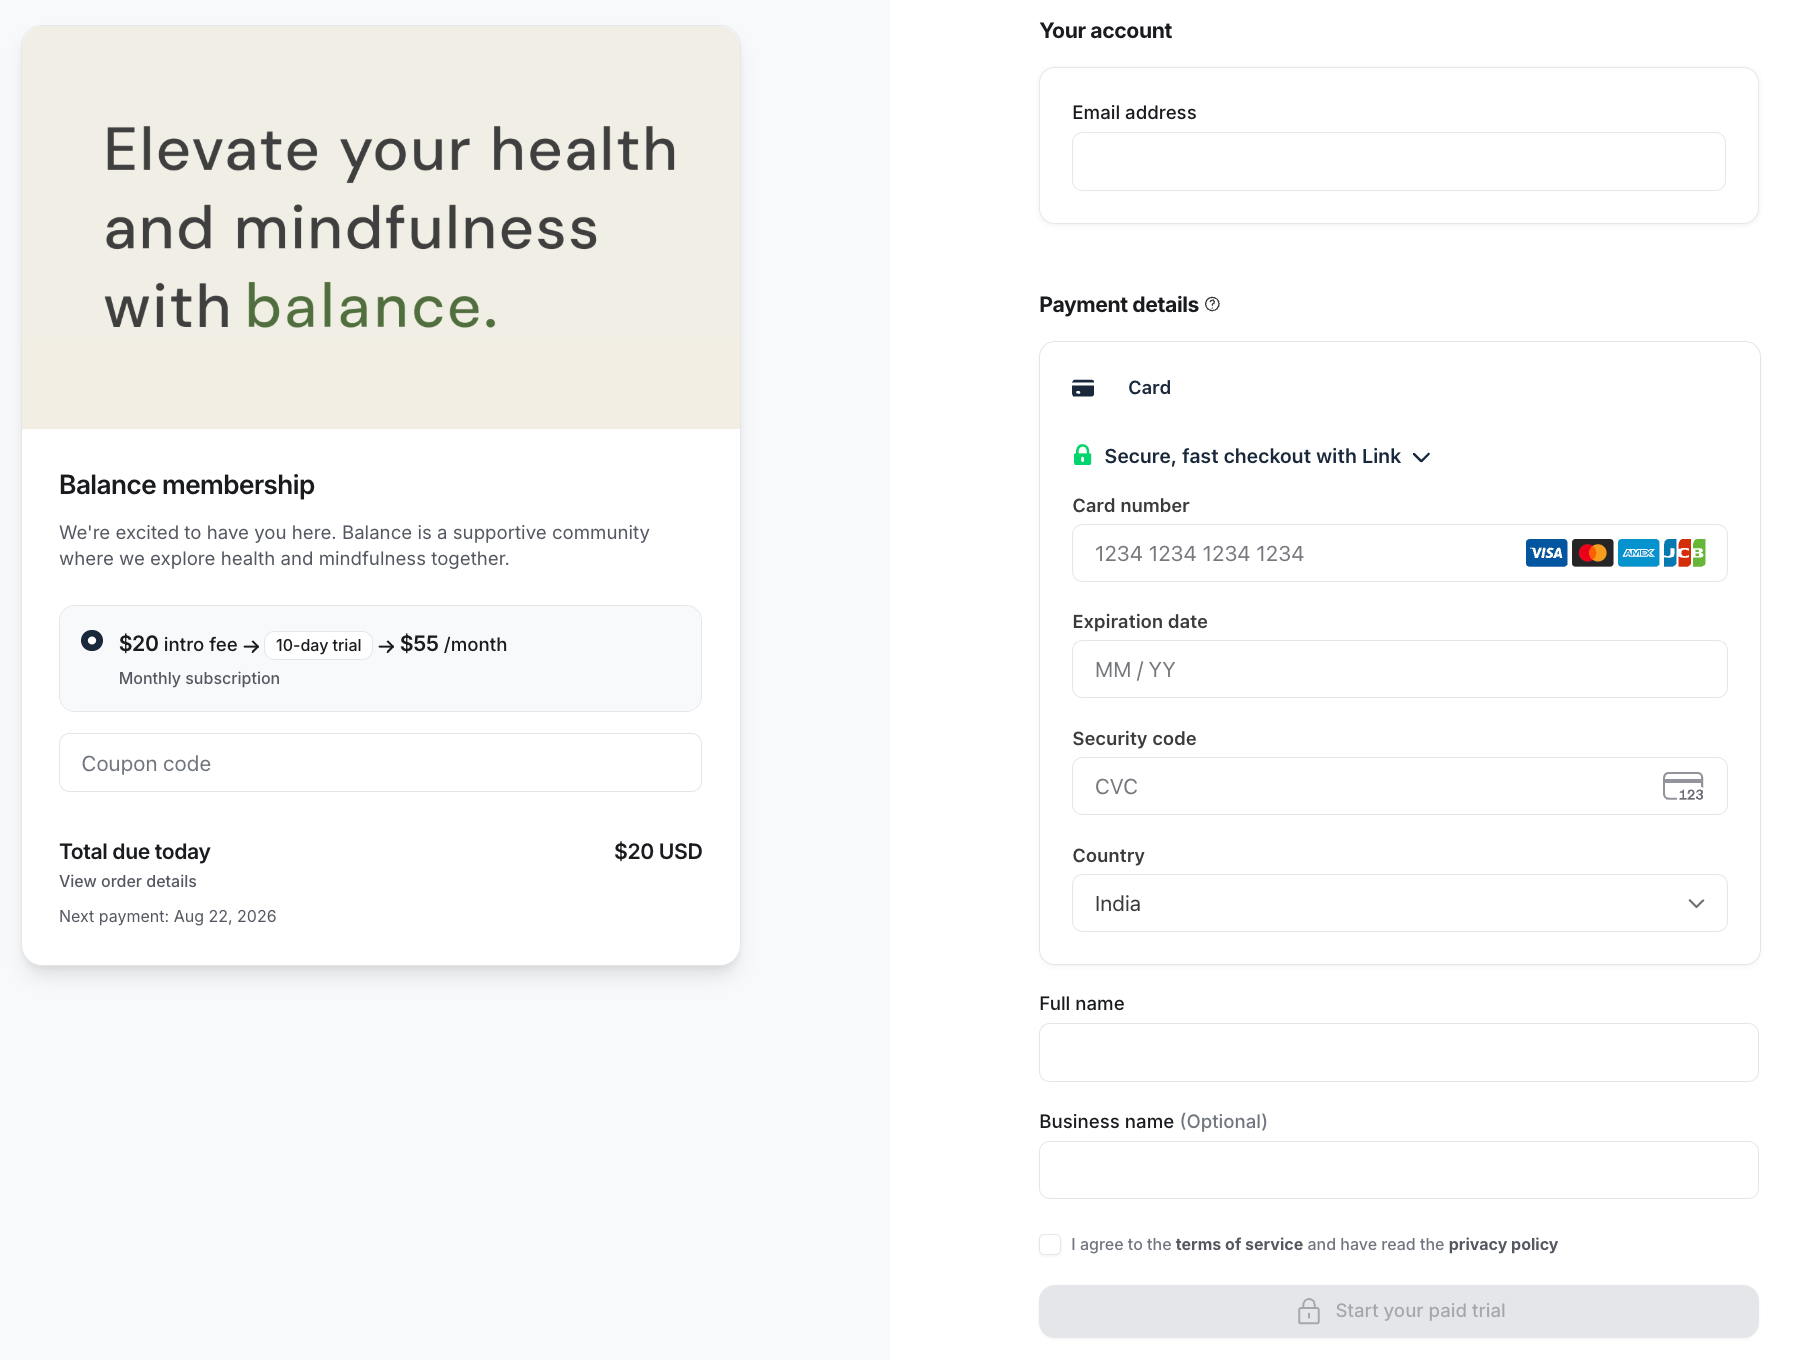
If you have added the price to an existing paywall, click Save in the top-right corner to apply your changes.You're all set! On the paywall checkout page, members can see all the essential information. This includes the amount due for the paid trial, trial duration, future payment amounts, and the total due upon purchase.
Additionally, members can apply a coupon code for potential discounts. If tax collection is enabled, members must enter their billing address. Moreover, there will be an option to include their Tax ID directly on the checkout page.
What happens at the end of a paid trial period?
Since the member has already added the payment method to start the paid trial, they are charged for the paid membership once their trial period ends. If members do not want to continue the trial, they can cancel at any time, and their paywall access will be revoked.
Additionally, if the payment fails, Stripe attempts to charge members according to the retry schedule. If all retry attempts are exhausted, the member's subscription status is updated to Canceled, resulting in the removal of access from paywalled content.