Updating a paywall
Last updated: August, 2026
Circle paywalls are designed with flexibility in mind, allowing you to adapt your monetization strategy to meet evolving business needs. This article provides a comprehensive guide to navigating these updates.
Updating a paywall
Whether you're adjusting pricing, introducing new pricing tiers to attract different customer segments, modifying access levels to enhance user experience, or configuring post-purchase settings, you can do so easily from the paywalls settings page.
To make informed updates and maintain a seamless experience for both you and your users, keep the following points in mind:
Changes apply to new purchases: Modifications to critical paywall components, such as pricing, access, or post-purchase settings, will only affect new purchases made after the changes are saved. Existing subscribers or members who purchased prior to the update will retain their original pricing, access, and settings.
Updating external pages: If your paywall checkout URL is embedded on external platforms, such as your website, blog, or marketing campaigns, it’s crucial to update these external pages to reflect any changes made to your paywall. For example, if you adjust pricing or introduce a new tier, ensure that all promotional materials display accurate and up-to-date information.
Archiving paywalls: When a paywall is archived, it becomes unavailable for new customers, but those who previously purchased the paywall will continue to keep their access and, in the case of recurring pricing, maintain their active subscriptions. If you wish to revoke access for existing members, you must manually cancel their memberships.
Accessing paywall configuration
Follow these steps to access your paywall setup:
Click Payments in the left sidebar, then select Paywalls.
Hover over a paywall. Click the More actions (three dots icon) and select Edit.
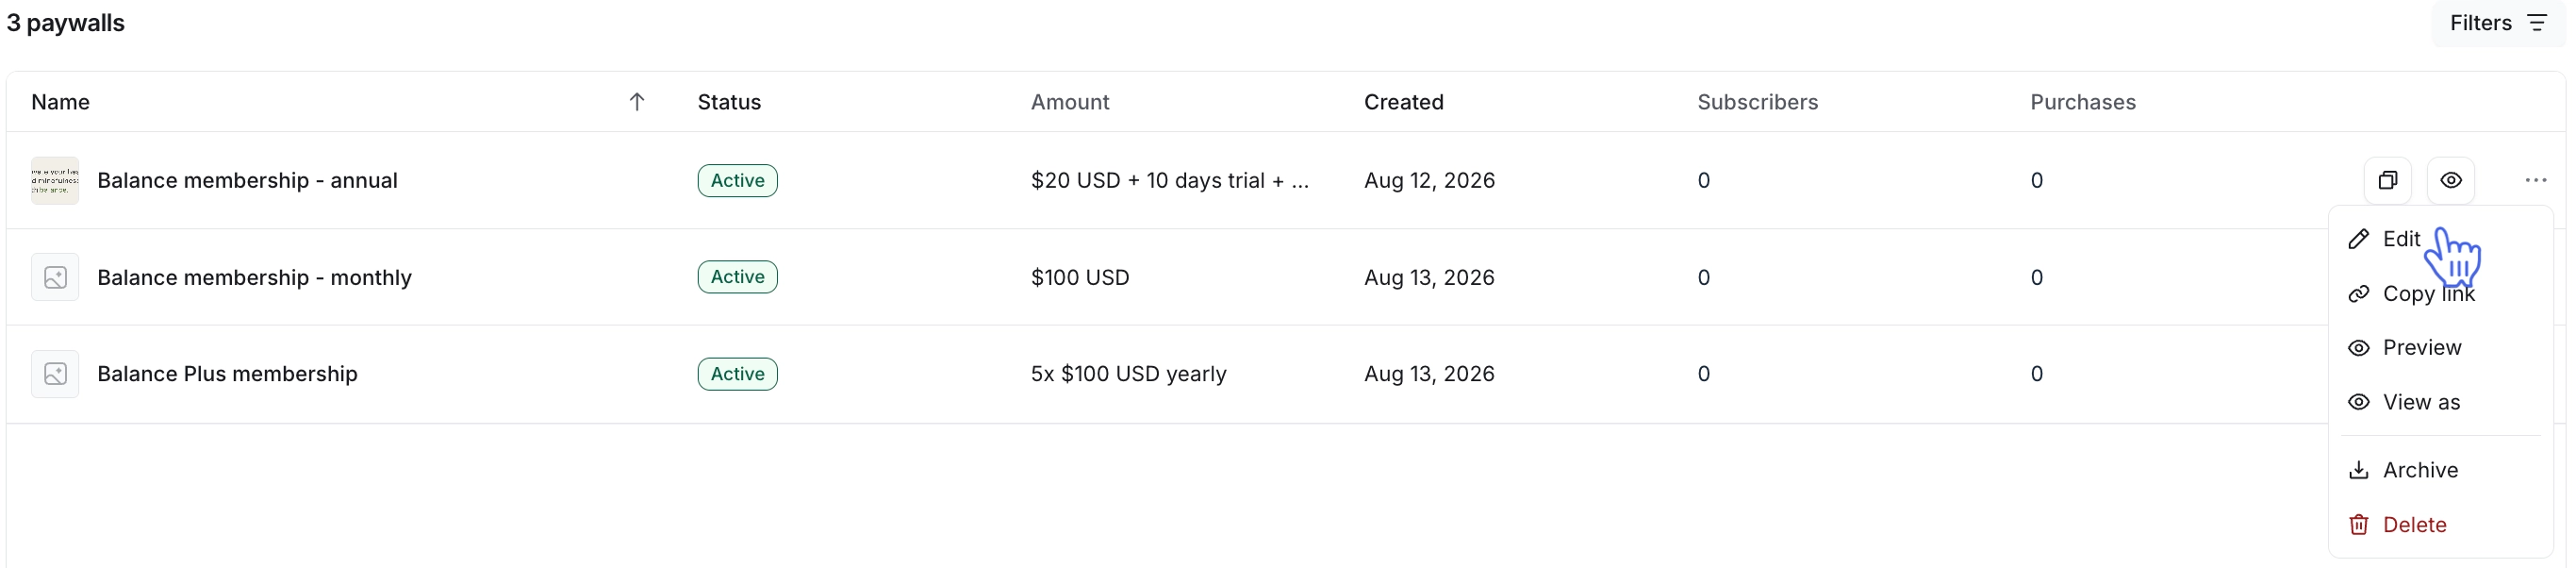
The paywall setup screen will appear, displaying tabs similar to those available during the initial paywall creation process.
After making any modifications, click Save on top-right corner.
Each tab in the paywall setup interface allows you to fine-tune specific aspects of your paywall.
Modify paywall details
Under the Product tab, you can update:
Display name
-
Currency: You can update the currency of your paywall prices if the paywall is still in draft status.
Important: You cannot update the currency of a published paywall. You need to create a new paywall if you would like to start charging members in the new currency
Checkout description: Update the detailed explanation of what users gain by purchasing this paywall, which will be displayed on the checkout page to encourage conversions.
Internal name (optional)
Subtitle
-
Checkout URL: The unique web address directing users to the paywall’s checkout page. To modify the URL slug, simply enter the new slug in the provided field.
ℹ️ Note: Changing the URL slug will deactivate the previous checkout URL. To avoid broken links and user confusion, we recommend updating your content or external pages where you included your paywall checkout URL with the new URL.
-
Auto-apply coupon: Use the Auto-apply coupon toggle to create a paywall checkout URL with a pre-selected coupon automatically appended. This feature enables you to share a customized checkout link where the discount is seamlessly applied on the checkout page, streamlining the user experience.
Note: Enabling the toggle and selecting a coupon does not automatically apply the discount to all checkout pages. The discount will only be applied when users access the checkout page through the specific URL that includes the appended coupon code.
Update paywall pricing
The Price options section lets you manage and fine-tune your paywall's pricing. This includes adding new pricing options, removing existing ones, updating pricing settings, and highlighting preferred options to optimize the user experience.
📚 For more information on how pricing settings work, please see our paywall setup guide here.
Before you make changes to pricing or settings, here are some key things to keep in mind:
Updated pricing applies only to future purchases: Any changes to pricing (e.g., adding or removing a price) will only affect new users who purchase the paywall after the changes are saved. Members who have already brought the paywall will continue paying the price they originally agreed to until their subscription or installment plan is canceled.
Trial settings affect new purchases only: Updates to trial settings (e.g., trial duration or enabling/disabling trials) or requirements for debit/credit card information during trial purchases will apply exclusively to new purchases made after the changes are implemented.
-
Subscription group changes: If you make changes to the subscription group settings, it will apply to new and existing members who purchased the paywall. For example,
If you change a subscription group, members will see plan options based on the new subscription group when they try to change their plan.
If you turn off the Upgradable subscription group toggle in the settings, members will no longer be able to switch plans in their billing settings.
Changes to members’ ability to self-cancel trial or subscription: If you enable or disable the toggle that allows members to self-cancel their trial or subscription purchase, it will affect both new and existing members who have already purchased the paywall.
Add a new pricing option
Click Add price.
Configure your desired pricing options, including amount, type, billing frequency (e.g., monthly, yearly), and any additional settings.
Click Add.
Remove a pricing option
Hover over the pricing option you wish to remove.
Click the More actions (three dots icon) next to the pricing and select Make preferred.
ℹ️ Note: A paywall must always have at least one price. If your paywall only has one price and you want to replace it, add the new price first, then remove the old one.
Highlight a pricing option as preferred
To emphasize a specific pricing tier on the checkout page:
Hover over the pricing option you wish to highlight.
Click More actions (three dots) next to the pricing and select Make preferred.
Once marked, the selected pricing option will be automatically pre-selected for users on the checkout page. Users retain the flexibility to choose a different pricing tier if they prefer.
Mobile pricing
You can add prices exclusively for your branded Circle Plus app. Prices must be approved by Apple before they can be added to the paywall. When you click Add price, a dialog will appear with the following fields:
Payment type
Apple in-app purchase ID: A unique alphanumeric ID used to identify the product in the Apple App Store.
Google in-app purchase ID: A unique ID used to identify the product in the Google Play Store.
Price: The price for the selected payment type.
💡Tip: For the unique ID, we recommend using the name of the paywall.
Update paywall access
This section lets you control which spaces and space groups members are granted access to via this paywall.
Access groups linked to your paywall are displayed with one of the following statuses:
Connected: These access groups are actively linked to the paywall. Members who join through the paywall automatically receive the space access defined by these groups.
Removed: These access groups were previously linked to the paywall but are no longer active. The Removed tag preserves their history and indicates that members who purchased during that period were granted access through these groups.
Key things to know about updating paywall access
Changes apply to new purchases only
Modifications to paywall access, such as adding or removing access groups, will only affect members who purchase the paywall after the changes are saved. Existing subscribers will retain the access they were granted at the time of their purchase.
Updating access for all members who purchased paywall
To apply access changes to existing subscribers, you should modify the existing connected access groups rather than add new ones. Below are recommended approaches based on the type of change:
-
Adding additional access: Instead of connecting a new access group to add more access, add the desired spaces to an existing connected access group. For example:
Scenario: Your paywall is connected to Access groups 1 and 2. Now you want to grant access to Access group 3 through this paywall.
Solution: Instead of linking Access group 3 to the paywall, add the spaces from Access group 3 to Access group 1 or 2.
Result: When you save the changes in Access group 1, all members of the group, including those who gained access to the group through the paywall, will automatically receive access to the spaces you have added to the group. In addition, since Access group 1 is already connected to a paywall, users making new purchases going forward will also receive updated access.
-
Removing access group: While you will need to remove the access group from paywall access to prevent new purchases from getting access to the paywall, for existing members, you will need to remove them manually from access groups.
Scenario: Let’s say you want to remove Access group 1 from the paywall access for members who have already bought the paywall.
-
Solution:
Create a bulk action workflow with a Paywall subscription audience rule to target members subscribed to your paywall.
Use the Remove members from access group action to remove members from Access group 1.
Alternatively, navigate to the Members tab in the access group setup, apply filters to identify paywall subscribers, and remove them directly from the access group.
Result: This ensures that existing subscribers no longer have access to the spaces in Access group 1.
Migrating legacy space access to access groups
If your paywalls currently use legacy space access for paywalls instead of access groups, you can migrate members’ access (who brought the paywall) to access groups. This migration option allows you to seamlessly transition to access groups. To do so, click the Access groups option in the Paywall access tab and select Migrate to access group.
📚 For a detailed guide on the migration process, see Migrate your paywall’s access from legacy space access to access groups.
Add an access group
To add an access group to the paywall access, simply click the dropdown menu and select a group from the list. The access group will appear with a connected status.
Remove an access group
To disconnect an access group from the paywall, click the More actions (three dots) next to the group and select Remove. After saving, new paywall purchases will no longer grant access to the removed group.
ℹ️ Note: If this access group has already provided members with access through this paywall, it will remain visible in the Paywall access tab with a Removed status indicator to maintain visibility of past configuration.
Customize the checkout page
In the Checkout tab, click Customize to update or disable sections you've added to your checkout page.
Paywall cover image: To replace or remove the cover image, use the options at the bottom of the cover image thumbnail.
Product details: You can edit existing content, add new items, or hide sections like badges, benefits, and testimonials.
Badges: Click Badges in the sidebar to open the settings. To hide badges, switch off the Show badges toggle. You can duplicate or delete the badge using icons at its top right corner.
Benefits: Click Benefits in the sidebar. To hide benefits, switch off the Show benefits toggle. You can duplicate or delete the benefit using icons at its top right corner.
Testimonials: Click Testimonials in the sidebar. To hide testimonials, turn off the Show testimonials toggle. To duplicate or delete the testimonial, use the icons at its top right corner.
Price details: You can highlight special offers, show reduced prices, and create urgency with countdown price locks.
Callouts: Add short text labels to highlight discounts or promotions. Set the callout text and colour in the Callout text and Callout colour fields. The callout only appears when you add text for that price. You can also click the More actions (three dots) icon next to a price name to highlight it.
Reduced prices: Turn on the Reduced price toggle next to a price name to show a discounted amount. Set a Before price to show the original amount with a strikethrough, and a Your price to show the reduced amount.
Countdown price lock: Turn on the Countdown price lock toggle to show visitors how much time they have to act before a price lock expires. Choose Remaining time to start a unique countdown for each visitor, or Date and time to count down to a specific date and time based on the visitor's computer timezone. You can customise the countdown text and choose Do nothing or Redirect to another page when the timer expires.
❗ Important:
If a coupon discount and a reduced price both apply to the same price, the coupon discount takes priority.
The redirect only applies to new visitors. Visitors already on the page when the timer expires are not affected.
Click Save Changes once you’re done. Click View in the top-right corner to preview how the paywall will look to a new visitor on mobile, app, or tablet.
Upsell
In the Upsell tab, you can offer customers an upgrade immediately after checkout. This could mean switching to a higher-tier plan, moving to yearly billing, or adding premium features. Upsells help customers get more value from your community, and can increase your average order value. You can offer customers an additional item alongside their main purchase by selecting the paywall you want to add. Paywalls within the same subscription group cannot be selected as add-ons.
Customize post purchase experience
The Post purchase tab allows you to customize users' experience after purchasing your paywall or starting a paywall trial.
Create a workflow: Click Create workflow to set one up. This takes you to the workflows tab.
Thank you page: Turn on the Thank you page toggle to show it after purchase, or turn it off to skip it. You cannot customise the default thank you page.
Custom redirect URL: Turn on the Custom redirect URL toggle to send users to a URL of your choice instead of Circle's default flow. If you turn it on, enter the URL you want users redirected to after purchase or after the thank you page, if that's also turned on.
Confirmation email: Turn on the Confirmation email toggle to send an email after purchase. When it's on, you can edit the email's title and description, for example, to thank customers, share subscription details, or point them to next steps. You can also customise the call-to-action (CTA) button with a custom label and URL.
Modify conversion tracking code
The Tracking tab allows you to monitor your paywall's performance by managing the conversion tracking code. You can add or update your code in the Conversion tracking code field.
📚 To learn more, see Add conversion tracking code to paywalls.
Workflows
You can create new workflows directly from this tab to set up automation or run bulk actions related to paywalls. You can also access your existing workflows created within your community. To create a new workflow, click New workflow in the top right corner. Choose from one of the templates or set up a custom workflow to meet your specific needs.
📚 For more information on workflows, check out our guides here.