Onboarding members to your SSO-enabled community
Last updated: October, 2026
For your SSO-enabled community, it’s crucial to understand various ways of adding new members to your community spaces and space groups. In this article, we will guide you through how to utilize various methods to provide automatic or manual access to certain spaces and space groups when new members log in to your community via SSO.
Key considerations for onboarding members to SSO-enabled community
Before you decide to choose the ideal method for onboarding SSO members to your community, please review the following aspects of member onboarding.
Community setup
You can tailor your community to be open to the public or exclusive to members, controlling both overall community and content access. You can use any of these community visibility options for your SSO-enabled community.
The community access layer governs general visibility, with public or private options. Meanwhile, content access provides precise control over spaces and space groups, offering detailed configurations for space access, sidebar visibility, lock screens, and more.
📚 To learn more about setting up community access, refer to the Community Access section in the Help Center.
Access to community
Once SSO is enabled, members can sign in to your Circle community using their SSO credentials. Note that new member accounts can no longer be created directly on Circle; they must be created on the SSO provider’s platform.
You can choose to enable the Sign up via a custom URL toggle in your community’s SSO settings page to keep the Sign up button visible and direct it to a custom sign up URL.
Through SSO integration, individuals with an account on your SSO provider can effortlessly sign in, and Circle will instantly create a member record for them in the community.
However, when it comes to granting access to specific spaces and space groups, as well as mapping their profile information from the SSO account and configuring basic profile settings, it's essential to have a separate method in place. This ensures that access aligns precisely with your intended permissions and settings.
If you haven't configured a method to grant SSO members access to spaces and space groups, they will only be able to access open spaces in your community. The member access flow would then follow these steps:
Initial login: Upon first logging in to the community via SSO, Circle will create a member record for the user.
-
Profile completion: Members will be prompted to complete their profile information before being directed to the community.
ℹ️ If the Skip profile confirmation step option is enabled in your SSO settings, members with a preset name will not need to confirm their profile information.
Access to open space: Upon entering the community, members can view and join any open spaces based on your space visibility settings.
Access to community content
There are several methods available to ensure that your members receive appropriate access to spaces and space groups within your community:
Volunteer access: Offer community content for free or make it private to SSO members by setting up different types of space access.
Default space access: Automatically provide free access to specific spaces when members sign in for the first time.
Paywalls: Offer access to private space via Circle paywalls.
Automation: Utilize Zapier, Circle API, or Workflows to automate space and space group access and set up their profile information.
Manual Invitations: Add members to your community using built-in invitation methods.
Set up volunteer access for free or paid community content
This approach provides a solution for use cases in which you let members decide which spaces to join based on their interests.
💡 This approach is ideal for:
Free communities: Public communities where all spaces are visible to new members, and they can join for free to participate in spaces, such as creating posts, enrolling in courses, RSVP to events, and more.
Hybrid communities: Communities where some spaces are free to join. However, other spaces are private and accessible only when you manually add a member to spaces using your admin account or when a member purchases a paywall that provides access to space.
ℹ️ Note: While this approach is ideal for letting members choose what spaces to join and purchase memberships, you will need to use additional methods like Zapier or API if you would like to automatically map their profile fields, set up basic profile settings, and more.
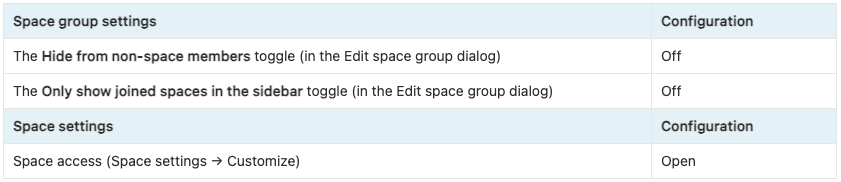
Here is the example configuration for the space group and its spaces that you are offering for free.
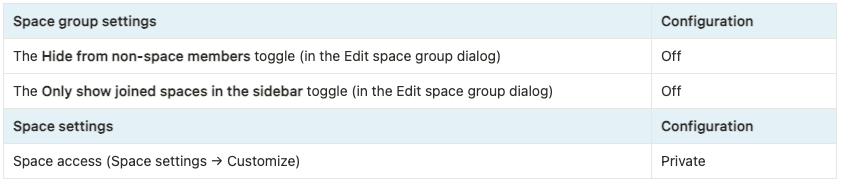
Here is the example configuration for the space group and its spaces that you keep private and gated behind paywalls.
📚 For ideal space and space group configurations for setting up this kind of access for your public or private SSO community, please see the following articles:
Examples of space access configuration for public communities
Examples of space access configuration for private communities
Here’s how it works when the space access and its visibility settings are set to be accessible by non-space members:
New members log in to your community via SSO provider for the first time.
All the open spaces are visible to members in the left sidebar.
Members can view the space content of open spaces. They can join and actively participate in the space that interests them, such as creating posts, leaving comments, and RSVPing to events.
When members try to access the private spaces, they encounter a lock screen.
Automate free access to certain spaces via default space access
You can set up default space access in your onboarding settings to automatically add new members to certain spaces via invite access (free access) whenever they join the community.
When you add spaces to this default space access configuration, it will provide access to those spaces independently of any other methods used to provide access to new members.
To add or update the default space access setting:
Click the community name or logo (or the dropdown icon next to it) in the top-left corner and select Settings.
Scroll down to the Audience section and select Onboarding.
-
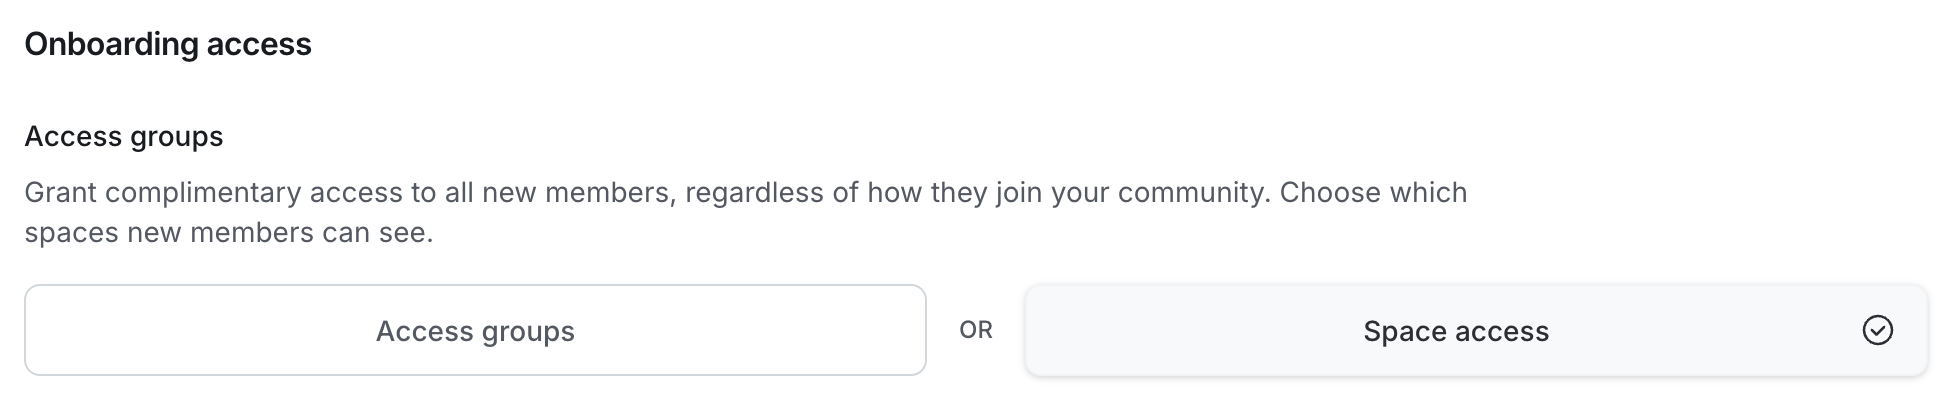
Navigate to the Onboarding access section.
ℹ️ Note: For communities created before January 29, 2025, you'll see both Space access and Access group options when setting up entry points.
Select the space or access group to add or remove it as you prefer.
Provide access via paywalls
Circle paywalls enable you to charge your members for access to your community’s premium content.
Since the members have accounts with your SSO provider, they can navigate to the paywall checkout URL while logged in to the community using their SSO credentials. Alternatively, members can use the Sign in option on the checkout URL to sign in to the community via SSO before purchasing a paywall.
We also strongly recommend setting up all spaces you offer as a part of paywall access to private. You can also set up lock screens for each private space to promote your paywall offerings.
📚 For more information about the paywall purchase process, see Understanding the paywall checkout flow.
Automate space and space group access using Zapier
This is one of the excellent ways to automatically configure a member’s record in your community based on the specific trigger event from other applications.
💡 This approach is ideal for streamlining onboarding processes, enabling:
Personalized access: Grant members access to specific spaces and space groups based on your preferred criteria. For example, multiple cohorts.
Map profile fields: Map profile information from external apps to their Circle member profile seamlessly.
Customize profile: Automatically include their profile image, apply member tags, and configure basic settings like direct messaging and content moderation flags.
To achieve this, configure a Zap with a trigger event from your preferred application. Choose the Invite member action for the Circle app to set up access parameters, including spaces, space groups, tags, profile fields, and member profile settings for the new member invite.
❗Important: Since members already have the login credentials from their SSO provider account, they do not need to accept community invitations. Hence, we recommend skipping the invitation email for the Invite member action to eliminate any confusion. When you are configuring the Zap action, in the action step, choose True for the Skip invitation email field.
With this automated process, members no longer need to take additional steps to gain access to community spaces. The Zap is triggered when they perform specific actions, automatically setting up their member record with access on Circle. Once they log in to the community for the first time, we automatically update their member profile and access based on the Zap configuration.
For instance, suppose you have two member groups in your SSO account: teachers and students. During their account onboarding on your SSO platform, set up a Typeform for users to complete, incorporating a question about their role (student or teacher). The response to this question in Typeform determines their community access via Zapier.
📚 To learn more about setting up automation for onboarding SSO members to certain spaces and space groups within your community, see our detailed guide on Automate SSO member onboarding using Zapier.
Automate space and space group access using Circle API
You can automate the member onboarding using our Circle API with the help of a developer. To achieve this using API requests, go to our API documentation.
💡 If you have developer resources to create custom solutions, this approach is ideal for streamlining onboarding using our API:
Personalized access: Grant members access to specific spaces and space groups based on your preferred criteria—for example, multiple cohorts.
Map profile fields: Map profile information from external apps to their Circle member profile seamlessly.
Customize profile: Automatically include their profile image, apply member tags, and configure basic settings like direct messaging and content moderation flags.
In the API documentation, click Members and select POST Invite member. Use the POST method in Members API, which lets you invite community members, including their profile fields.
💡 Tip: Check out the Notes section in our API documentation for additional information about this endpoint.
❗Important: Since your members already have the login credentials from their SSO provider account, they do not need to accept community invitations. Hence, we recommend skipping the invitation email to eliminate any confusion. You can achieve this by including the skip_invitation=true flag in your API request.
Automate space or space group access using Workflows
Circle workflows are another great option to automate member access to spaces and space groups when they sign in to the community for the first time via SSO.
💡 This approach is ideal for:
Automating certain tasks based on specific events within Circle. For example, apply a Learner tag to members when they join a specific course space.
Scheduling or manually running bulk actions for specific audiences. For instance, add members with a Beginner tag to the Welcome space group in your community.
To achieve this, set up the Member joined community event and Add a member to space group or Add member to space action when setting up the automation workflow.
Additionally, you can use workflows to automate adding new members to a paywall trial once they join the community. You can achieve this by setting up the Member joined community event and Subscribe to paywall trial action when setting up the automation workflow.
As a result, when your member signs in for the first time through SSO and accesses the community, the workflow will automatically execute the action to provide access specified in the workflow.
📚 To learn more about how you can use workflows to automate tasks, schedule bulk actions, or manually run bulk actions, check out the Workflows section in the Help Center.
Manually invite members
While SSO-enabled communities typically favor automated processes, you still have flexibility in inviting members manually using one of our built-in invitation methods.
ℹ️ Note: Please keep in mind that since these methods are not automated, it may not align seamlessly with the dynamic of SSO-enabled communities. If a member tries to sign in to the community before you have manually added them to the community, they may not be able to receive access as you intended. Hence, you need to ensure that you send them the invite using these methods before they sign in for the first time for a smoother experience.
Here's a breakdown of the manual invitation options:
Invites: Our invite feature helps you invite individuals or multiple members together. You can invite them by manually entering their emails or by bulk importing via a CSV file.
Invitation links: The invitation link allows you to create a sign up link to provide free access to specific spaces and space groups, create a trial paywall subscription, and apply member tags when a new member joins your community using the link.
💡 Tip: You can utilize these invitation methods to seamlessly enroll your members in a paywall trial.
❗Important: Since your members already have the login credentials from their SSO provider account, they do not need to accept community invitations. So, we recommend skipping sending the invitation email to eliminate any confusion. You can achieve this by clicking Add without invitations instead of Send invites when adding members via the invite method.