Setting up a new course space
Last updated: July, 2026
About course spaces
Courses are dedicated spaces within the community, just like other space types such as posts and events. You can create a standalone course space within a space group or integrate it with other space types within a group to offer a more seamless learning experience. This flexibility allows you to structure courses to best fit your community’s needs.
There are three types of course spaces you can choose from:
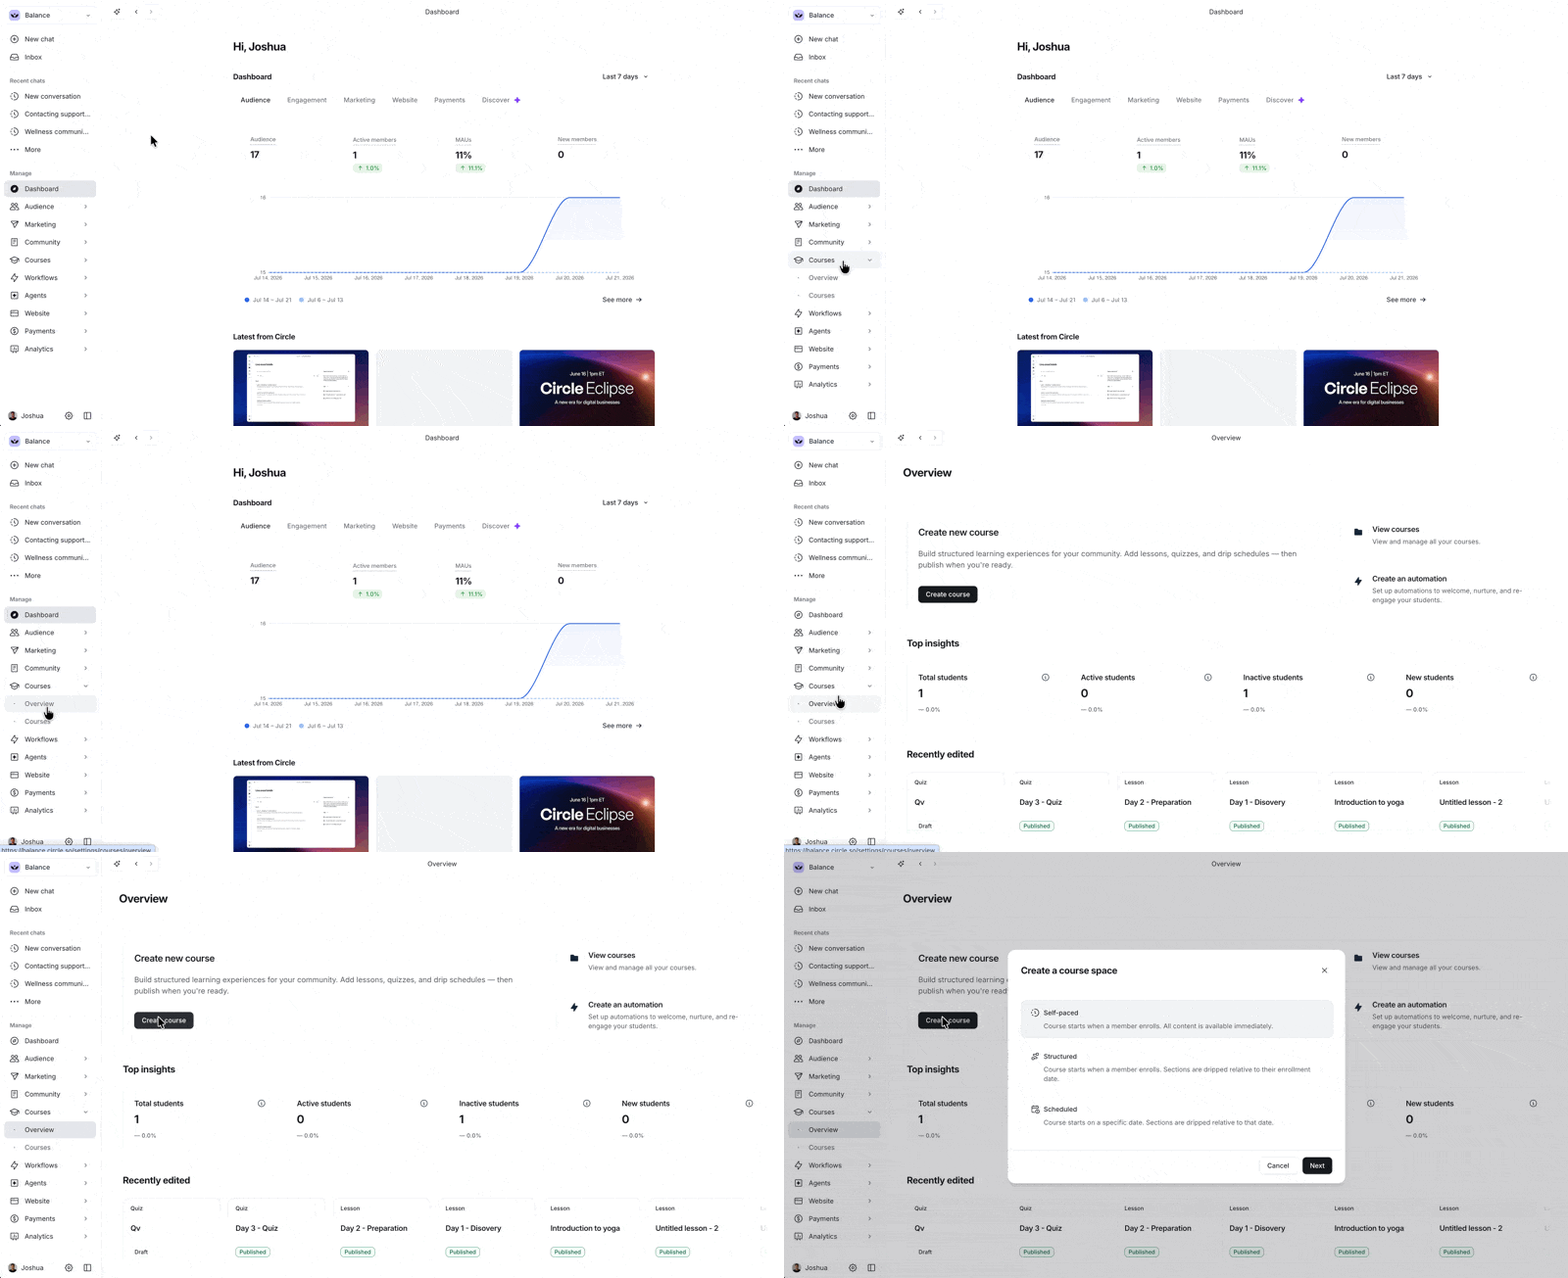
Self-paced: Choose this type if you wish to grant students immediate access to all course content upon enrollment, allowing them to learn at their own pace.
Structured: If you prefer to gradually release course sections based on student enrollment, this course type is the way to go. With this option, you can drip course sections after certain days relative to each student’s enrollment date.
Scheduled: This is an ideal course type when you want to set a predetermined schedule for releasing each section, so that sections drip on a specific date for all students.
Create a course space
Hover over a space group, click the ➕ icon, and select Create space.
-
Select Course from the Create a course dialog and click Next.
-
You can also create a course space from the Courses overview page in the AI sidebar.
-
Select your preferred course type and click Next.
-
Configure essential space details:
Select a space Icon: Add an icon to display in your community's left sidebar and space header. For more information, see Set up a space icon.
Enter the name of the space: Name your course space.
Select space group: The space group will be pre-filled based on where you initiated the new space. However, if you change your mind, you can choose a different space group from the dropdown.
Add a course thumbnail: Upload a thumbnail image to be displayed on the course card in the course directory. We recommend an image aspect ratio of 16:9 and a minimum image size of 800x450 px.
-
(Optional) Add members from this space group: Enabling this toggle will automatically add everyone who is a member of the space group.
ℹ️ Note: This setting is only available to communities created before January 29, 2025. If you are using access groups, this setting will grant manual space access to these members separate from the access group. This means that the space grant given through this setting will appear under the Manually added section within the members' account (the Edit account page).
Click Create space.
ℹ️ Note: Course spaces are created in draft mode. Draft your course content in private, hit publish on individual lessons, and publish your course space from space settings only when ready.
📚 For more information about course space customization, see Customize course space settings.
Build courses with Circle AI
Circle AI can turn your existing content into a complete course, complete with modules, lessons, and quizzes. You can input a prompt describing your course structure and content, and Circle AI builds the course for you.
To access Circle AI:
Click the dropdown icon next to your community name (or logo) in the top-left corner.
Select Circle AI or New chat.
Enter your prompt into the chat.
📚 For a ready-to-use prompt template you can copy, update with your own course details, and paste into Circle AI, see Build complete courses with Circle AI.
Customize course labels
You can customize Lesson and Section headings in courses to better fit your content.
You can choose from the labels below to match your course structure:
Sections can be labeled as Chapter, Level, Module, Part, Path, Phase, Section, Stage, Track, Unit, or Week, or kept as the default label, Section.
Lessons can be labeled as Activity, Assignment, Challenge, Class, Day, Exercise, Lecture, Lesson, Session, Topic, Tutorial, or Workshop, or kept as the default label, Lesson.
You can update these labels globally from the courses directory settings (click the More actions (three dots) icon in the right corner of the directory navigation bar and select Options). Alternatively, you can customize them for individual courses by clicking the More actions (three dots) icon in the course dashboard, then selecting Edit labels.
It’s time to start building the course!
📚 Check out the following article to learn more about building your course curriculum: