Set up Auth0 SSO
Last updated: October, 2026
You can now integrate Circle with Auth0, making it a seamless experience for your Auth0 members to log in to your community!
Once Auth0 is implemented, members won't have to sign up or log in with their Circle account — instead, they'll use Auth0 credentials and access Circle from your login page.
Key things to consider before getting started with Auth0 setup
If you plan to use a custom domain, set that up first, as this will change your Callback URL. Not doing this first can potentially lead to being locked out of your account.
We recommend keeping the Allow members with a Circle account to sign in toggle enabled in the community’s SSO settings to avoid getting locked out of your account while setting up your SSO integration. In case this happens, you can easily sign in again with your Circle credentials.
In case you would like to turn off the Circle Sign in completely, please make sure to add your community admin account email as a user in Auth0. Upon login, Circle will automatically sync your admin email account with your Auth0 user account once it detects the same email in the system. As a result, you will be able to log in using your Auth0 user account going forward.
To set up Auth0, please follow the guide below:
Turn on the production environment
Create an API key
Create Auth0 Application
Transfer Auth0 information to Circle
Set Login URI and Callback URL in Auth0
Create a social connection
Go live with SSO in Circle
Test Auth0 setup
1. Turn on the production environment
If you haven’t already, change your tenant environment in Auth0 to Production unless you are just testing.
To change the environment:
Navigate to your Auth0 account.
-
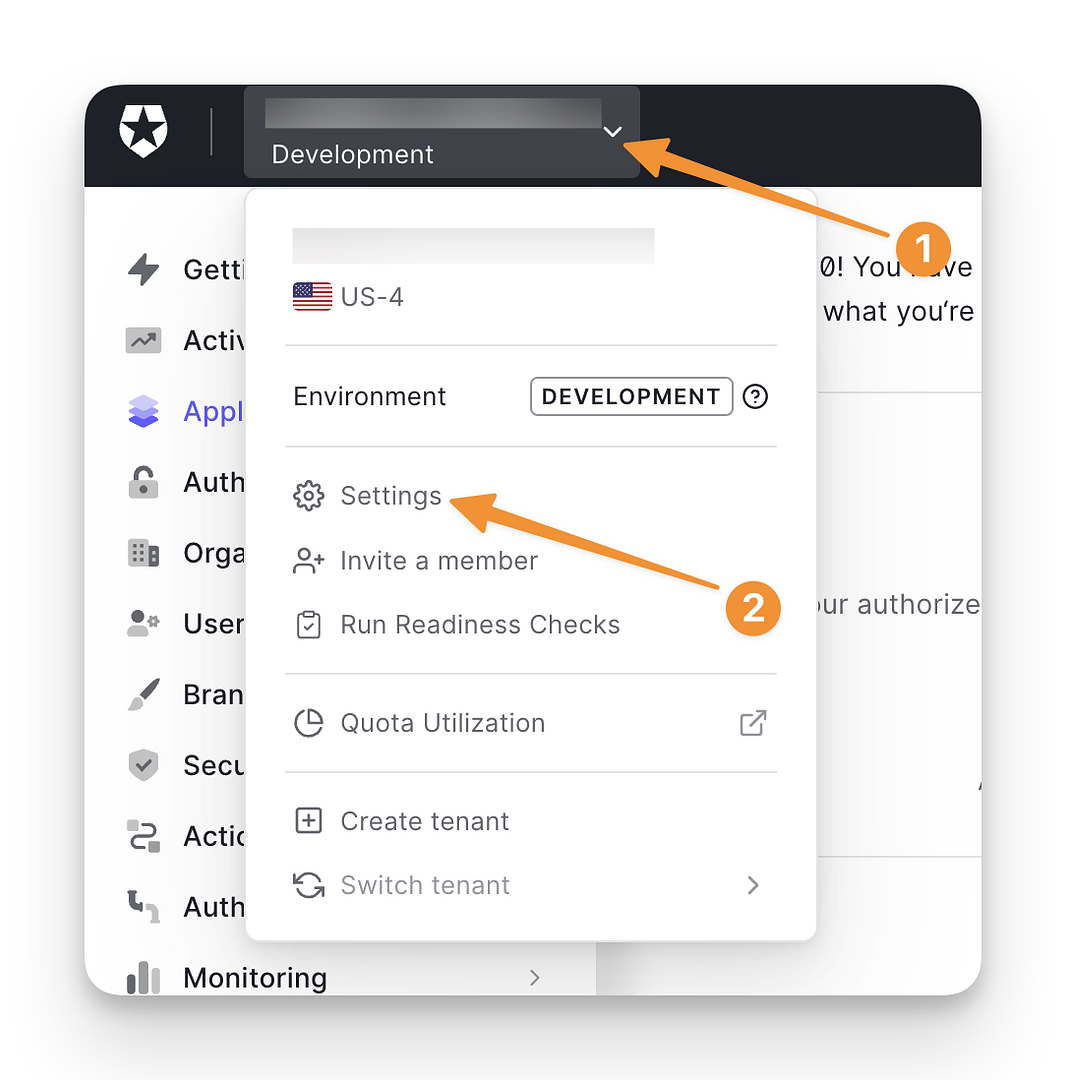
Click the down arrow beside your tenant in the top-left corner → Settings.
-
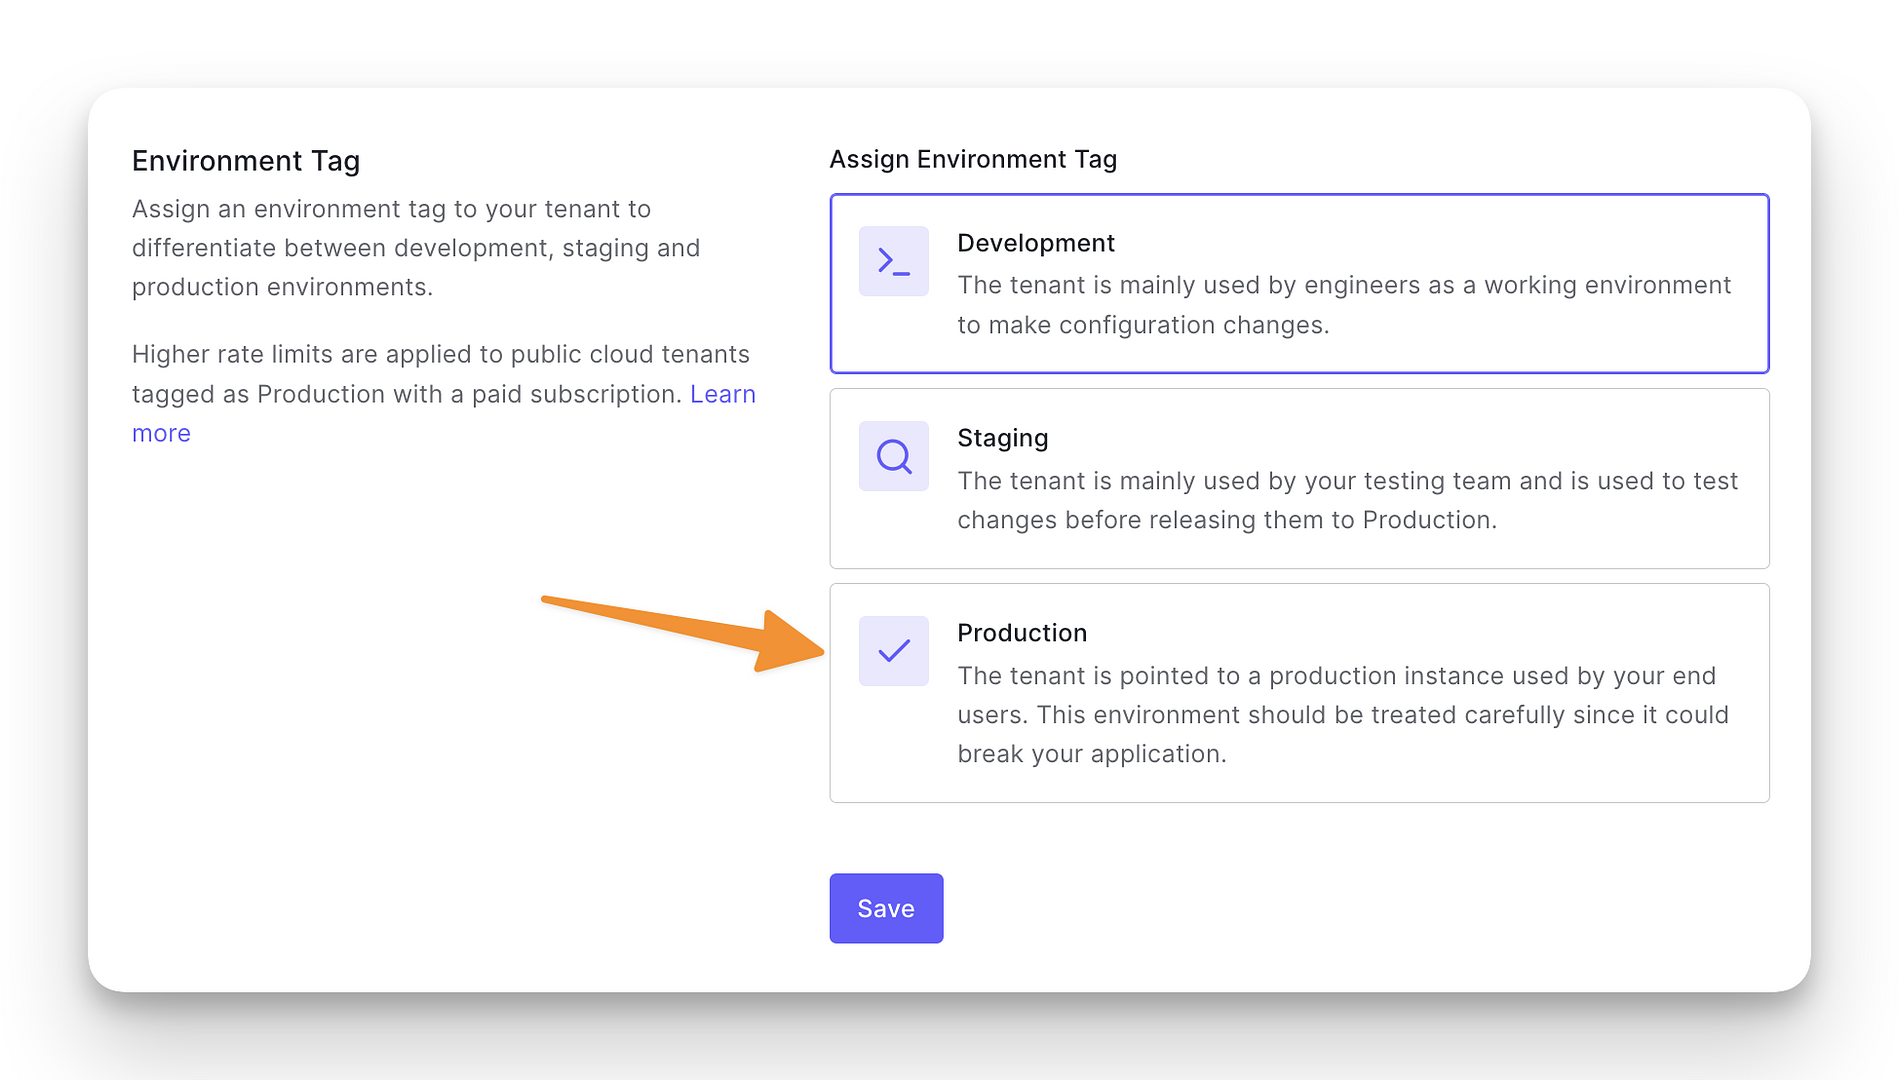
Select Production under the Environment Tag section.
2. Create an API key
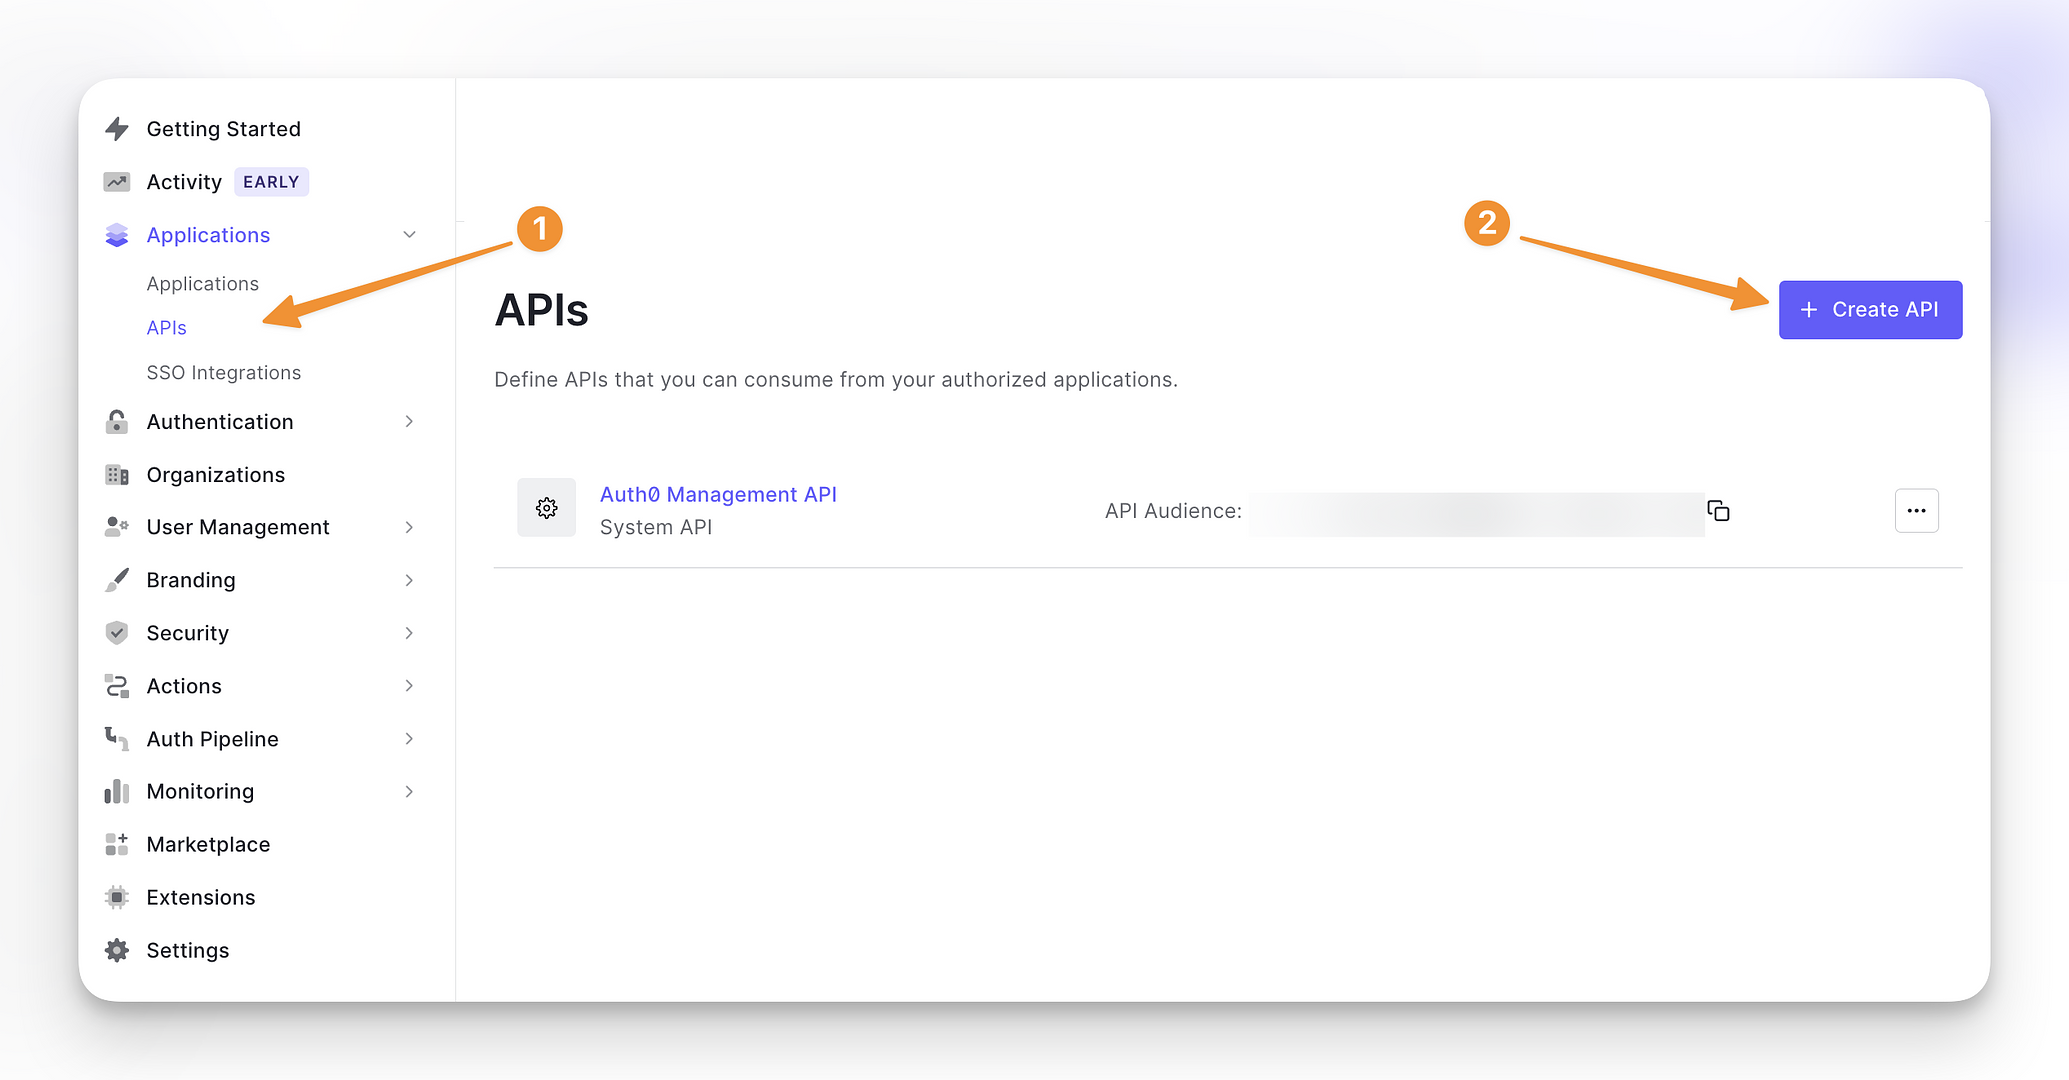
Click the Applications menu in the left sidebar → APIs.
-
Click Create API.
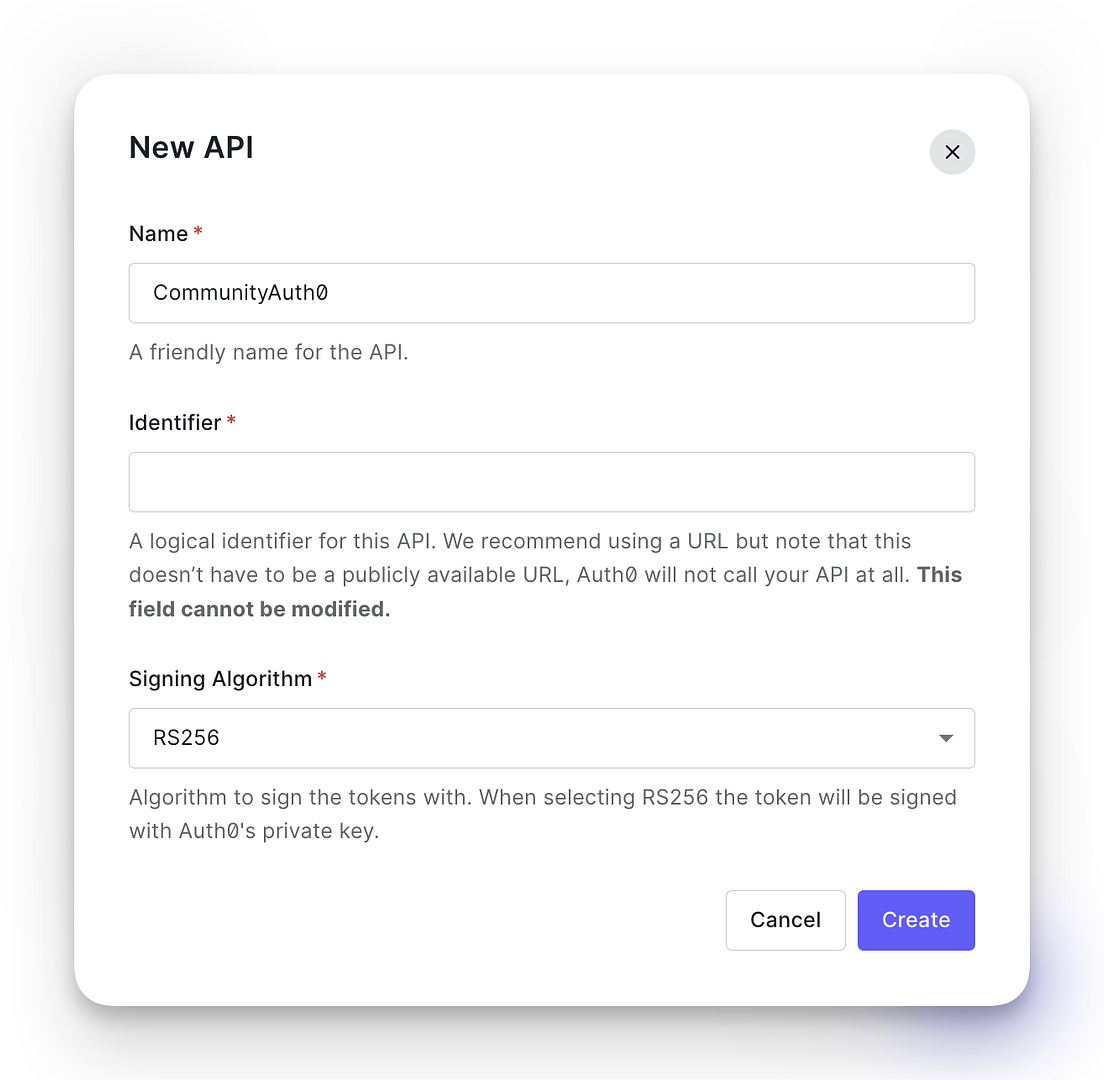
Give it a name for easy identification.
-
Add a logical Identifier: It can be your community link or Callback URL (See 5. Set Login URI and Callback URL for info on where to get Callback URL).
Click Create.
3. Create Auth0 Application
Create application
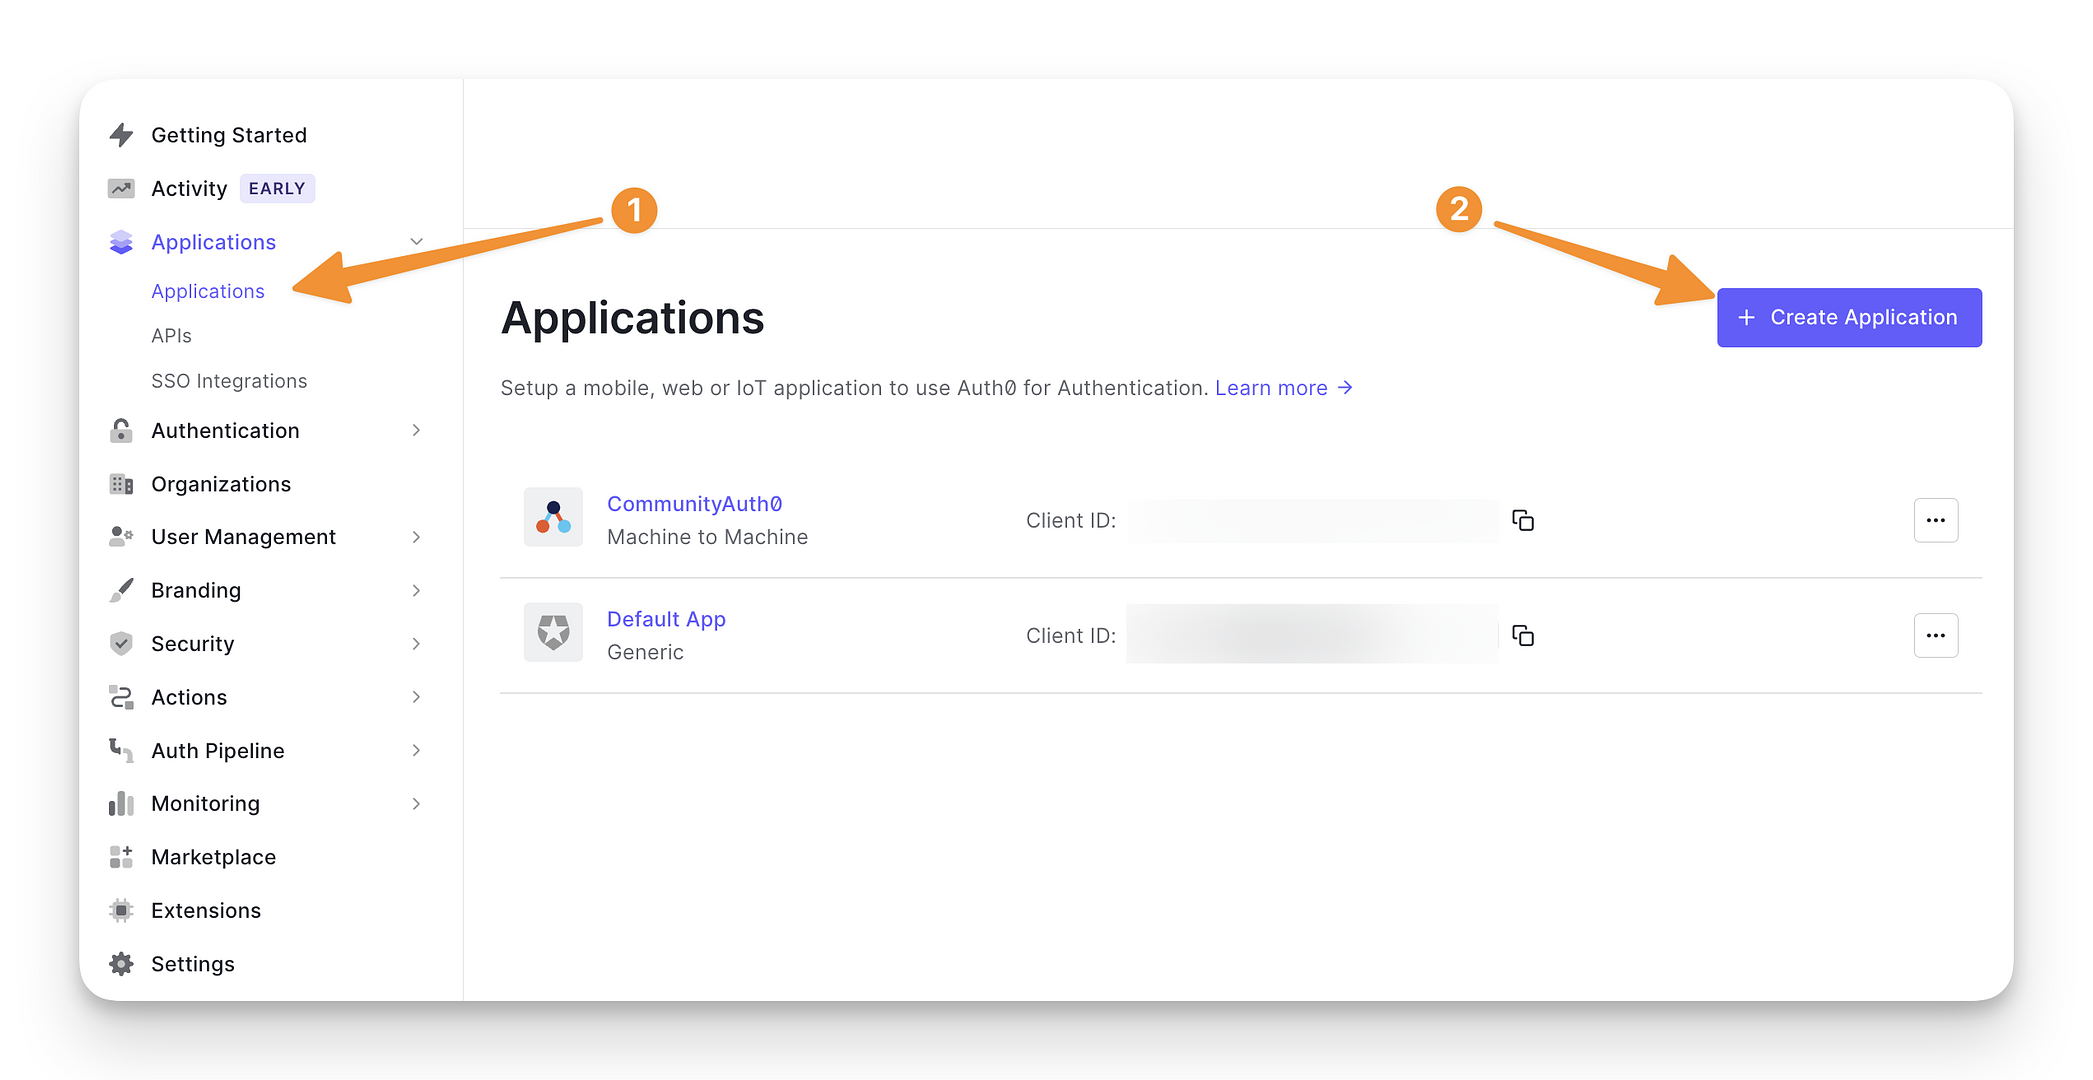
If you haven’t already, create an application for this setup in your Auth0 account:
Click the Applications menu in the left sidebar → Applications.
-
Click Create Application in the top-right corner.
Choose your preferred application type.
Click Create.
Grant permissions within the application
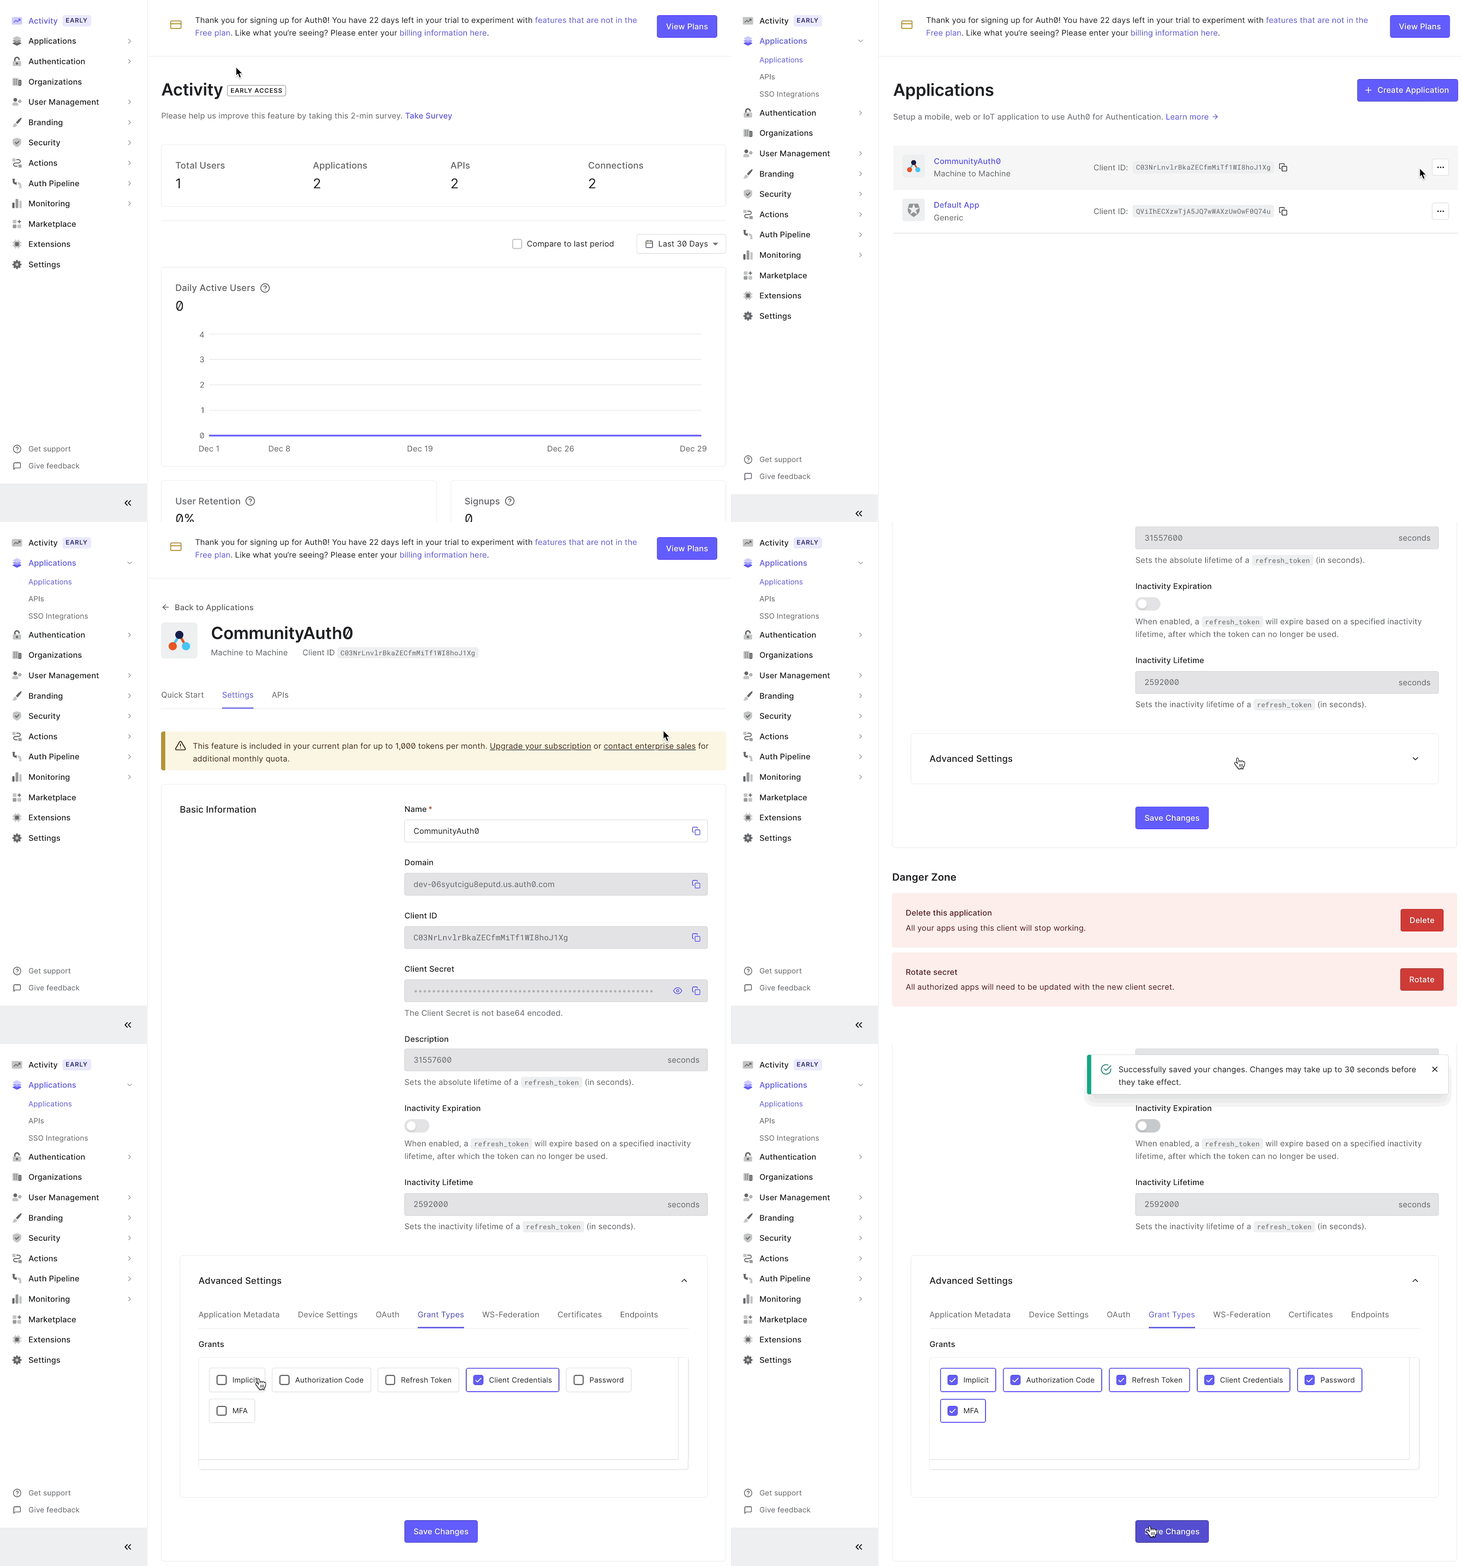
Please ensure that you have enabled appropriate grant types in your application to avoid an Auth0 error on the login page.
To manage grant types:
Click the Applications menu in the left sidebar → Applications.
Click the More actions (three dots) icon beside the application → Settings.
Scroll down to the Advance Settings option.
Select the Grant Types tab.
Select all the relevant grant types.
Click Save Changes.
Enable API
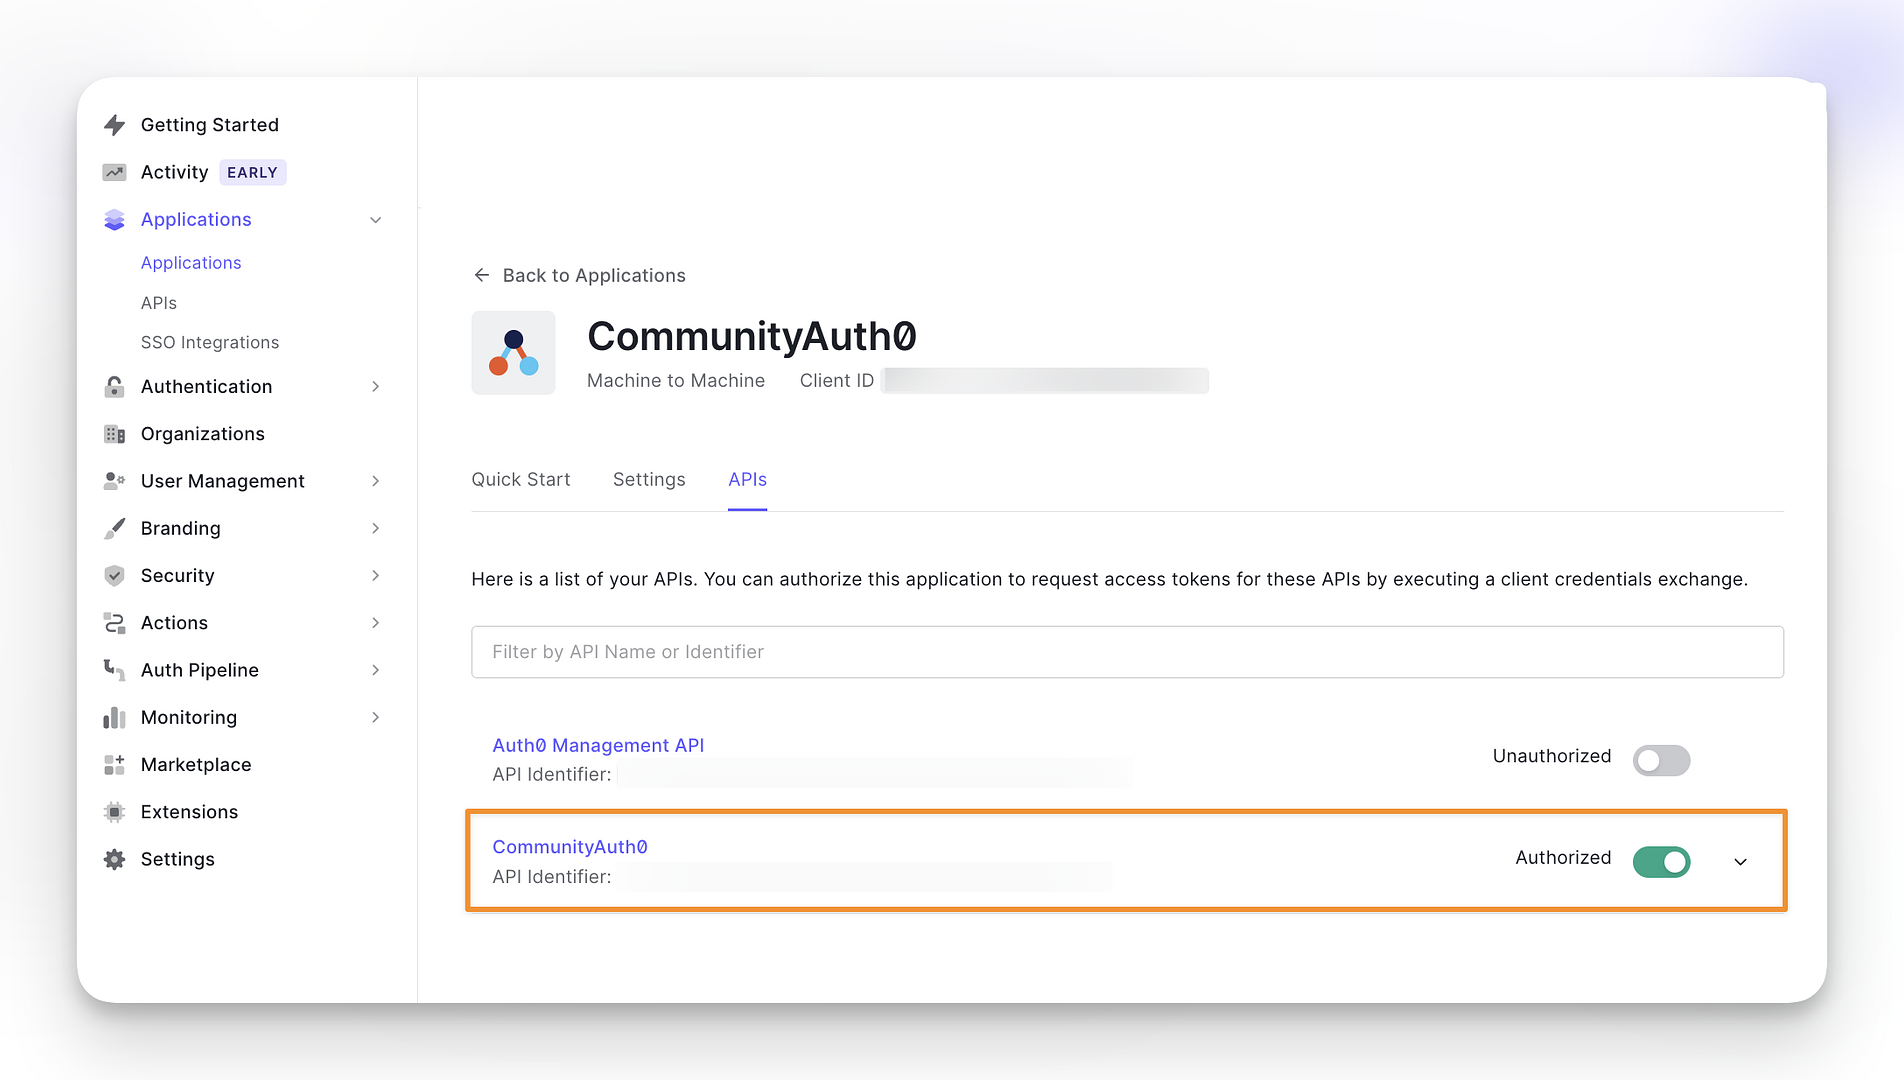
To ensure your API keys are active within your application:
Click the More actions (three dots) icon beside the application → APIs.
Toggle the API relevant to the application.
4. Transfer Auth0 information to Circle
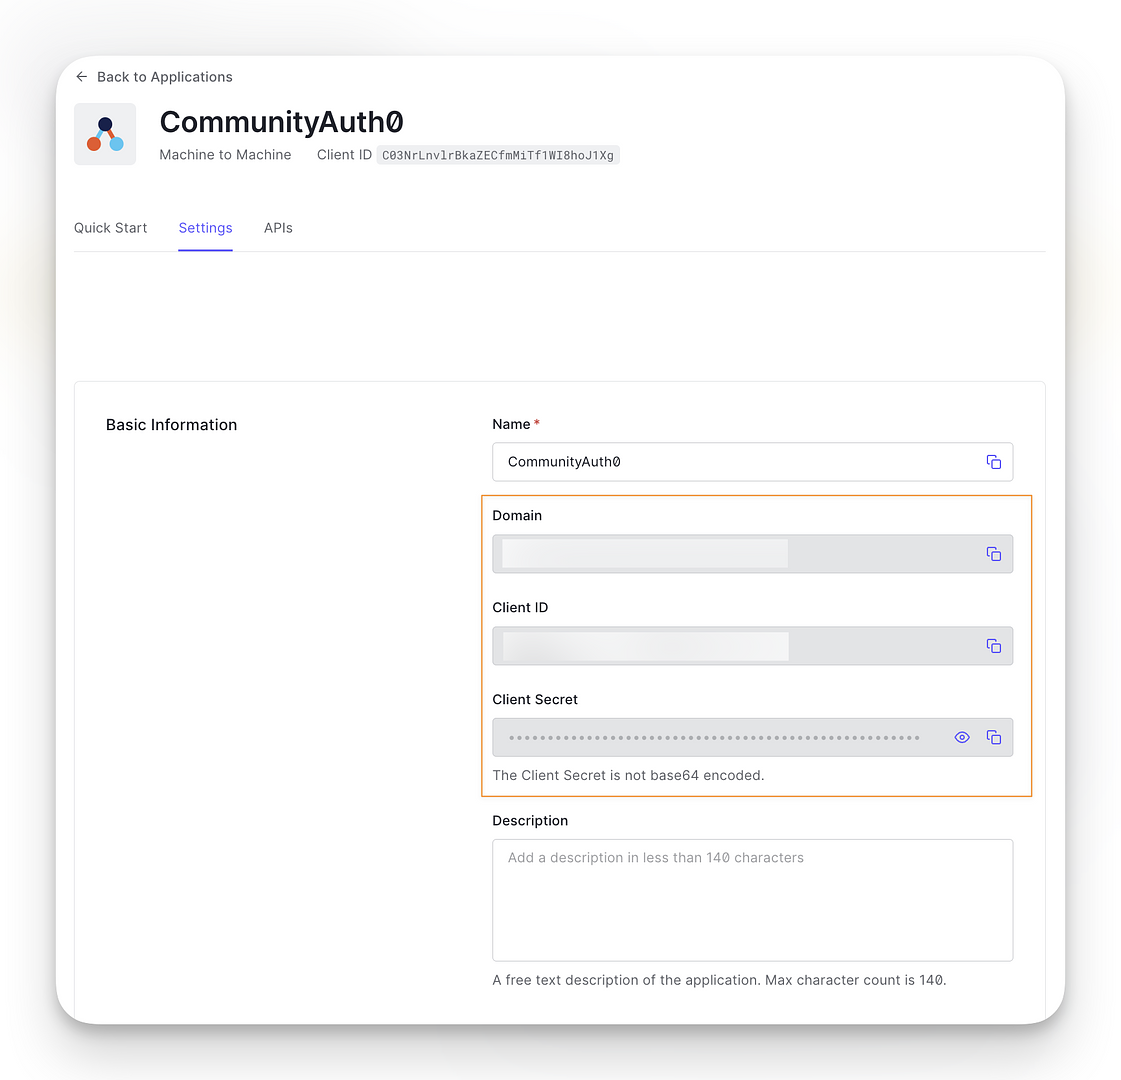
Copy basic information from the Auth0 application
Click the Applications menu in the left sidebar → Applications.
Click the More actions (three dots) icon beside the application → Settings.
-
Under the Basic Information section, copy:
Domain
Client ID
Client Secret
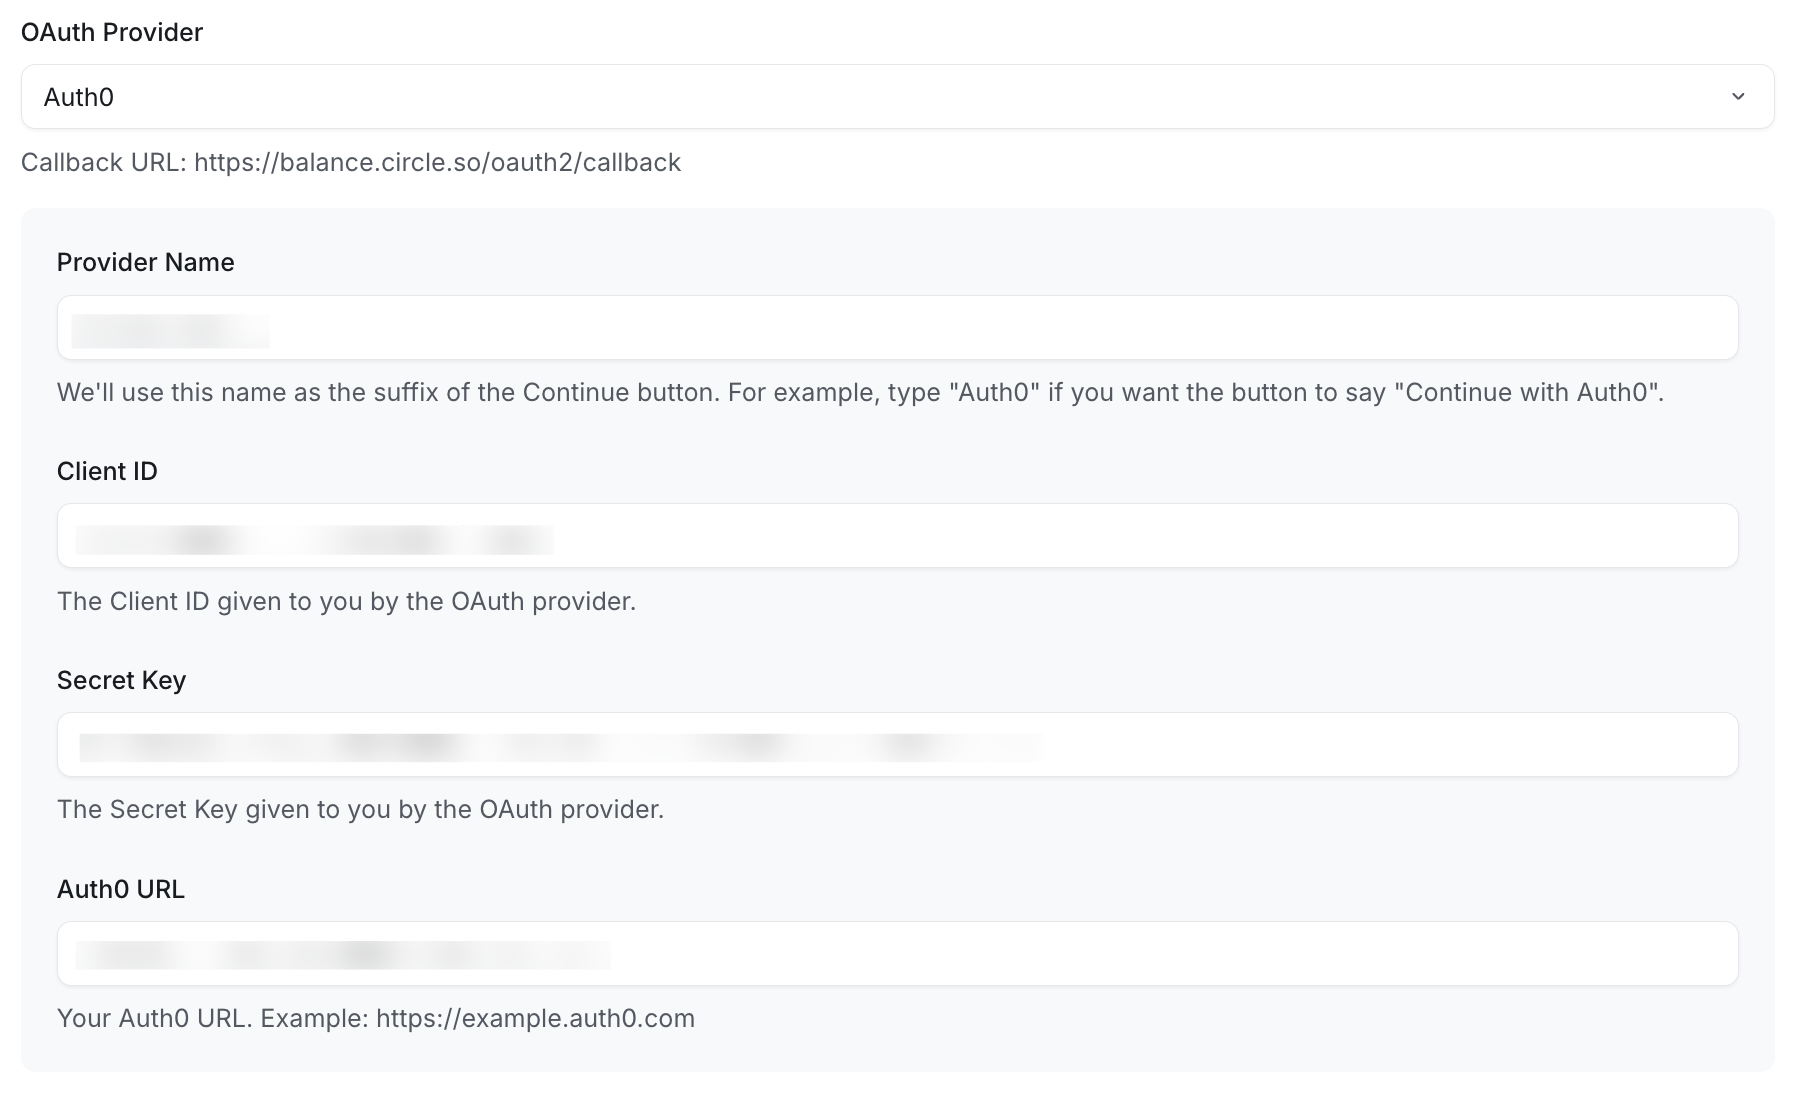
Paste application information in Circle
Navigate to your community in a separate browser tab.
Click the community name or logo (or the dropdown icon next to it) in the top-left corner and select Settings.
Scroll down to the Community section and select Single sign-on.
Scroll down to the OAuth provider section.
Paste information.
Click Save changes.
❗Important: You must add https:// to the start of your Domain link copied from Auth0. The updated Auth0 Domain link can be pasted in your Circle SSO settings in the Auth0 URL field.
5. Set Login URI and Callback URL in Auth0
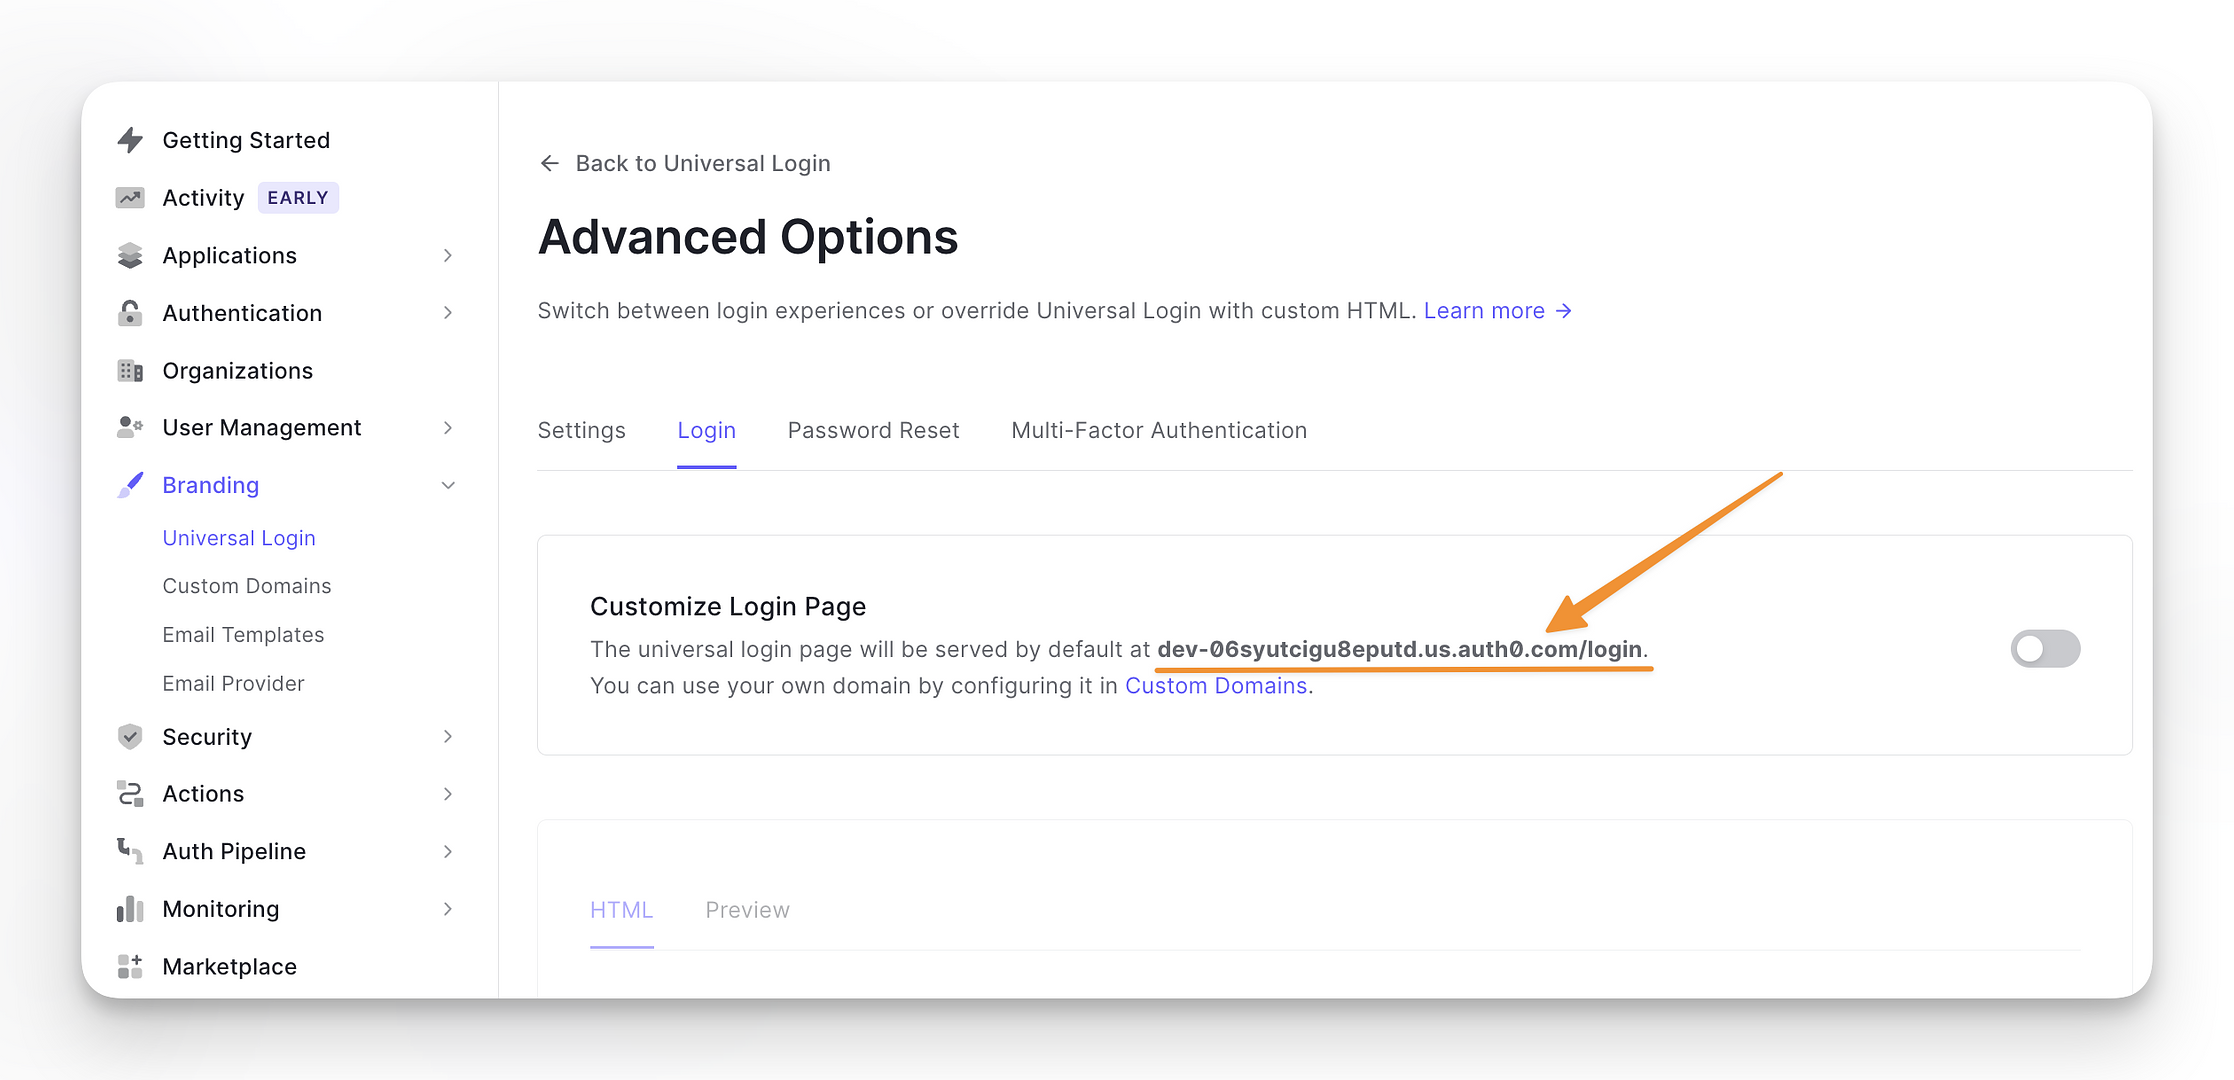
Copy Login URI
Navigate to Auth0.
Click the Branding menu in the left sidebar → Universal Login.
Scroll down and select Advance Options.
Click the Login tab.
Copy the Login URI from the Customize Login Page toggle.
Copy Callback URL
Navigate to your community.
Click the community name or logo (or the dropdown icon next to it) in the top-left corner and select Settings.
Scroll down to the Community section and select Single sign-on.
Scroll down to the OAuth provider section.
Copy the Callback URL.
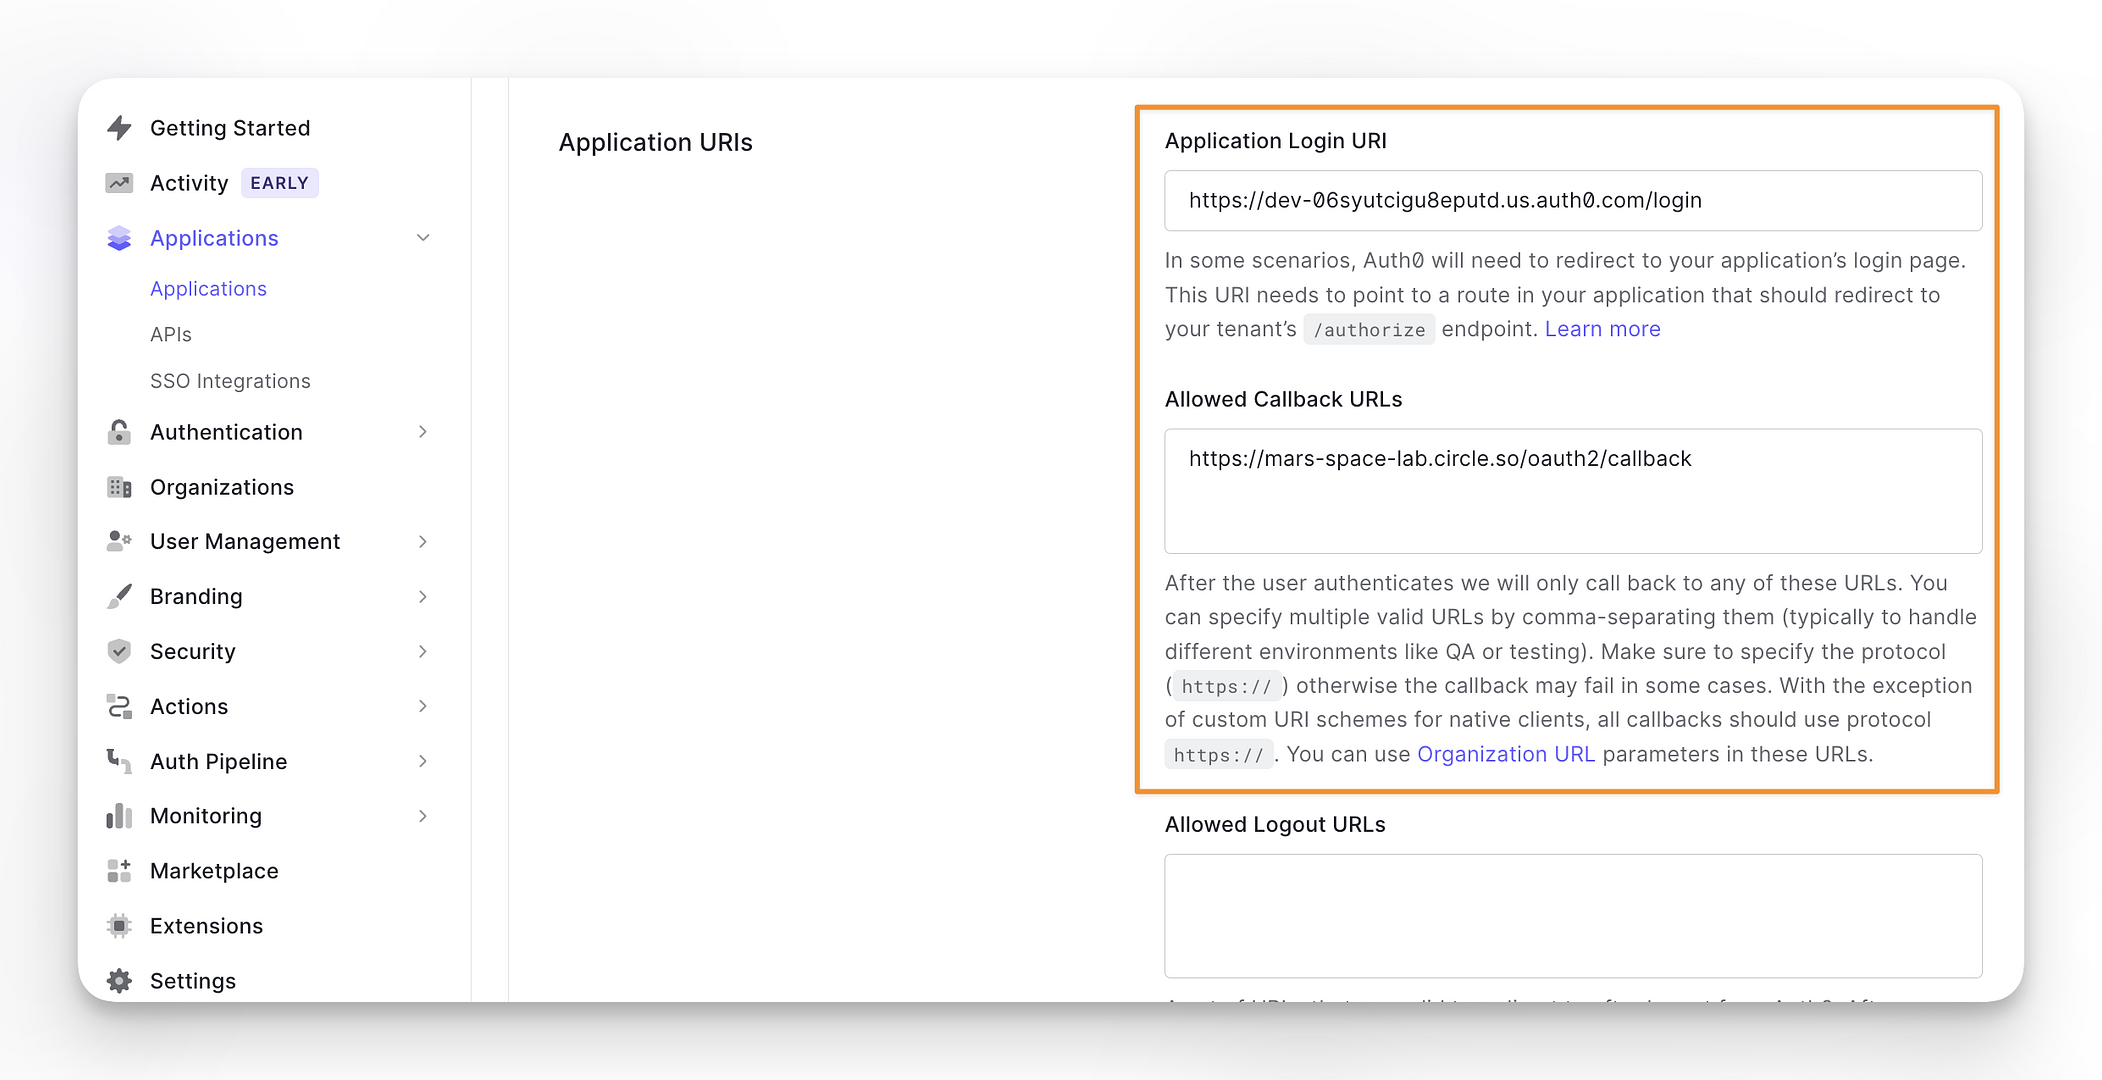
Paste the Login URI and Callback URL in the Auth0 Application
Click the Applications menu in the left sidebar → Applications.
Click the More actions (three dots) icon beside the application → Settings.
Scroll down to the Application URIs section.
Paste both links and save the changes.
ℹ️ Note: Make sure you add https:// before the Login URI to avoid error when saving changes.
6. Create a social connection
❗Important: Before going live with the Auth0 setup, we suggest removing any social connections that are in development mode or that you no longer need.
To create social connection in Auth0:
Click the Authentication menu in the left sidebar → Social.
Click Create Connection in the top-right corner.
Choose from the given options, or scroll down and select Custom Connection.
ℹ️ Note: Based on the social connection option you choose, you may be required to complete additional setup on the social connection's developer account or console to activate the connection.
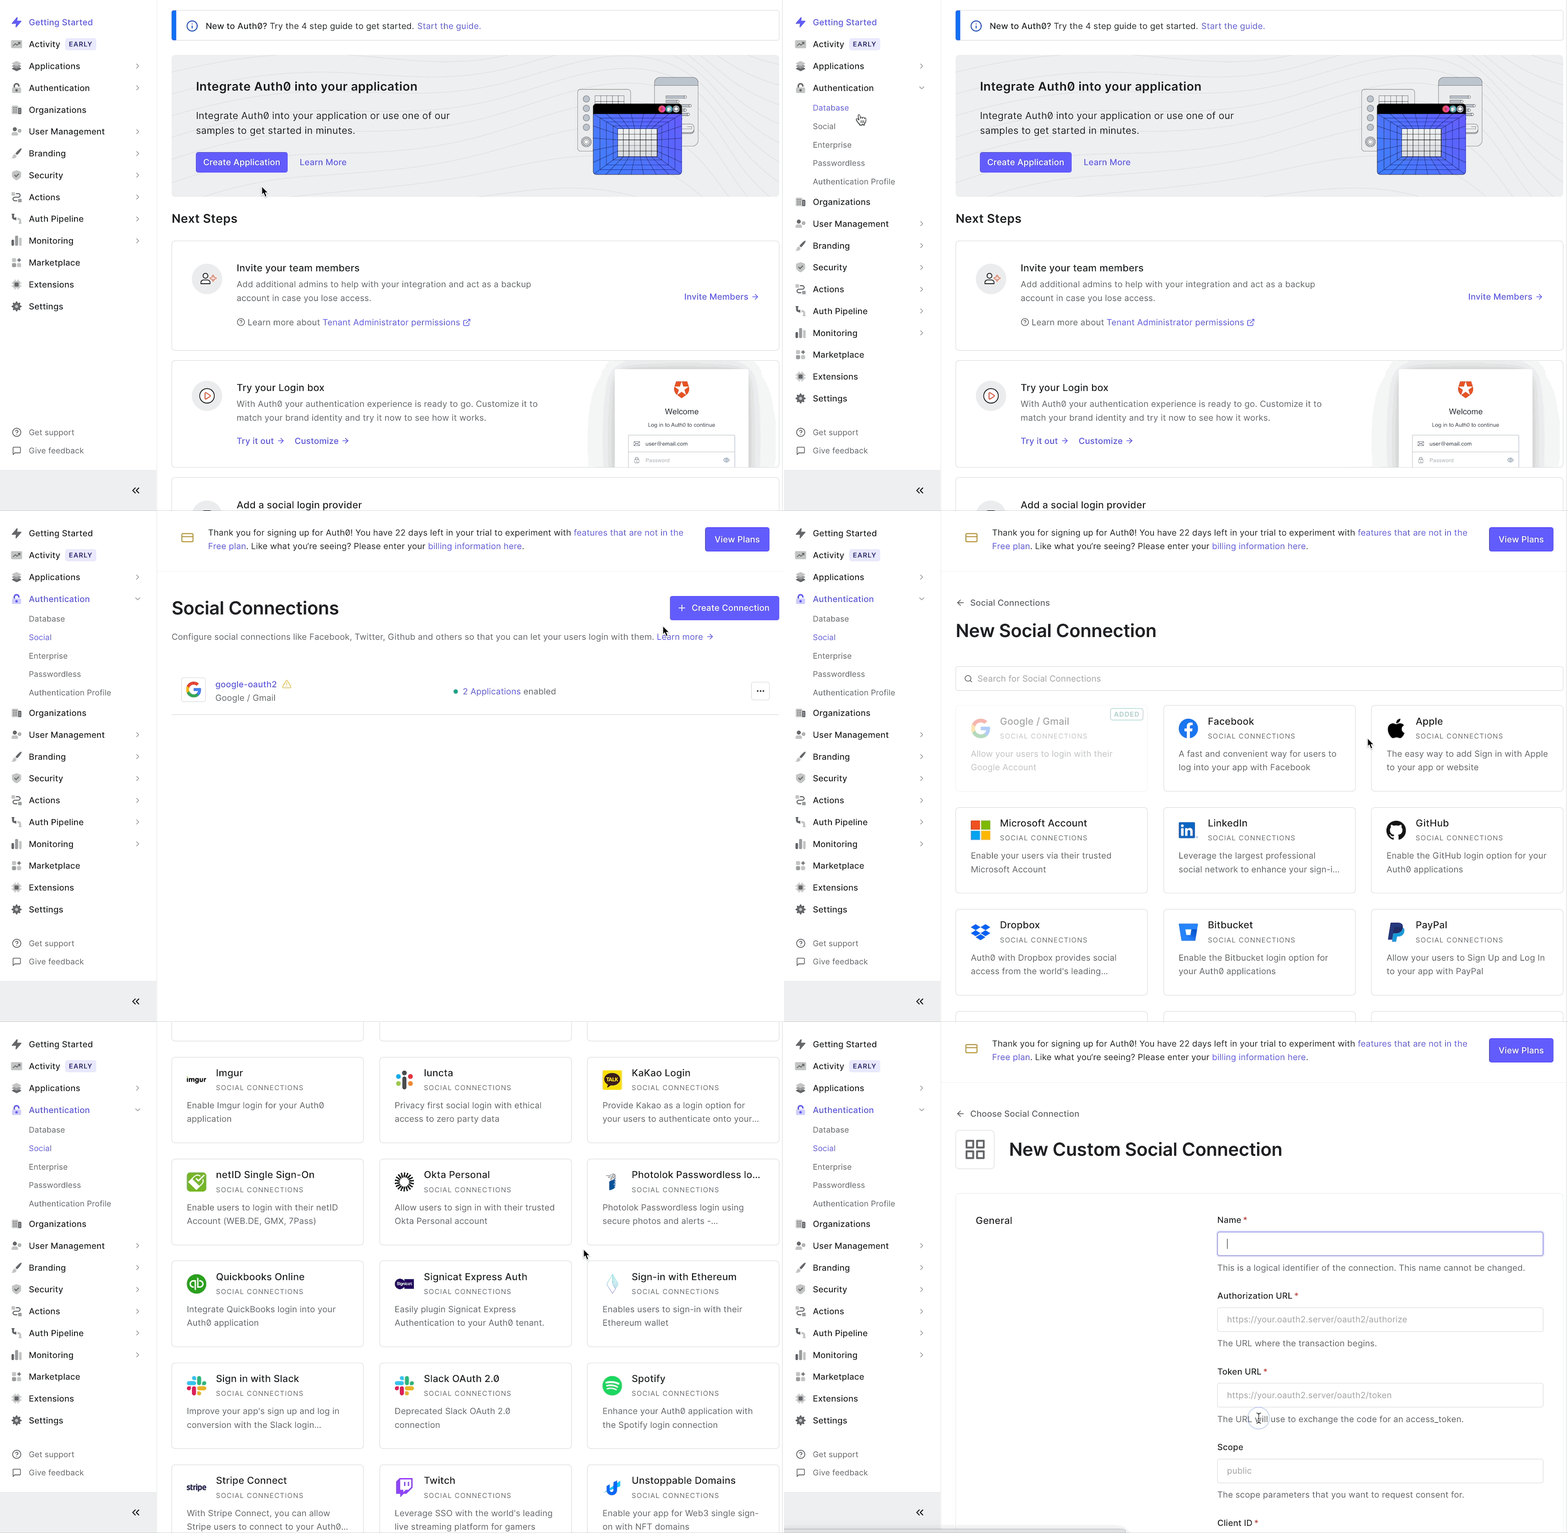
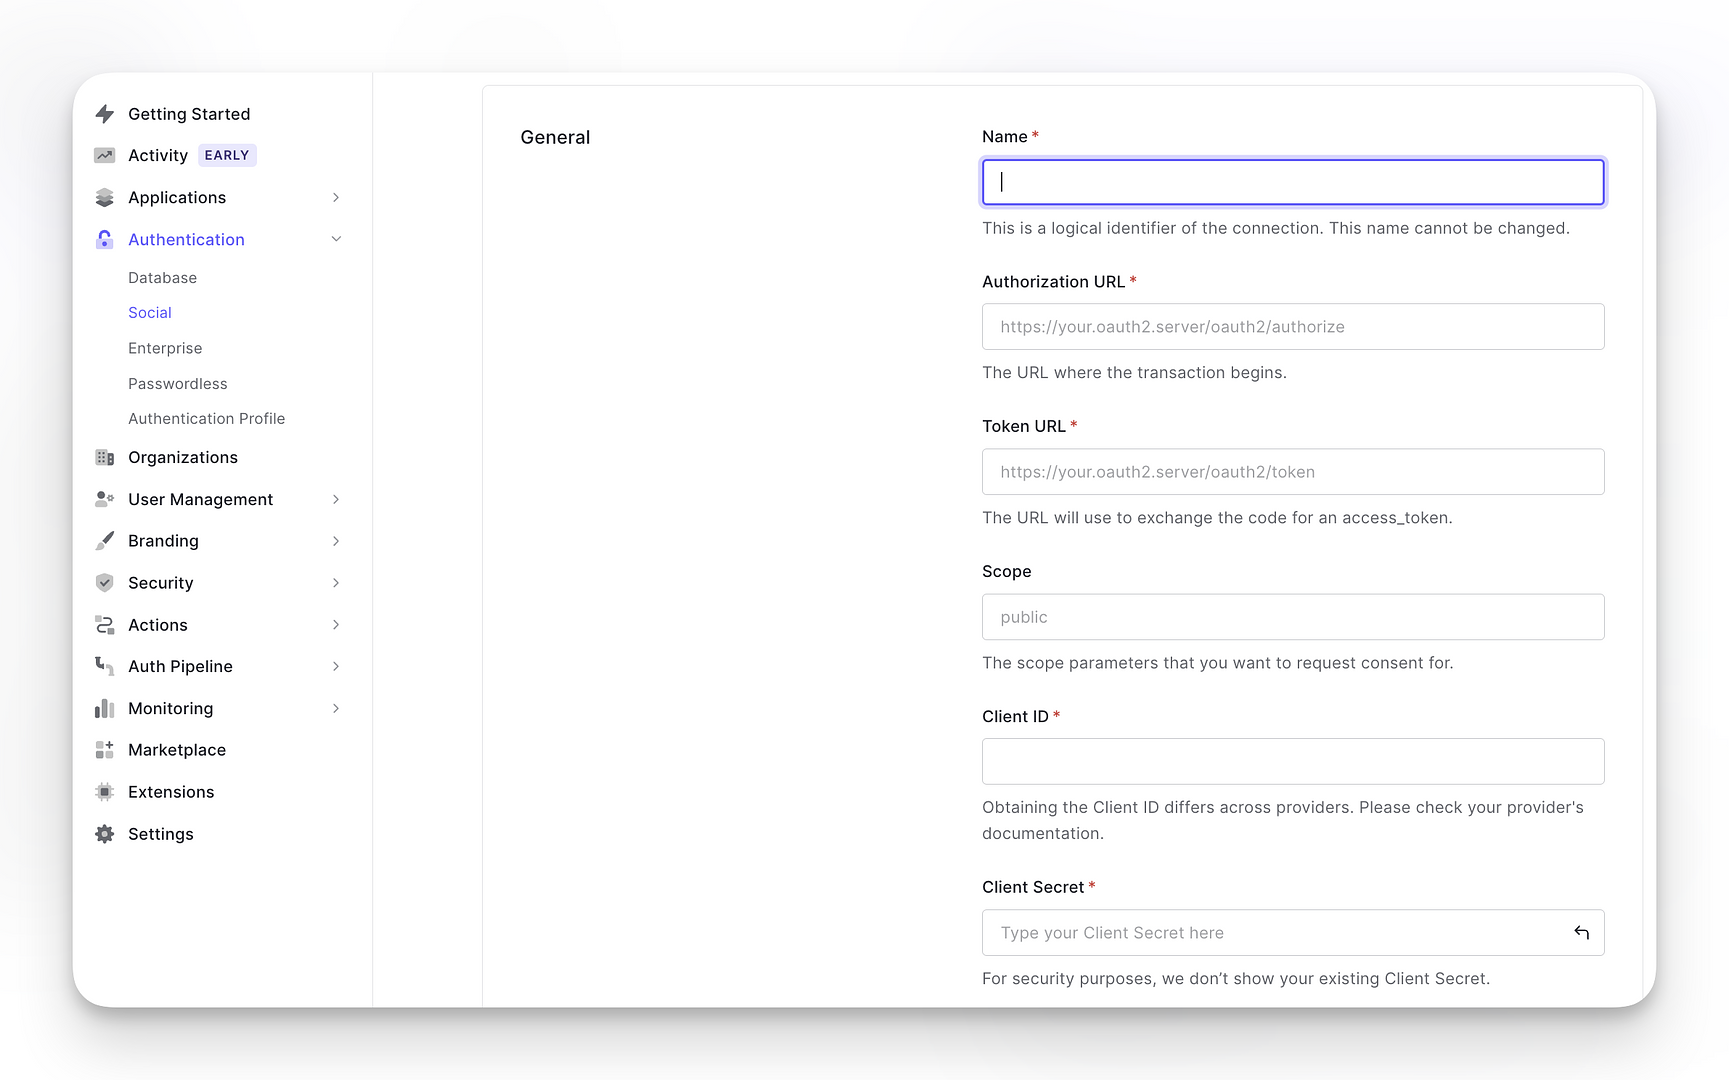
We will select Custom Connection as an example here:
Name: Add a name for this connection.
Authorization URL: Add a Callback URL from your community (copy it from Settings → SSO → OAuth provider section).
Token URL: Add Domain link from Auth0 (Applications → Settings → Basic Information) in this field along with /oauth/token at the end of the URL, e.g., https://YOUR_DOMAIN/oauth/token.
Scope: Add open profile email or openid profile email depending on your OAuth/Auth0 configuration.
Client ID: Add Client ID from your Auth0 account (Applications → Settings → Basic Information).
Client Secret: Add Client Secret from your Auth0 account (Applications → Settings → Basic Information).
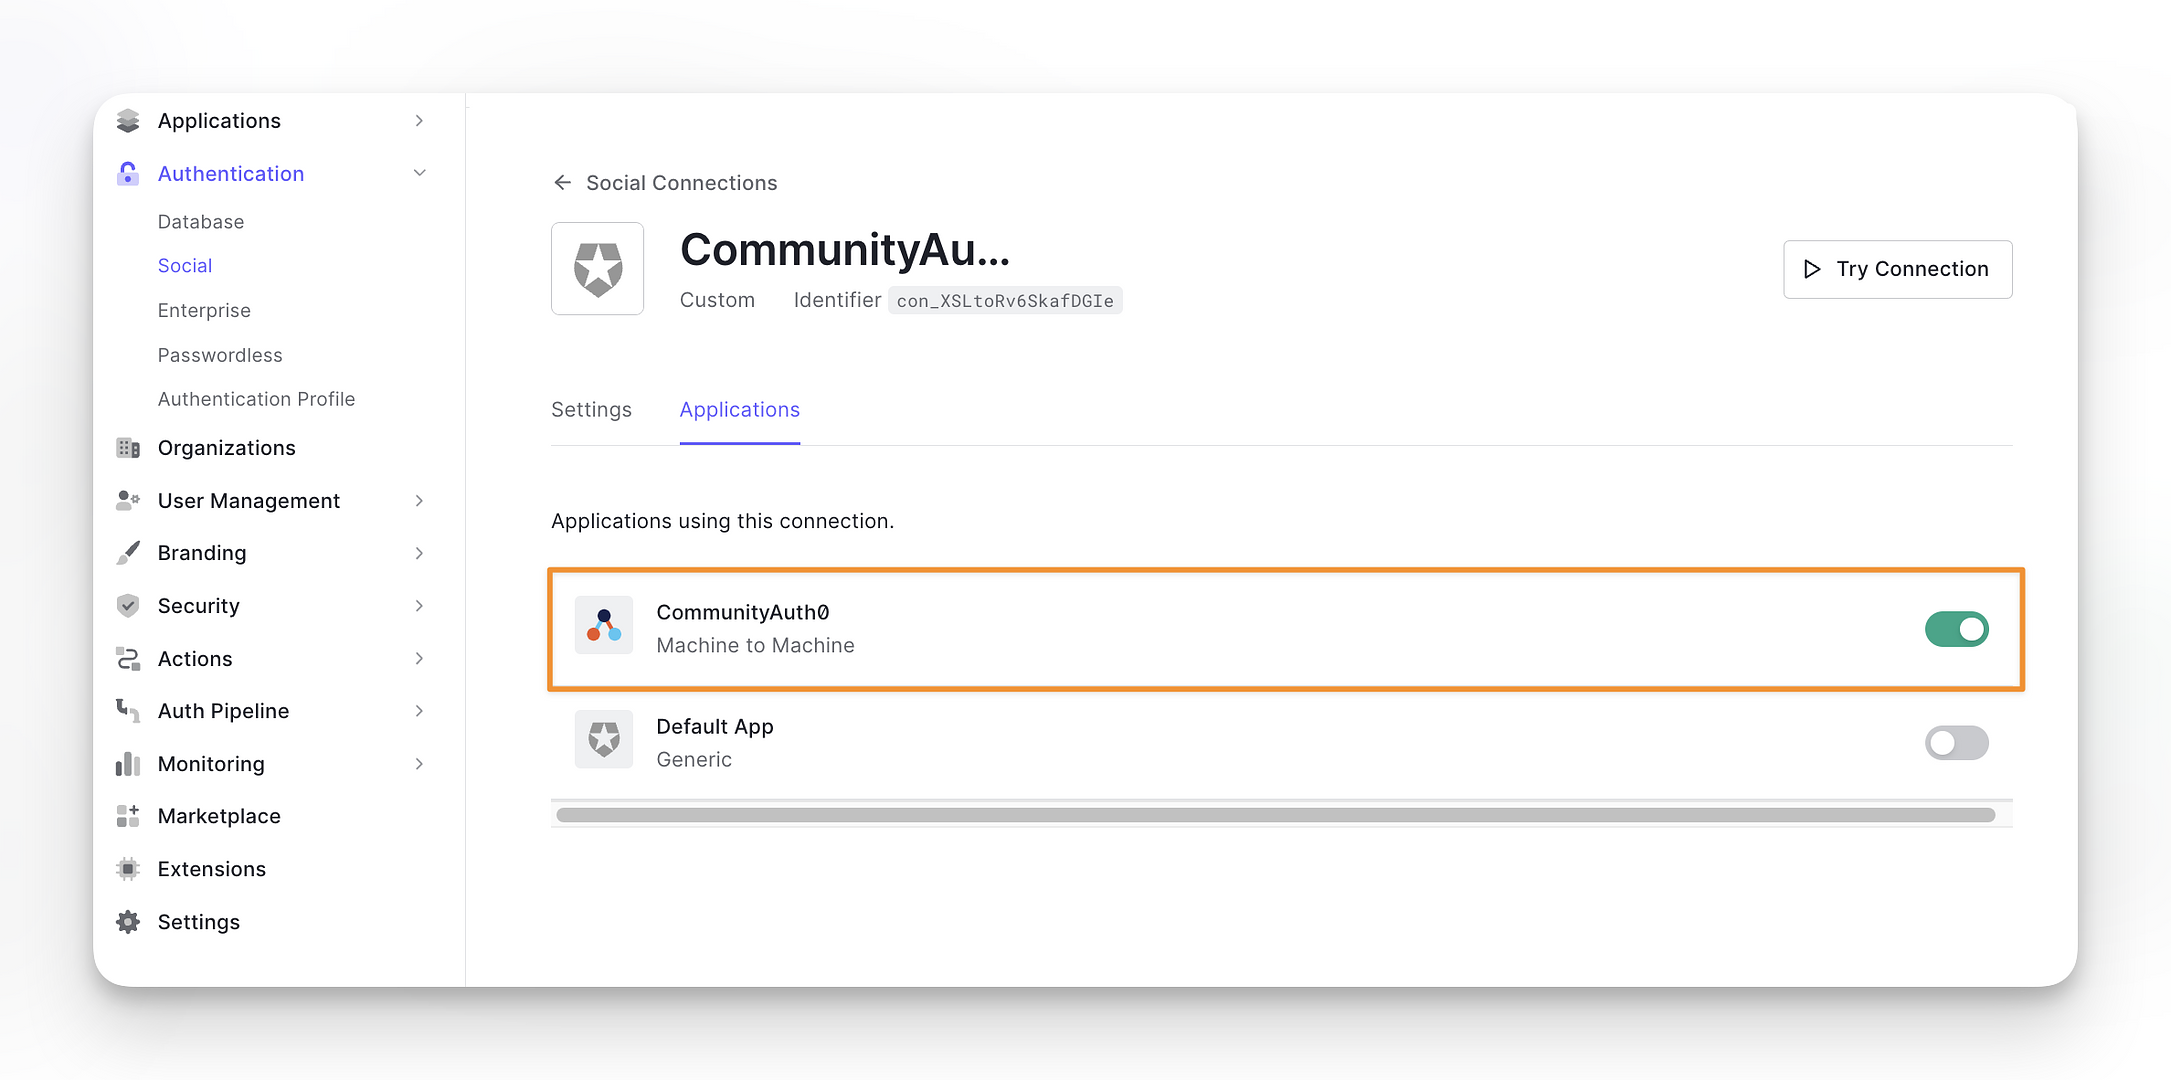
❗Important: Once you have created the social connection, make sure to enable it under Applications tab by turning on the toggle 👇.
7. Go live with SSO in Circle
Navigate to SSO settings in your community:
Click the community name or logo (or the dropdown icon next to it) in the top-left corner and select Settings.
Scroll down to the Community section and select Single sign-on.
Enable SSO
Toggle the Enable SSO option to go live.
Allow members with a Circle account to sign in
You can keep this enabled to allow your members with a Circle account to sign in. If enabled, you will see both Auth0 and Circle login options on your login page and can use the Circle option if your initial SSO setup does not work.
❗Important: In case you would like to turn off the Circle Sign in completely, please make sure to add your community account email as a user in Auth0.
Upon login, Circle will automatically sync your admin email account with Auth0 user account once it detects the same email in the system. As a result, you will be able to login using your Auth0 user account going forward.
Allow members to sign up via a custom URL
You can enable this option if you would like to keep the sign up option visible in your community and redirect users to a custom sign up URL.
❗Important: Custom sign up option will only be visible if one of these options is enabled:1. You have set your community to public.2. You have enabled Allow members with a Circle account to sign in.
💡 Tip: Members will also have the option to sign up via the Auth0 application on the login page.
Skip profile confirmation step
You can enable this option if you would like to skip the profile creation step for your members with preset name when they sign in to the community via SSO for the first time.
Enable state param
Enabling the state parameter enhances security by storing information in the session, adding it to the authorization URL, and verifying that the OAuth provider sends back the correct state parameter in the callback.
8. Test Auth0 setup
Once you have set your preferences and enabled SSO in your community, test the Auth0 setup by creating a test user.
Create test user
Navigate to your Auth0 account.
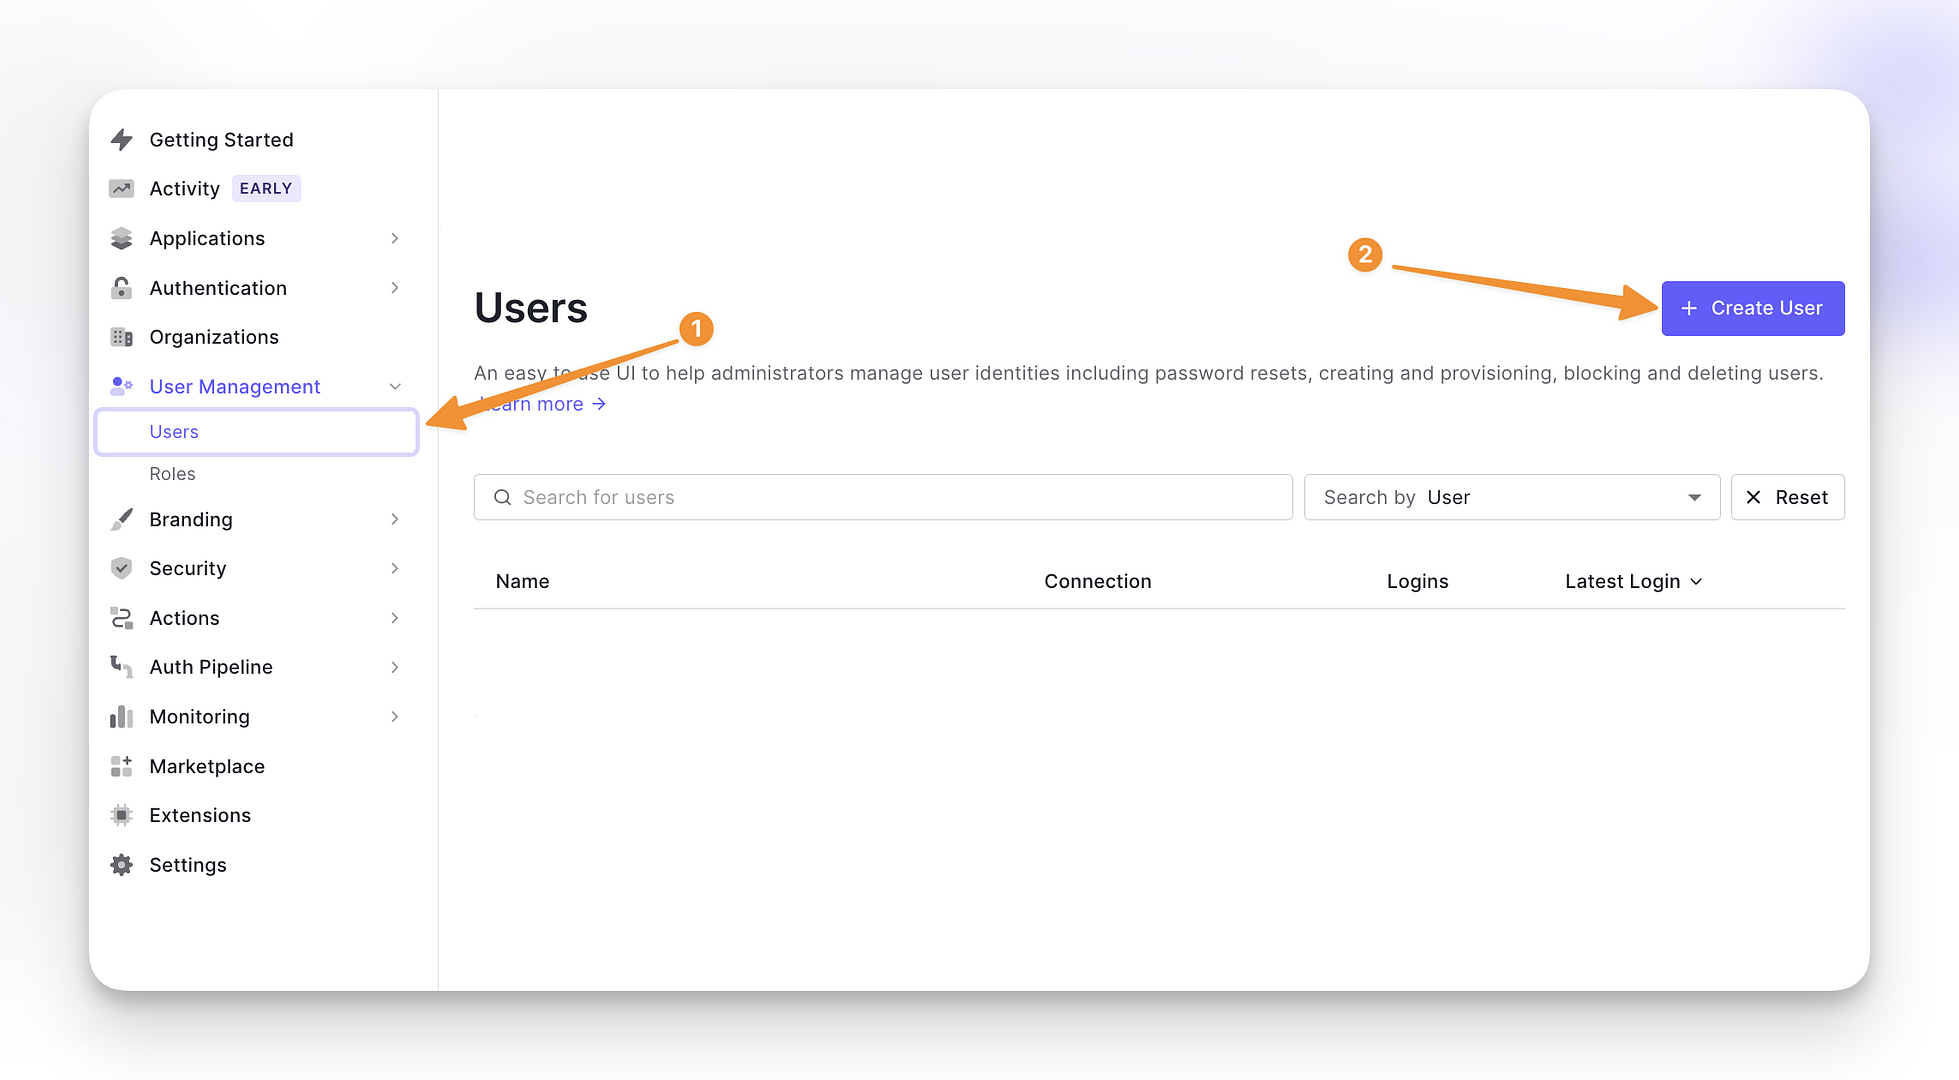
Click the User Management menu in the left sidebar → Users.
Click Create User.
Auth0 sends a verification email for this user to activate the account. Verify your user email by navigating to your email account.
Check out the community login
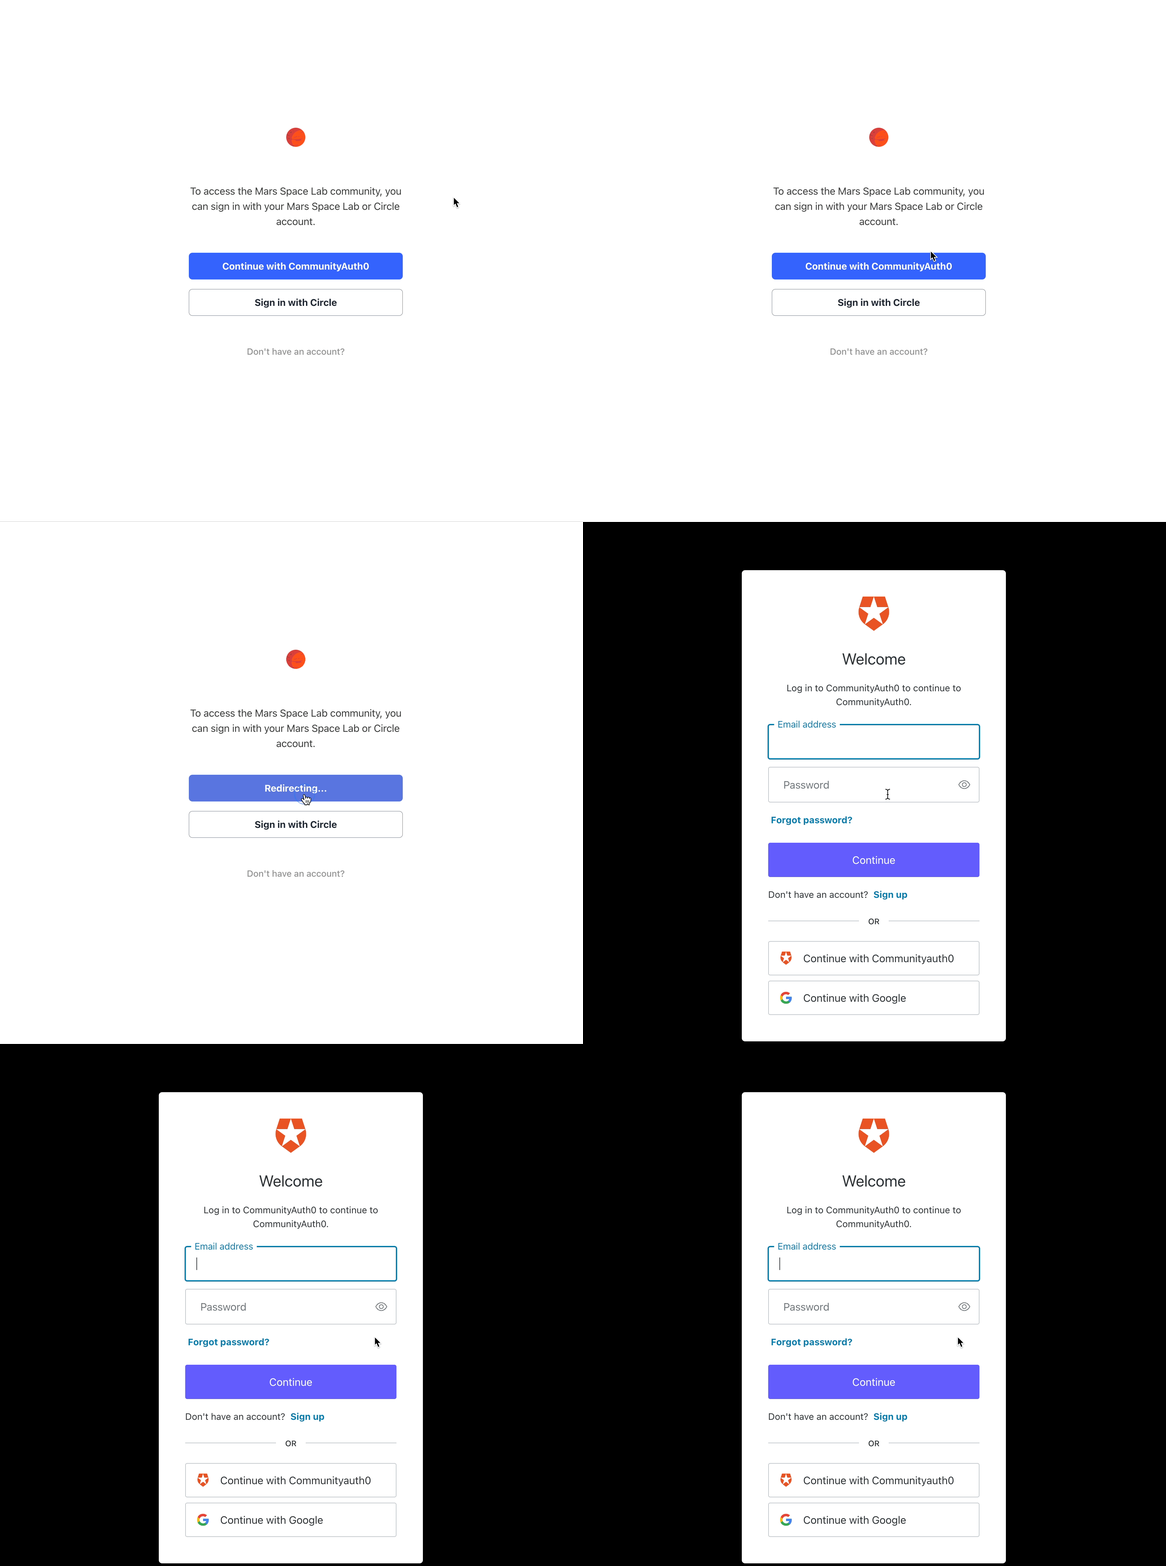
If your setup is successful, you will be presented with the Auth0 option (continue with Your application name) on the login page when signing in to your community:
Open your community URL in an Incognito/Private browsing session.
Sign in with test user credentials.
Customize login page
If you would like, make changes to your login page in your Auth0 account as per your preference by navigating to Branding → Universal Login.
💡 Tip: To learn more about the customization options, check out the Auth0 guide on Universal Login Pages here.
Verify SSO connection
Once you have enabled SSO for your community, you can also verify the SSO connection at any time using our verification feature! To do this, click Verify SSO connection on the header of the SSO settings page and log in through your SSO provider.

The tool will then verify your connection and provide logs for each verification step.
📚 For more information, see Verify your SSO connection.
You are now all set 🎉