Create paid events
Last updated: September, 2026
Monetize your premium event offerings and reach a wider audience with paid events. In this article, we will guide you through everything you need to know about setting up paid events, understanding access, and maximizing your event's potential.
About paid events
Paid events let you host and monetize events directly in your community. This feature adds value in two ways: it creates a premium experience for attendees and opens new opportunities for engagement and revenue. You can create paid events the same way you create your regular event in the event spaces. When setting up a new event, you can choose whether it is free or paid.
Key details to know
Event types: You can set up a single paid event or a recurring paid event series with the same ticket price for each event. For recurring events, attendees need to buy tickets for each event individually.
-
Pricing structure: You can only set up a single ticket price for the paid event.
If you’d like to offer events with installment or recurring subscription pricing, we recommend adding the event space access to an installment or subscription paywall and share that with your audience instead of creating paid events.
If you’d like to offer ticket prices at multiple tiers, a workaround would be to create multiple paid events for each tier.
-
Supported locations: Paid events support all location types supported in Circle.
Please note that if you host a paid event on Circle live stream or live room location, visibility will be set to Event attendees by default. This ensures that the live event is only visible to attendees.
Note that the public live streams are not supported for paid events. The Disable live link sharing setting is also turned on by default. We recommend leaving it enabled so that non-attendees cannot bypass ticketing and directly join the live event session.
Ability to purchase events: Both visitors and members of your community can purchase event tickets. When visitors buy an event ticket, they become members of your community and the event space.
Free event access: When you set up a paid event, members cannot get free access to that event on their own, even if they are members of the event space. However, you can manually add members to the event or share a coupon code that provides 100% off to grant members and visitors free access to the specific paid event.
💡 Tip: In this guide, we refer to “Visitors” as people who aren’t members of your community yet. When they purchase a ticket, they’re converted into members automatically.
Availability
The paid event feature is available on all community plans. You’ll need to connect your Stripe account with Circle paywalls to utilize it. If you already use Circle paywalls, you do not have to take additional steps to host paid events.
ℹ️ Note: Only admins can create paid events within the community. You can, however, assign a community member as the event's host. The host and event space moderator can also manage various aspects of the event, except for the ”Is this a paid event?” section.
Circle paywalls integration
Paid events are powered by Circle paywalls, which handle payment-related aspects of the event.
This helps you utilize other aspects of the paywalls, such as tracking transactions, providing refunds, offering coupons, and charging taxes.
-
Coupons: You can offer discounts on event tickets using coupons. You can either use an existing coupon or create a new one from the Paywall settings.
To set up a coupon for a specific event, create the paid event and publish it.
Create a new coupon (or edit an existing one) and select which paid events it applies to. You can make it valid for all paid events or limit it to specific ones.
💡 Tip: You can create a coupon that covers the full price to allow people to purchase tickets for free.
Taxes: If you’ve enabled tax collection for Circle paywalls, taxes will automatically be applied to ticket purchases wherever applicable. This ensures compliance without extra setup for each event.
Purchase stats: All ticket purchases for paid events appear on the paywall Transactions page within your community. You can use the Event filter at the top of the page to view all transactions for a specific event.
Refunds: If needed, you can issue a partial or full refund directly from the Transactions page.
❗Important: Please note that paid events created in event spaces are not eligible for the affiliate program.
Understand access that attendees receive when they purchase an event
When a visitor or member of your community purchases a paid event, they receive access to the following:
-
Community members:
Event: Members will be RSVP’d and gain access to the event.
Event space: If they are not already members of the event space, they will automatically become members. Going forward, they can view details of all the events posted in the space, buy tickets for paid events, and RSVP to free events.
-
Visitors: When visitors purchase an event, they become members of your community and gain access to the following areas along with the paid event:
Event space: As a member of the event space, they can view details of all the events posted there, buy tickets for other paid events, and RSVP for free events.
Onboarding access: If you have set up default space access in your onboarding settings, they automatically gain access to those spaces.
Open spaces: New members can access and join any public spaces within the community that are open and visible to non-space members. Please refer to space access and visibility settings for more details.
❗Important: If a member has purchased a paywall membership that provides access to the event space, they will still need to buy the event ticket. If you would like to give them free access to a paid event, you will need to manually add them to the event attendee list or offer them with a coupon that gives 100% off the ticket price.
Access paid event stats
You can track ticket sales and revenue from your paid events directly in community analytics. It displays the number of tickets sold and the revenue generated from paid events in the selected time frame.
To access these stats, click Analytics on the sidebar, then select Events.
Set up paid events
When creating an event, you can choose whether to charge for it. To set up options for the paid event:
Start by creating an event in your chosen event space.
Enter the event title, date and time, recurrence (if it’s a series), and select the location.
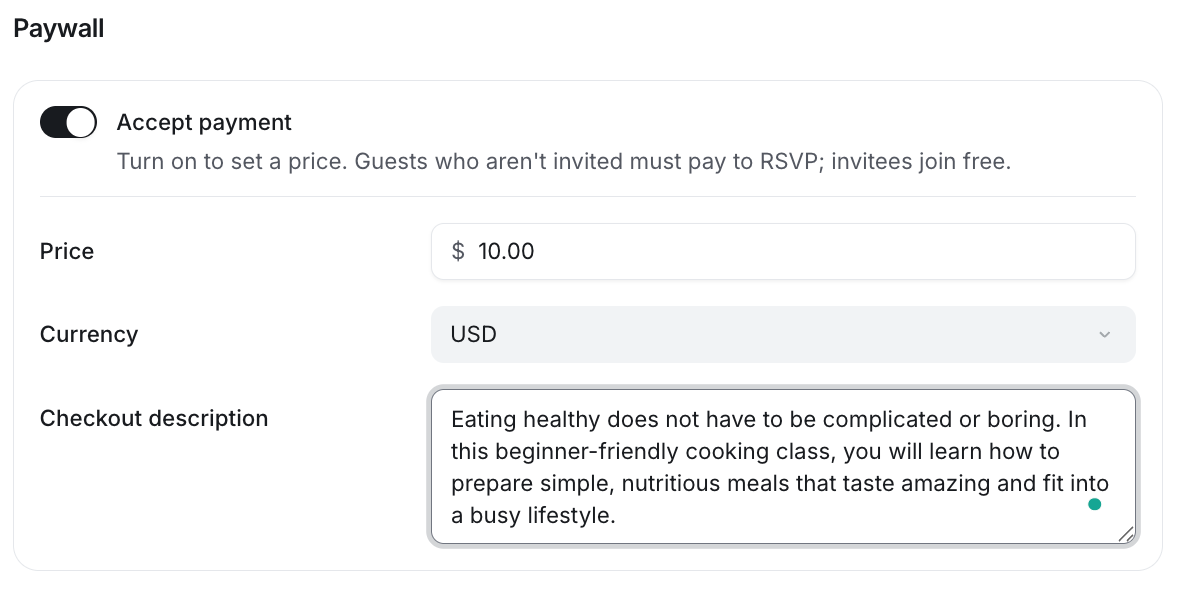
Toggle on the Accept payment option in the Paywall section.
Enter the price you want to charge for the event ticket.
Select your preferred currency for tickets. We support the same currencies offered by Circle paywalls.
-
(Optional) Include a checkout description that will display on the checkout page.
Please note that this description body is text-based only. However, you can paste emojis within text.
If no checkout description is provided, the event description will appear on the checkout page instead.
-
If you have added a cover image to the event description, it will also appear on the checkout page.
Click Save draft.
After saving the draft, you can finish setting up your event by:
Adding event post details.
Configuring event notifications and reminders.
Adjusting advanced settings such as permissions and SEO.
Manually add attendees to provide them with free access.
Once you publish the event, ticket sales go live. Visitors and members can then buy tickets directly from the event details page that you have shared with them.
📚 To learn more about publishing an event, see our guide here.
❗Important: The event details page will show a Buy ticket option for everyone except the event creator. To allow free access for other admins, moderators, or specific members, manually add them to the event or provide them with coupons for free entry.
Update paid event configuration
When an event is still in draft status, you can modify all aspects of the paid event configuration, including price, currency, and registration (switching between paid and free).
However, after you have published the event, you can only update the ticket price and checkout description. If you are updating a recurring event, you can apply these changes to either individual events or to all events in the series.
Paid event visibility and sharing
Paid events live inside your event spaces, just like regular events. By default, they follow the same visibility for community members and visitors as any other event. This means that whether community members or visitors can directly access the event details depends on your community and space access settings.
If you want to promote a paid event more widely, to those who may not have access to your event space or community, you can generate a share link. This allows non-space members or even visitors to view event details and purchase tickets.
The steps to share an event vary depending on your community and space settings.
Click Community in the left sidebar, then select Spaces.
Click the space name to open the event space and locate the event.
Depending on the event space’s visibility settings, you have the following three options:
Option 1: Open event space in a public community
When the event space is open and visible to logged out visitors within your public community, both community members and visitors can easily see the event details and purchase tickets directly from the space.
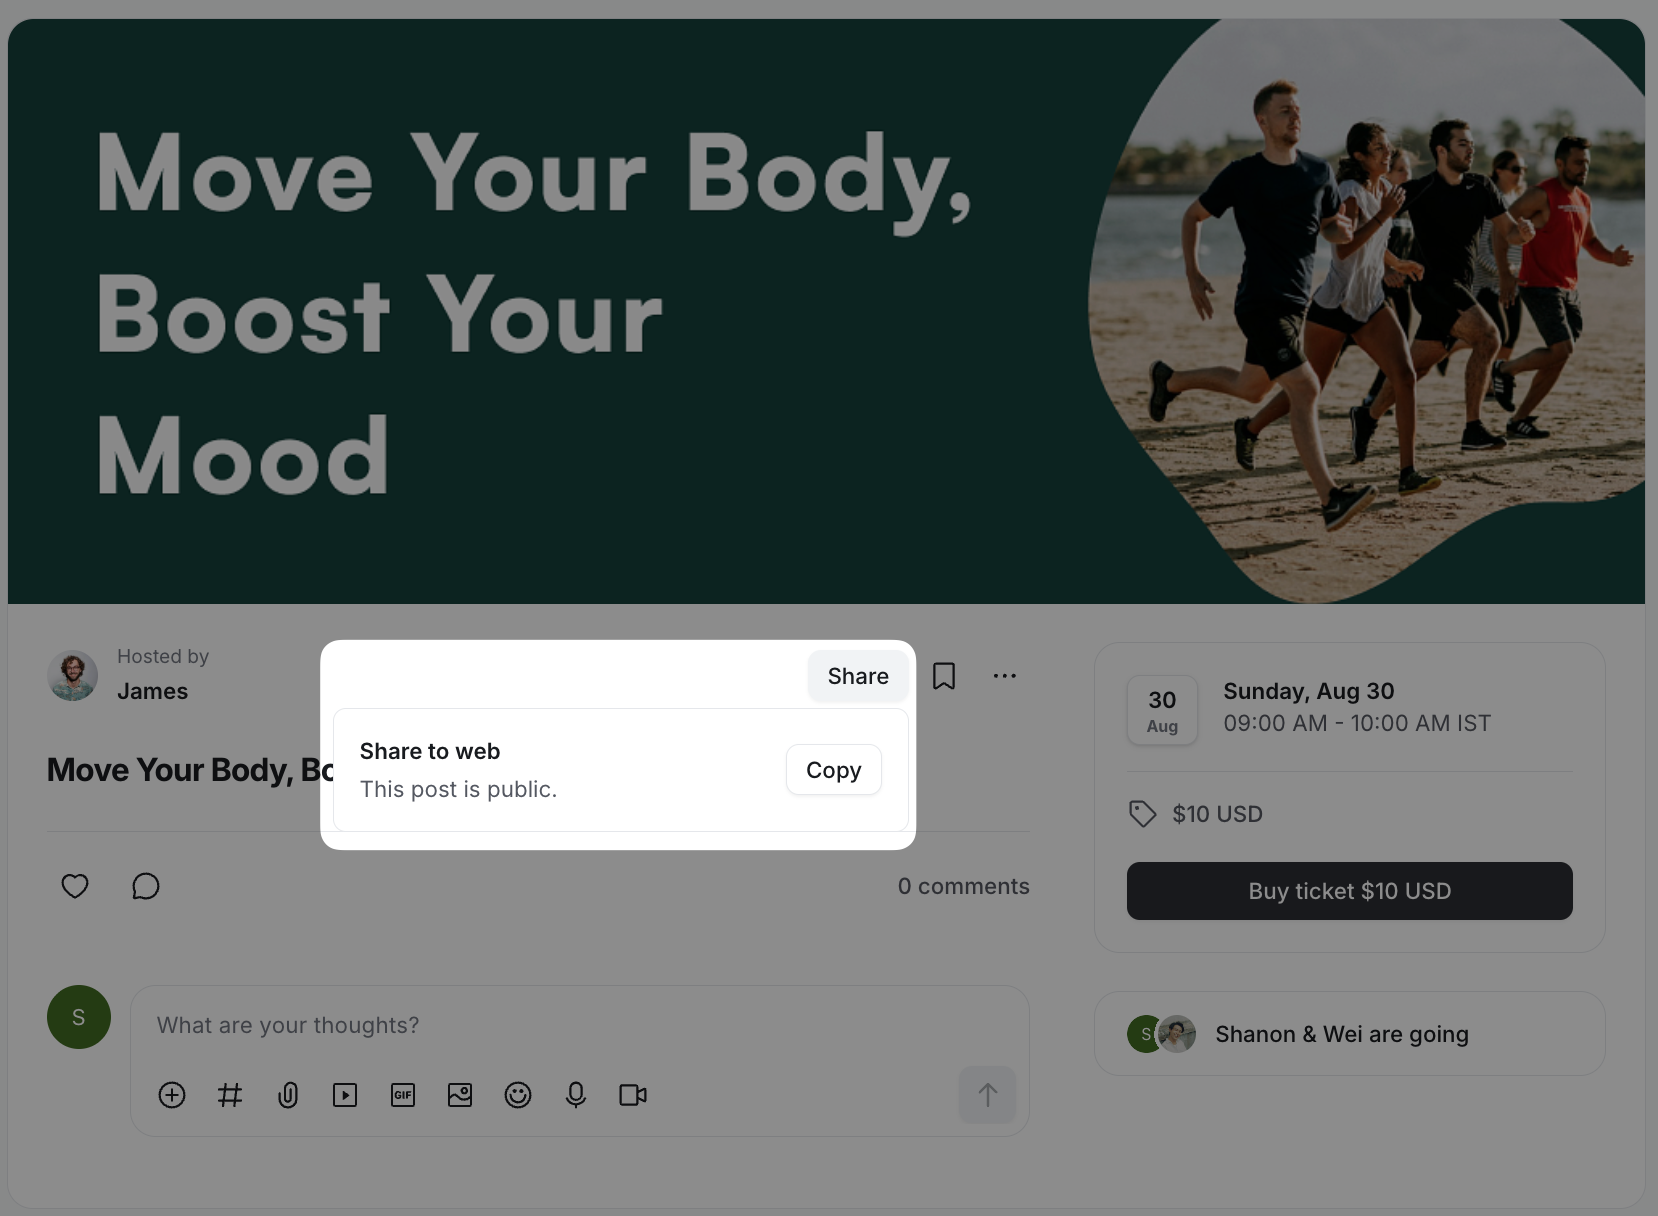
You can also share a direct link to the event details page with everyone. To obtain the link:
Click Share next to the event title
-
Click the Copy icon to save the link to your clipboard.
Option 2: Private event space in a public community
If the event space is private or secret within your public community:
Members of the private event space can view the event and purchase tickets directly.
Non-space members and visitors can’t access the space itself, but you can share the event link that lets them see the event details page and buy tickets.
To obtain the share link of a paid event:
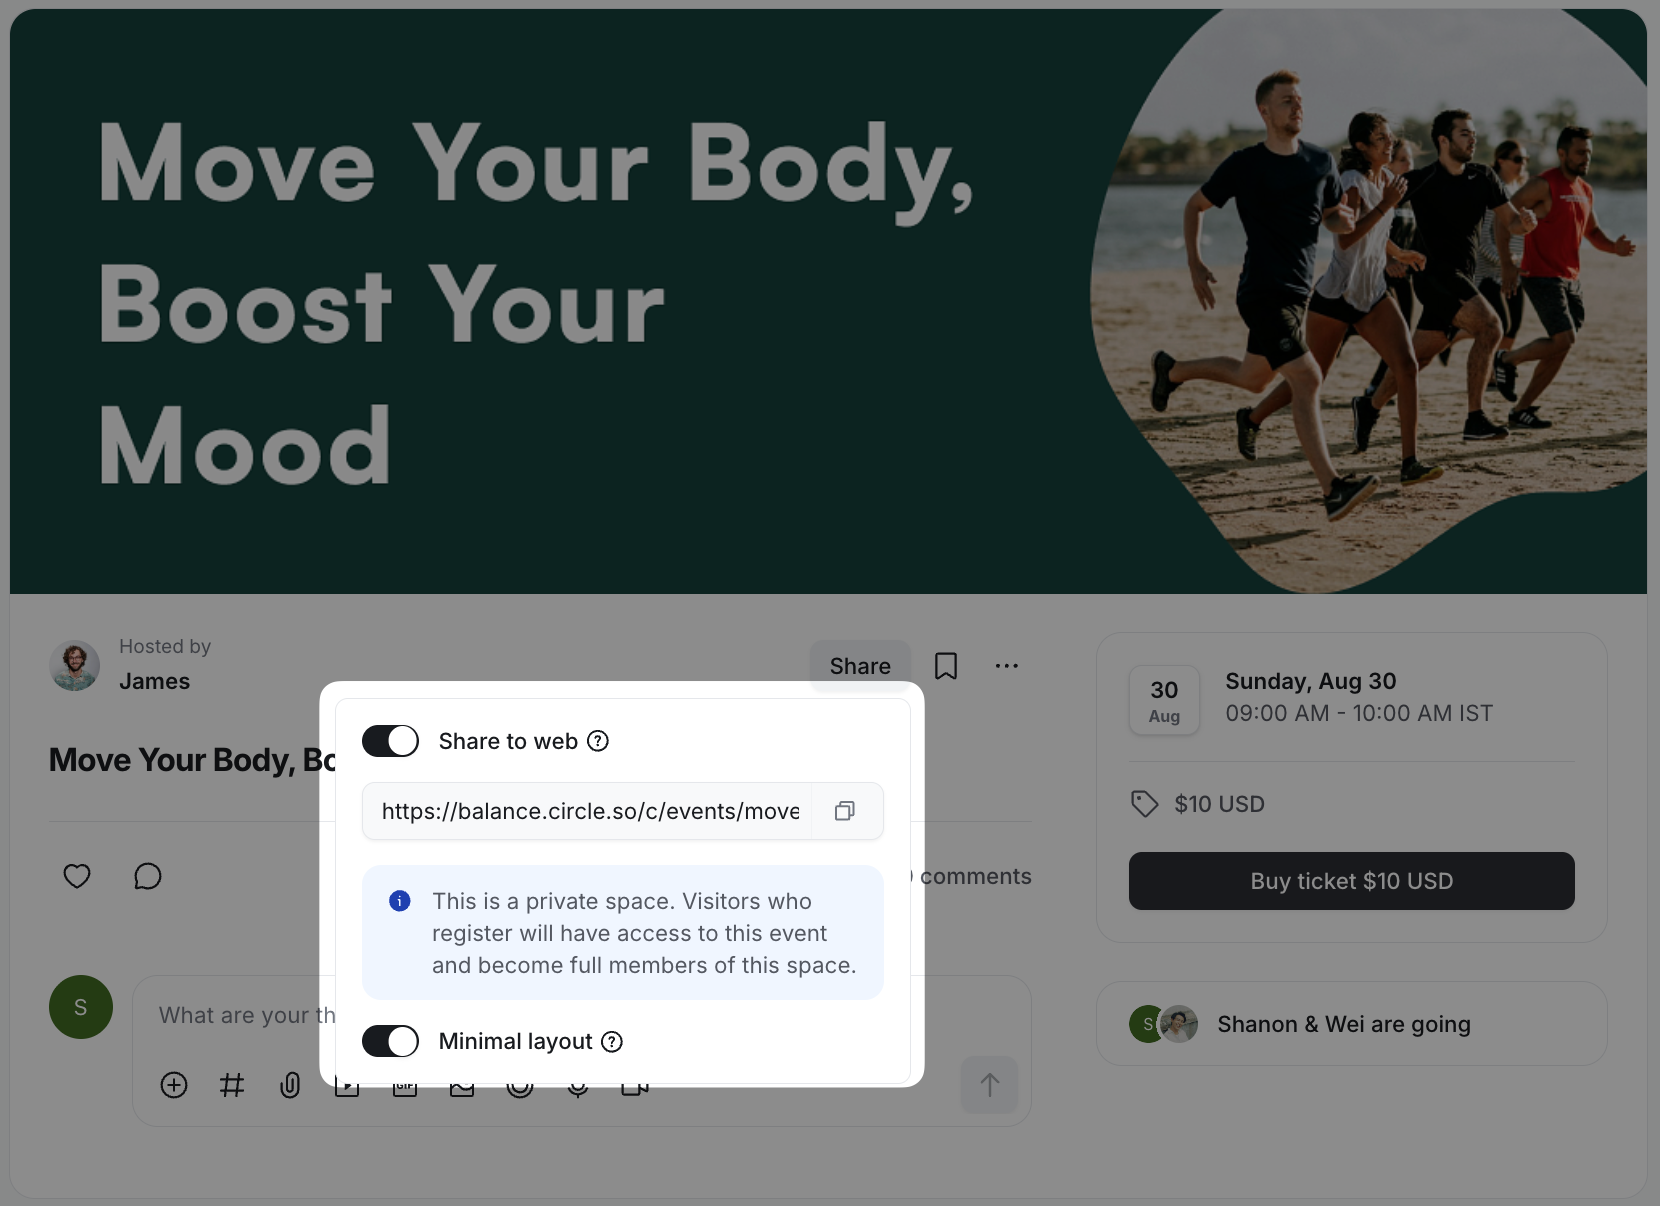
Click Share next to the event title, then turn on the Share to web toggle.
Minimal layout: When you share this event from a private space, you can turn this toggle on to show the event without the sidebar.
-
After adjusting the layout preference, click the Copy icon to save the unique link to your clipboard.
Option 3: From any space in a private community
If the event space is within your private community:
Members of the community can view the event details page and purchase tickets (depending on space visibility settings). If the space is private or secret, only space members can view the event details page.
For non-space members and visitors, you can still share the event link that allows them to see the event details page and buy tickets.
Here’s how to get the share link:
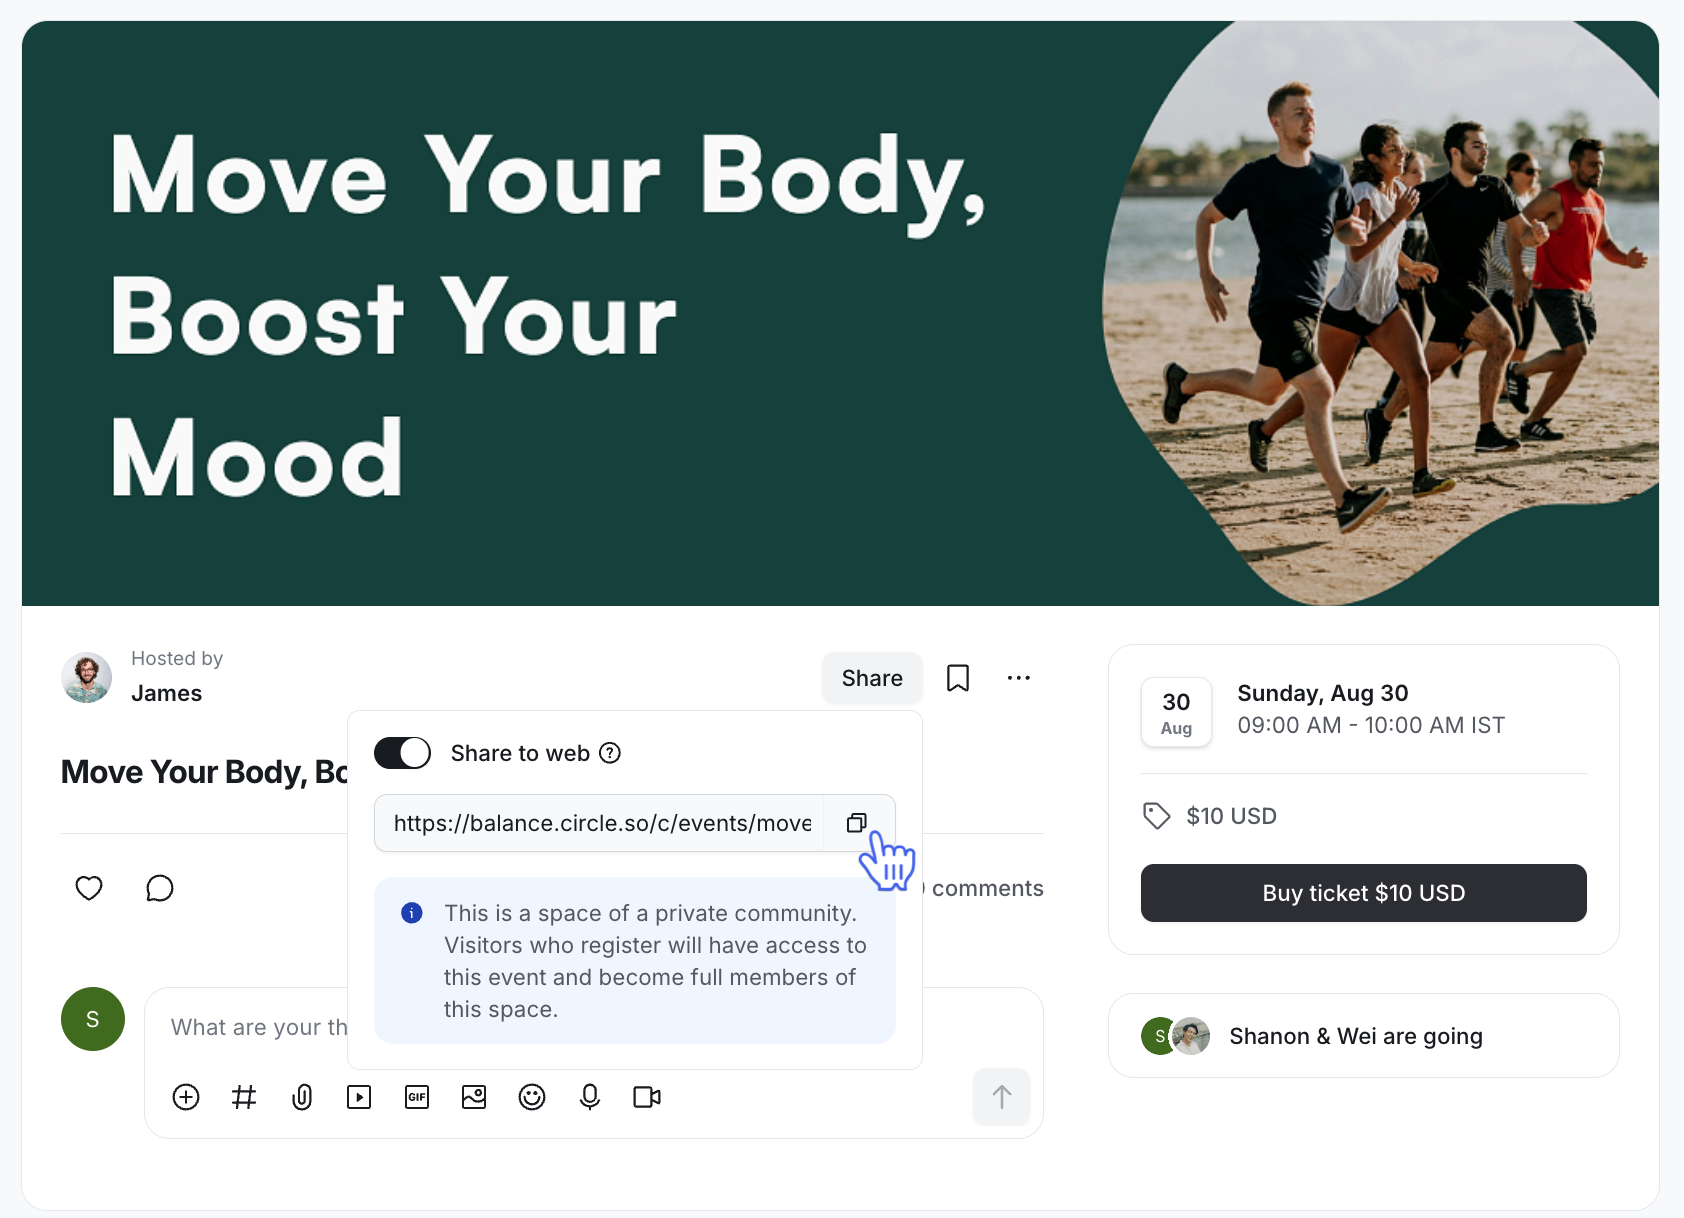
Click Share next to the event title, then turn on the Share to web toggle.
-
Click the Copy icon to save the unique link to your clipboard.
Understand the purchase flow of paid events
Buying a ticket for a paid event is designed to be simple and familiar for both members and visitors.
Tickets can be purchased from the desktop app (if logged in), a web browser, or a mobile browser. Below is how the process works for each type of user.
💡 Tip: Before promoting your event, it’s a good idea to walk through the purchase flow yourself. This helps you spot anything confusing and gives you confidence about what your members and visitors will see.
To do so, create a coupon with a 100% discount so you won’t be charged. Copy the event’s link and open it in an incognito/private browsing window. Go through the entire purchase process as if you were a visitor, buy the ticket, complete checkout, and profile setup. This way, you’ll experience the exact journey your attendees will take and can make adjustments to your event setup before sharing the event widely.
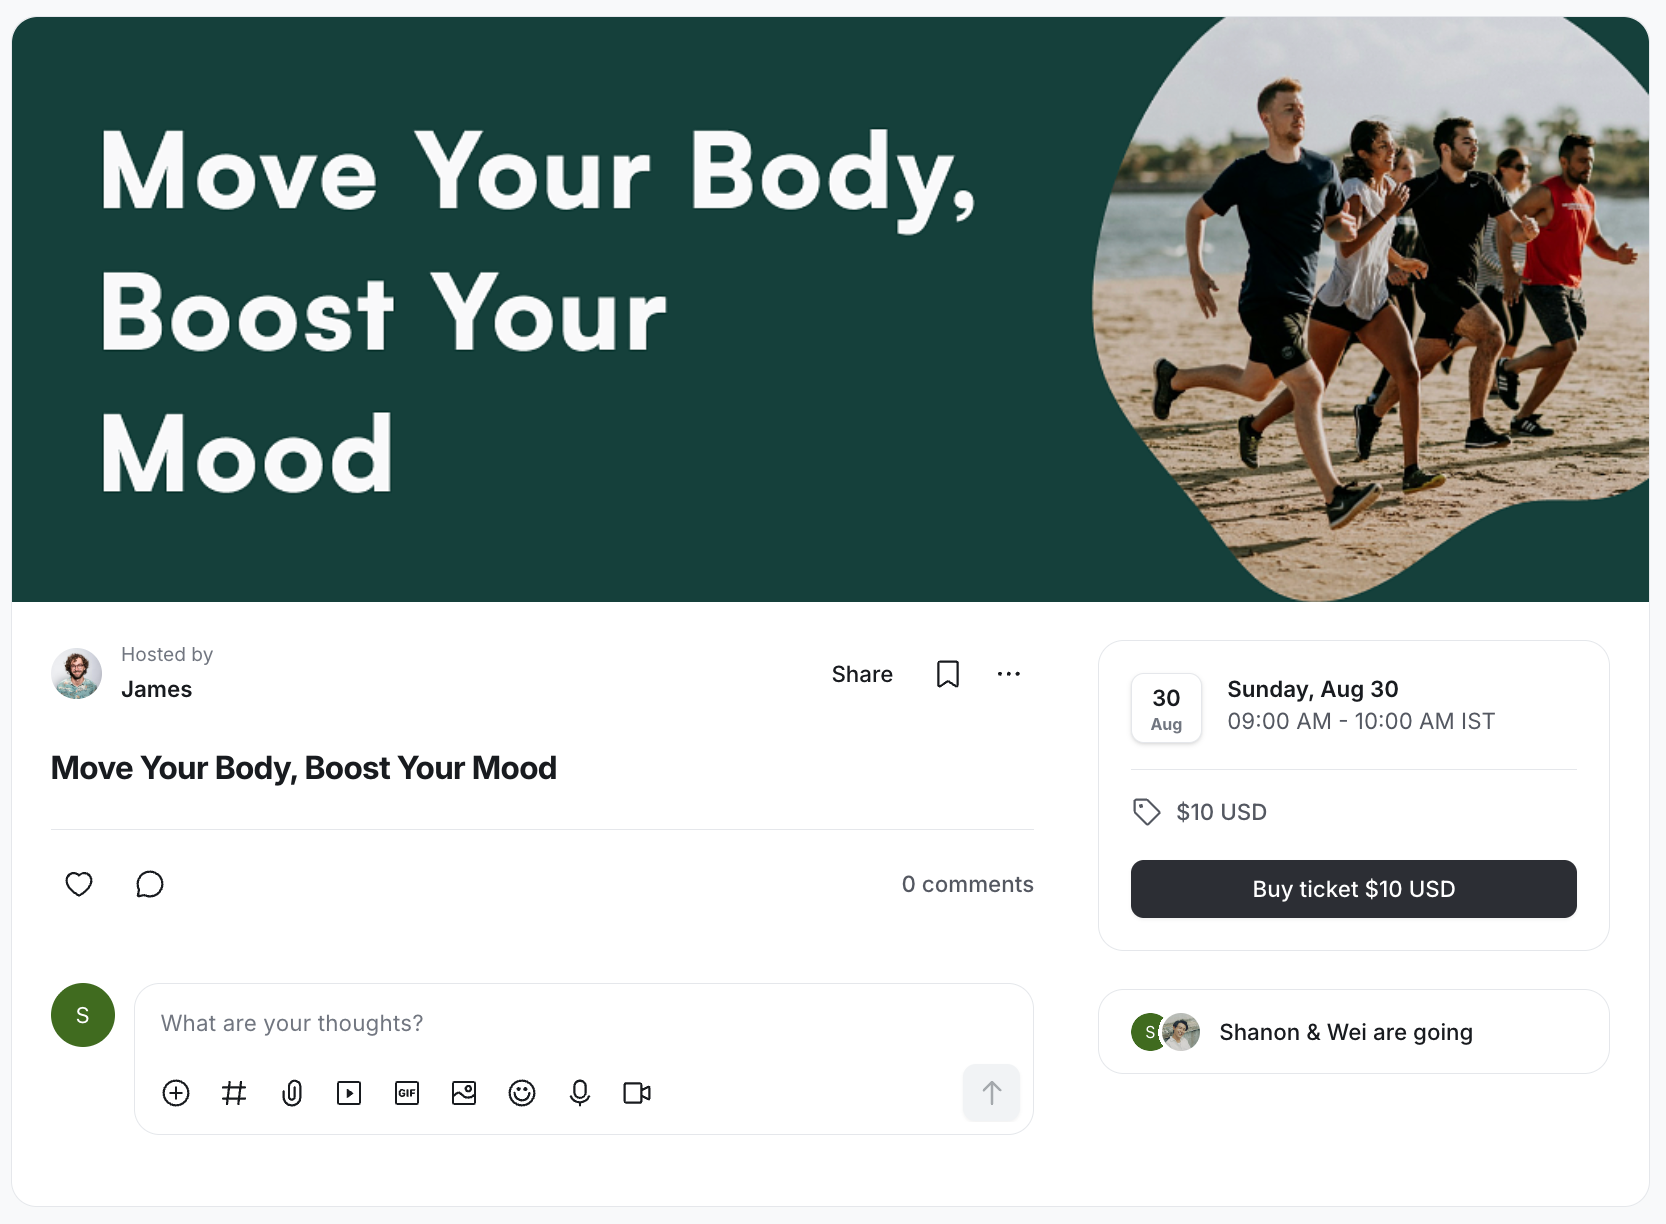
For existing community members
View event details: On the event details page, members can see all event information and will find a Buy ticket button.
-
Complete checkout: Clicking Buy ticket takes members to the checkout page. Similar to purchasing paywalls, here they can enter the payment information, address details (if Stripe Tax is enabled), tax ID (if tax collection is enabled), add a business name (optional), and apply a coupon.
ℹ️ Note: If the member is logged out, they can log back in directly from the checkout page before completing payment.
After a successful payment, they’ll see an automated thank you page and be redirected back to the event details page.
Depending on your event’s notification settings, they’ll receive either a confirmation email, an in-app notification, or both.
Add event to the calendar: On the event details page, they can use the Add to calendar option to download the invite (.ics file) or resend the confirmation email to their account email address.
Visitors purchasing an event
View event details: On the event details page, visitors can see all information about the event and click Buy ticket.
-
Checkout: Clicking Buy ticket takes them to the checkout page. Here, they need to provide the email and password to create the new community account. Similar to purchasing paywalls, here they can enter the payment information, address details (if Stripe Tax is enabled), tax ID (if tax collection is enabled), add a business name (optional), and apply a coupon.
Once the payment is successful, they’ll see an automated thank you page. Then they’ll be directed to the profile setup page, where they can complete their account by adding profile details and permissions.
ℹ️ Note: If visitors leave the browsing session without completing the profile setup, they’ll be prompted to complete it when they next log in. Until then, their member record will appear under the Invited tab in the Manage audience page for admins.
After profile setup, the visitor officially becomes a community member and is redirected back to the event details page.
Depending on your event’s notification settings, they’ll receive either a confirmation email, an in-app notification, or both.
Add the event to the calendar: On the event details page, they can use the Add to calendar option to download the invite (.ics file) or resend the confirmation email to their account email address.
Refund ticket payments
Managing ticket refunds is straightforward with the Circle paywall integration.
❗Important: When you refund the attendees, they won’t automatically be removed from the event or the event space. You can, however, manually remove them from the event or the event space.
Here’s how you can handle refund requests for your paid events.
Click Payments in the left sidebar, then select Transactions.
Locate the transaction using filters such as the member's name or the event. If filtering by an event, look for the event title.
Once you have located the member, hover over their details. Click More actions (three dots) next to the member entry, then select Refund payment.
The refund amount will default to the original ticket purchase amount. You can adjust the refund amount to provide a partial refund.
Add the reason for the refund (this is for internal purposes; members won’t be able to see the reason).
Click Confirm refund.
Use workflows to automate actions for event attendees
Circle workflows help you handle actions related to event RSVPs without extra manual work. You can set them up to run automatically for users when they RSVP or to perform actions in bulk to all attendees.
-
Automation workflow: Set up a workflow that triggers whenever a user RSVPs to your paid event.
Select RSVP’d to event as the trigger and choose the paid event.
Add the actions you want to run (for example, add them to an access group or have your AI agent send them a DM).
-
Bulk action workflow: Run actions for all event attendees at once, or schedule them for a specific day and time:
Select Event RSVP as the audience rule and choose the paid event.
Add the actions you want to perform for attendees, such as sending them an email.
Here are some ways to use workflows when members RSVP to paid events:
Apply specific member tags to attendees.
Add attendees to particular access groups.
Have your AI agent send them a DM.
Add attendees to a paywall membership trial.
RSVP or invite them to another event.
Frequently asked questions
Can I provide free access to a paid event?
Yes! Currently, you can provide free access to paid events in a few ways:
Coupons: Share a coupon configured to provide a 100% discount on the ticket price. This is a great option, especially when you want to give visitors free event access.
Manually RSVP members: Go to the People tab in the event setup and manually add members from your community as attendees. This will grant them free access to the event, bypassing the ticket purchase. You can utilize this option to manually add individual members, members from a certain space or space group, or those with specific member tags.
Workflows: Utilize a bulk action workflow to RSVP members who match specific criteria in bulk.
Can I limit the number of paid event attendees?
Yes, you can limit the available attendee seats for your paid event. To do this, go to the Advanced tab in the event setup and turn on the Limit RSVPs toggle. Enter the maximum number of RSVPs you want to allow for the event and save changes.
Once the RSVP limit is reached, people won’t be able to buy tickets anymore.
Can I cancel my event?
Yes, you can cancel an event by deleting it from the community. If any ticket purchases have already been made for the event, you will need to remove all paid attendees from the event before deleting it.
When you cancel a paid event, members are not automatically refunded. This gives you flexibility in handling rebookings or refunds for members who have purchased tickets.
Why does a member show up on the attendee list but hasn’t bought a ticket?
We automatically RSVP a member when they start the purchase to secure their seat for the paid event. This is to ensure that events with RSVP limits set are not oversold. If the member doesn't complete the purchase within 15 minutes, they are automatically removed from the list.