Create email content with the visual builder
Last updated: March 24, 2026
The visual builder makes it easy to create eye-catching emails. In this article, we’ll walk through the builder’s main features and how to add elements and blocks to create email content.
About the visual email builder
The visual email builder is a drag-and-drop builder that lets you create email content using individual elements and pre-built blocks. You can customize designs, adjust elements and blocks, and see every change in real time.
Ways to access the visual email builder
When creating a new broadcast or setting up a Send an email action in workflows, you’ll have two options to start writing your email from the Content section:
Choose to start from scratch: When you choose to start from scratch, you will be presented with the Visual builder and Text builder options. Select the visual builder option to get started.
Select template: Pick one of your saved templates built in the visual builder, then update it as needed. Visual builder templates will appear with the Visual badge. You can also use the Type dropdown menu to filter templates.
After you make a choice, the builder will open, and you can begin building your email content right away. For the broadcast or workflow you’re working on, you’ll also be able to leave and return later to finish your draft.
📚 To learn more about setting up a broadcast or workflow action, see our step-by-step guides on Create email broadcasts and Set up email workflows.
Who can use the visual email builder
Only community admins can create broadcasts and set up email workflows with the visual email builder. As an admin, you can access the builder from the desktop app and web browsers.
Get to know the visual builder interface
When you enter the email builder, the screen is split into the following sections. Each one has a specific role in helping you design your email:
Header: Access quick options to undo or redo, send a test email, save and exit, and manage templates.
Left sidebar: Access options to add new elements (text, image, button, etc.), insert blocks (pre-designed sections), and customize email theme.
Center editor: This is your main workspace where you build and edit your email. You can click directly on any block or element to edit it, and you’ll see your changes update in real time.
-
Right sidebar: This shows editing options for the element or block you select in the center editor. Depending on the element, you’ll see the Content and Design tab to customize it.
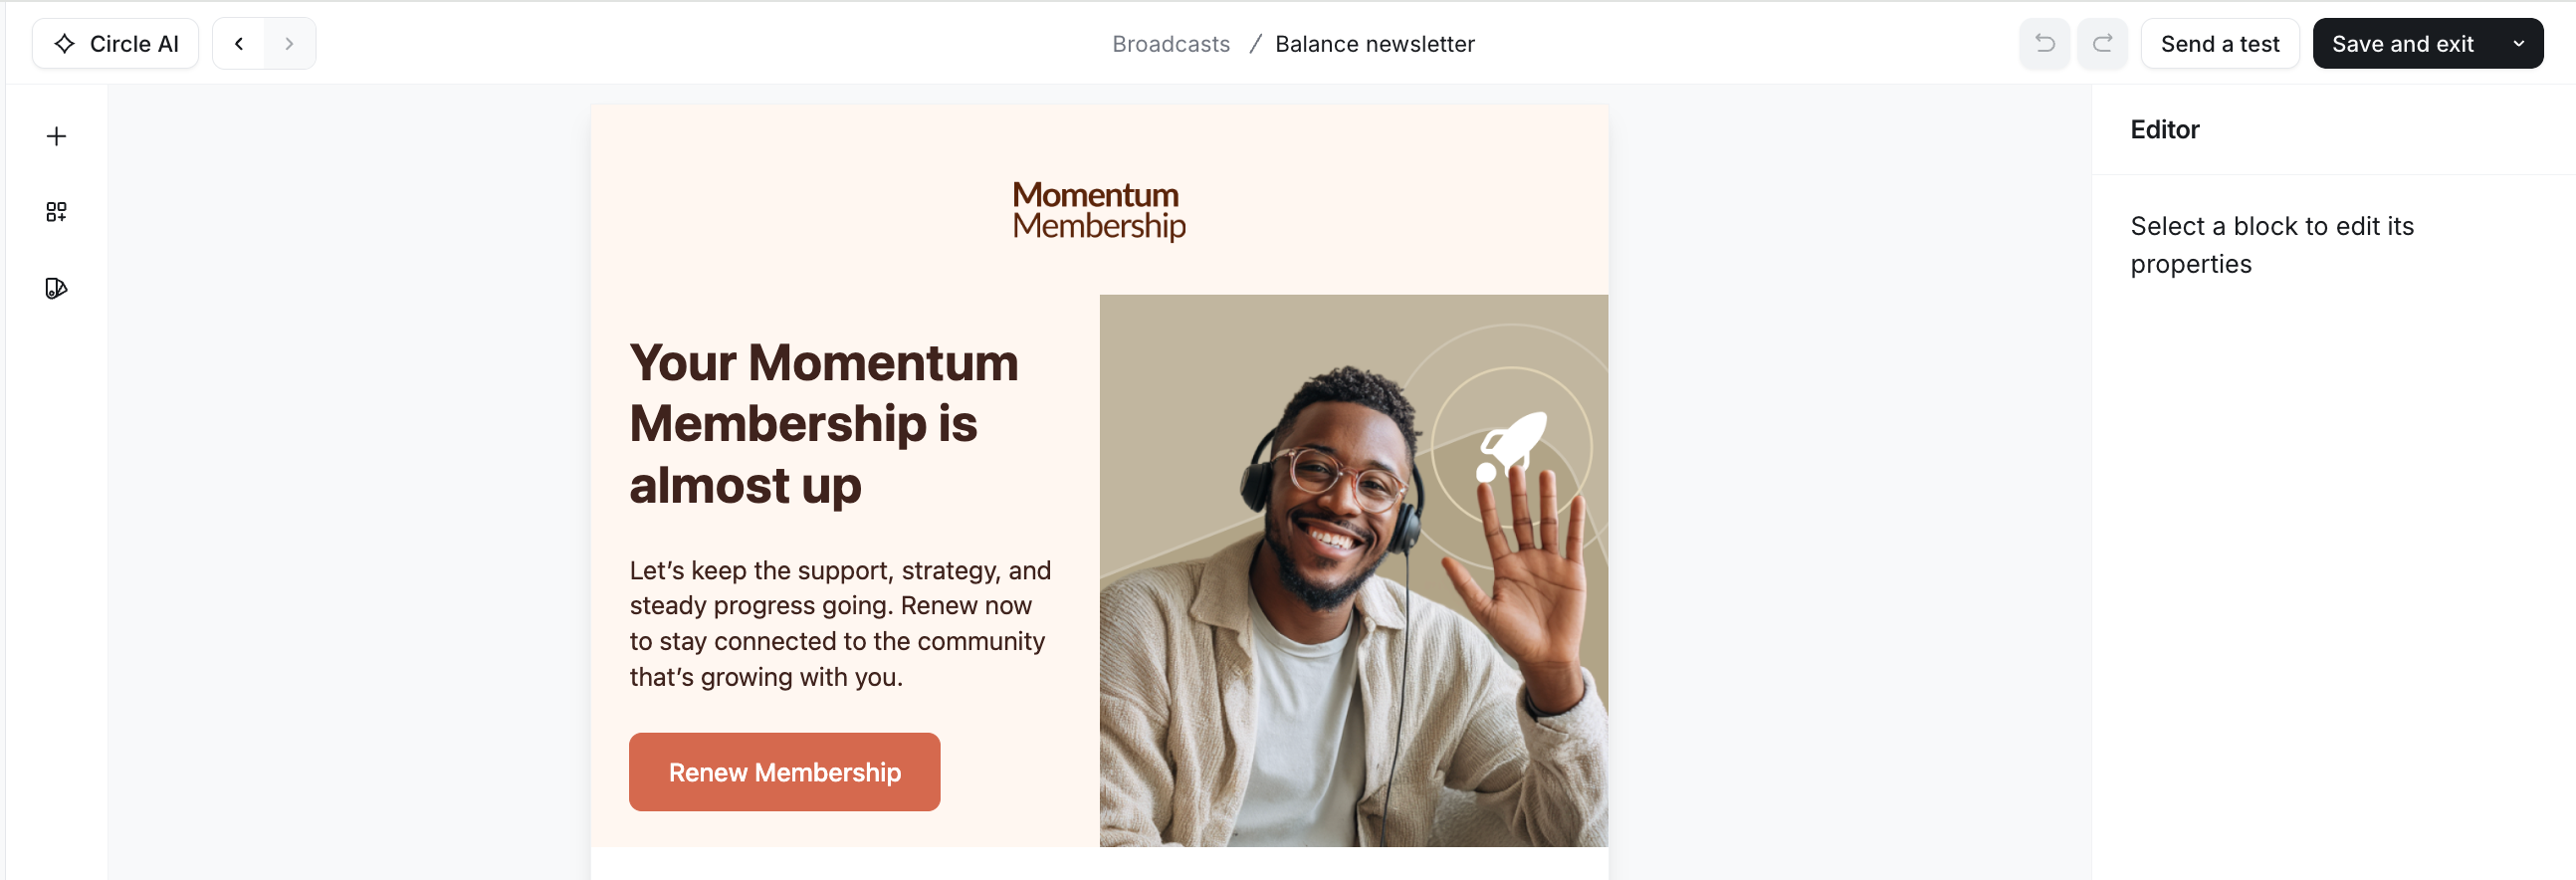
At the bottom of the center editor, you’ll also see a control bar. This bar lets you:
Switch between desktop and mobile views to edit and preview how your email will look on different devices.
You can adjust the zoom level to focus on details (up to 100% zoom) or view the full layout at a glance.
Saving your draft
When drafting your email, make sure to save your work before leaving. Click the Save and exit button at the top right of the builder to ensure your progress is not lost.
Undo and redo edits
Use the Undo and Redo icons in the header to move backward or forward through your recent edits. This makes it easy to fix mistakes without starting over.
Templates
The dropdown next to Save and exit gives you the following options:
Save template: Save your current draft as a new template. If you loaded a template and made changes, you can also save them to the existing template instead of creating a new one.
Change template: Load a different template to replace your current draft with template content.
📚 For information, see Create and manage email templates.
Elements and blocks
You can build email content with the following:
Elements: individual pieces of content, such as headings, paragraphs, buttons, and images. You can add these anywhere within your email.
Blocks: These are pre-designed layouts with elements such as hero headers and features, combining text, buttons, and images. Blocks are designed to save time and give your emails a polished structure without having to start from scratch.
Add elements
Follow these steps to insert new elements:
-
Click Elements in the left sidebar.
-
Find the element you want, then use one of the following methods:
Drag and drop to add: Click and hold the element you want. Then drag it into the builder. You’ll see a blue line appear when you hover in the builder. Release when the blue line is exactly where it will be added in the builder.
Click to add: Alternatively, you can click on an element from the list, and it will be added right above the footer.
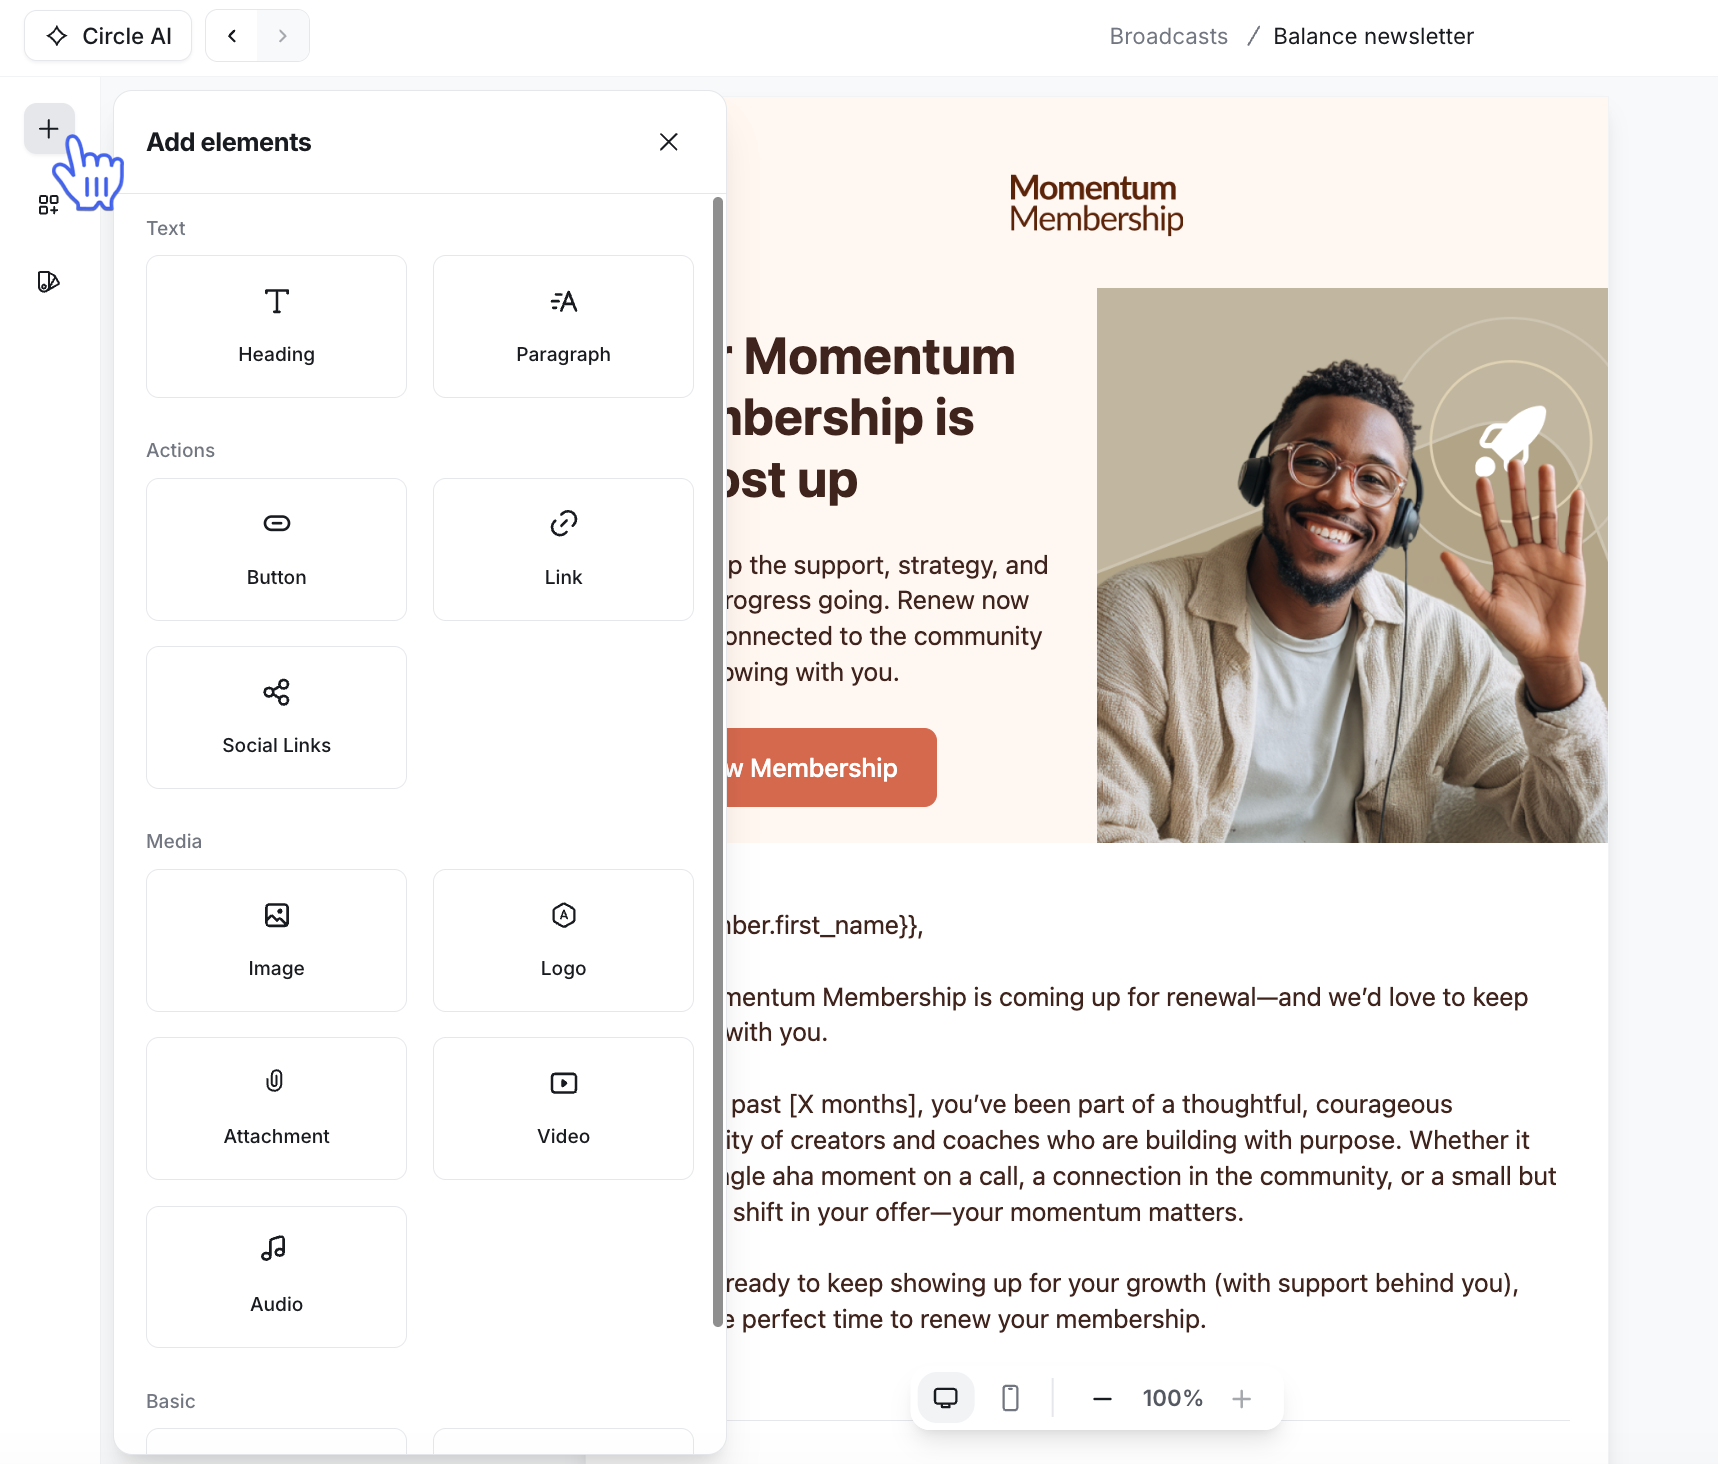
Once the element is added, click it in the builder to open its customization options in the sidebar, including content and design.
Available elements include:
Headings and paragraphs: Add main titles, subheadings, and body text. Use these for your message content, introductions, or announcements.
Buttons: Create clear calls to action within your email that direct users to a link.
Links: Insert text links within your emails to direct readers to more information.
-
Social links: Add links to your social platforms (including Facebook, Instagram, X, YouTube, Spotify, TikTok, and more) directly in your email. By default links are pre-filled from your profile fields (when available). Social links blocks are responsive and supported across devices and email clients.
💡Tip: Use the right sidebar to customize icon styles, spacing, alignment, and colors to match your brand and design.
Images: Add visuals such as banners, photos, or product images to make your email more engaging.
Logo: Display your community’s logo within the email to maintain brand consistency. You can also replace it with a different image.
Attachments: Include downloadable files like guides, worksheets, or checklists for your audience.
-
Video: Add videos within your email content. This lets you promote launches, share walkthroughs, or highlight community updates in a more engaging way.
ℹ️ Note: Videos don’t play directly inside the email. When a recipient clicks the video thumbnail or play button, it opens on the hosting platform in a new tab.
-
Audio: Add audio to your email content, such as podcasts, announcements, or voice updates.
ℹ️ Note: Similar to video elements, audio doesn’t play directly inside the email. When a recipient clicks the audio thumbnail or play button, it opens on the hosting platform in a new tab.
Line: Add a horizontal divider to separate sections and improve readability.
Lists: Create custom list items with emojis to present information in a clean and personalized format.
Add blocks
Here’s how to add a block:
-
Click Blocks in the left sidebar.
Browse categories such as hero headers, features, or galleries to find a block that fits your design.
-
Add the block by either:
Dragging and dropping: Click and hold the block, drag it into the builder, and drop it where you want. A blue line will appear to help see exactly where it will be added.
Click to add: Click the block to place it right above the footer.
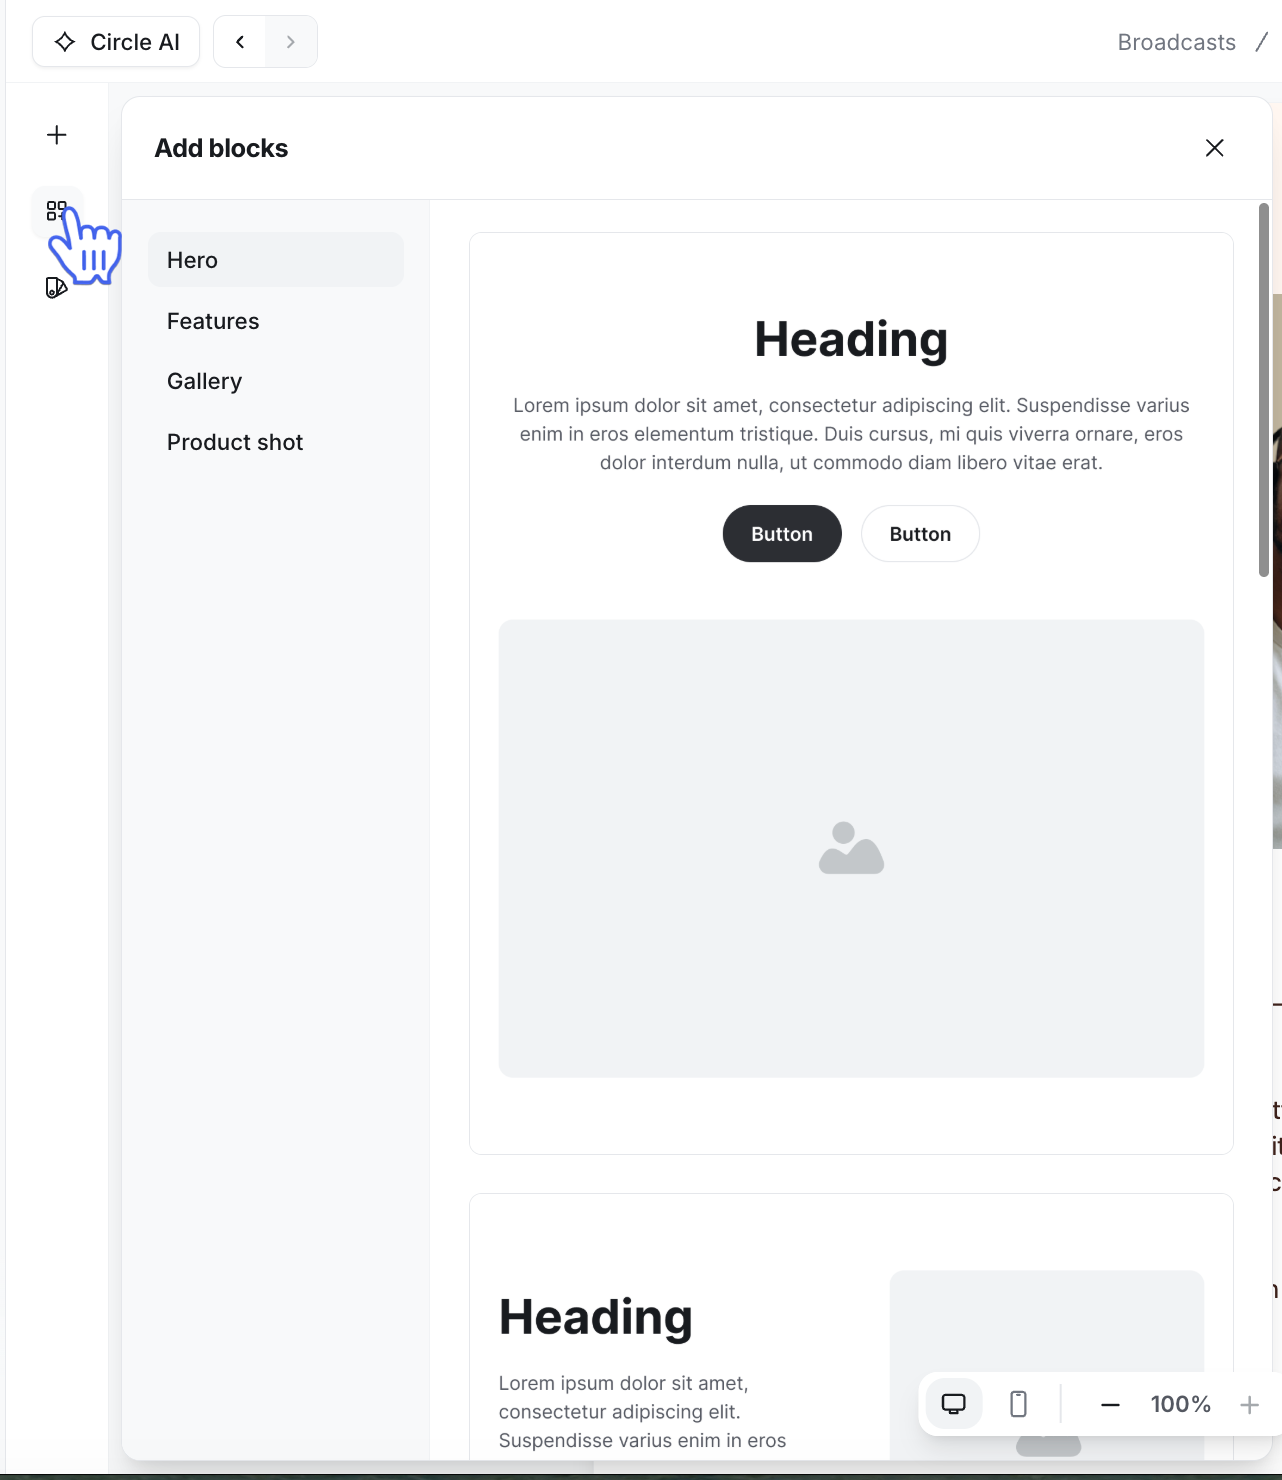
Once added, click the block in the editor to access design options. You can also click individual elements inside the block (such as a heading or button) to customize them individually in the right sidebar.
Customize elements and blocks
Once you’ve added an element or block, you can click it in the center builder to start adding content and adjusting its design. The right sidebar is where all content and design customization options live.
📚 For a full walkthrough with step-by-step instructions, see Customize elements and blocks in the visual builder.
Email themes
Email themes help you keep a consistent look and feel across your content. In the visual builder, you can open the Designpanel from the left sidebar to personalize your theme. From here, you can:
Apply a predefined theme.
Make changes to your current theme and it automatically save it as a custom theme.
📚 To learn more about customizing and creating themes, see Customize email theme in the visual builder.