Setting up a new member space
Last updated: June 02, 2025
Member spaces let you build focused spaces that make it easier for members to find and connect with the right people in your community.
About member spaces
A member space is basically a type of space designed to function as a custom member directory. Like other spaces, member spaces live within space groups so that you can create multiple directories tailored to different purposes or audiences. Whether you're building a private network, an interest-based group, or an exclusive directory, you have complete control over the space and its members.
You can easily access member spaces on all supported platforms, including the desktop app, web browsers, and our Circle and branded mobile apps.
Here are a few ways to use member spaces:
Create private or secret directories for select membership tiers or network groups.
Offer a shared interest space where members connect around topics, roles, or goals.
Host an open member space where members can opt in to discover and connect with others.
Filter members
One of the most powerful aspects of a member space is the ability to filter and explore member profiles, similar to the main member directory. This makes it easier for members to find others with similar interests, roles, or activity levels.
Both admins and members can use a variety of filters, including:
Name
Role (Admin, Moderator, Member)
Tag
Status (Online, Offline)
Level
Standard profile fields
-
Custom profile fields
💡 Tip: If you have custom profile fields in your community, admins can select any customizable profile fields to filter results. Members, on the other hand, are only able to select customizable profile fields that are set to be visible on the full profile page.
And more
To filter members, follow these steps:
-
Select a filter: Choose one of the default filters visible on the filters bar or click Add filter to access additional filters. You’ll be able to use various platform and profile fields as filters.
On desktop, the member space offers a full range of filtering options. On Circle's mobile apps and branded apps, however, filter options are limited and applied with the default "Is" condition. These filters are accessible at the top of the screen; simply swipe horizontally to view all available filters.
-
Set your criteria: After selecting a filter, enter the relevant criteria. Certain filters support advanced conditions for more precise filtering.
-
Using filter conditions: These conditions are available to text type and list type filters, such as name, headline, location, and space access (including checkbox and dropdown type profile fields). Depending on the type of field you are applying as a filter, you can use one of the following conditions:
Contains (available only to text, link, and number type fields)
Does not contain (available only to text, link, and number type fields)
Is
Is not
Is empty
-
Is not empty
-
Apply the filter: Click Apply or Done to finalize your selection.

When using multiple filters, they are applied using the "And" condition, meaning all selected criteria must be met. To refine your search further, you can apply the same filter multiple times, creating highly specific combinations for more granular results.
To access the full profile, simply click the member's name. From the profile, you can:
Message member
Copy the profile link
Edit member (Admin only option)
View member’s posts, comments, and space access
View rewards (Admin only option)
View profile information (About tab)
Check the last seen status
Utilize the “Near me” filter
Discovering members close to you has never been easier with the Near me filter! This allows you and your members to quickly find others in their area, making it simple to connect and collaborate with them.
The Near me filter uses the geo-coded location field set in member profiles to identify members in the same location as you are. For example, if you are in Paris looking to connect with others in the city, you can use the Near me filter to quickly see the list of members who have set their profile location to Paris.
To use this filter, simply click Near me at the top of the member space. Note that this option is currently only available when accessing the member space from the desktop. Combined with other filters, such as interests, tags, or roles, you can narrow down your search to find the perfect match.
Choose the space layout
You can choose how members are displayed in a member space by selecting a default layout from the member space settings. This helps shape how members browse and connect with each other.
-
List: This layout shows members in a compact vertical list with more profile information visible by default. Members’ tags, headline, and bio appear directly in the view, offering more context without needing to click into profiles. Use this layout when details matter more than visuals.
Note that the headline and bio fields shown in list view are system fields and must be filled out in the member’s profile to appear here.
Card: This layout displays members in a grid format using profile images as visual thumbnails. It’s ideal for quickly browsing faces and names.
You can also set a default sort order for the member space, such as Alphabetical, Oldest, or Newest. Members can change the sort at any time while viewing the space.
ℹ️ Note: On mobile apps, the member space appears in list layout by default, regardless of the layout selected on desktop.
Manage member space
You manage member spaces the same way you manage other spaces in your community. You can:
Set the space name, icon, and space group location.
Control who can access the space.
Select a layout that fits your needs.
Add or remove members.
Gate the space behind a paywall.
Set up a lock screen.
Configure additional space options.
Create a member space
To add a new member space, follow these steps:
Hover over a space group, click the ➕ icon, and select Create space.
In the Choose space type dialog, select Members and click Next.
-
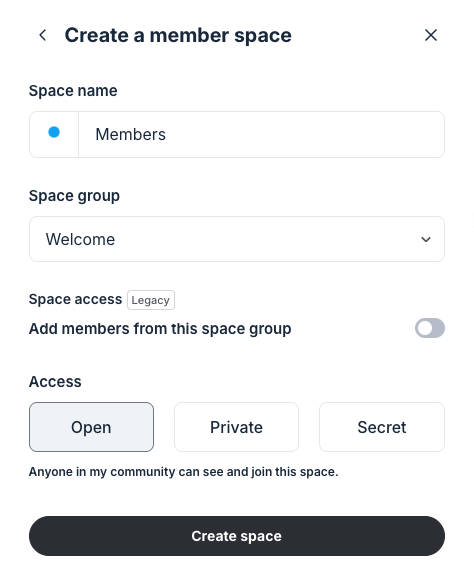
Configure essential space details:
Add a space icon: Add an icon of your choice that will be displayed in the left sidebar and space header in your community. To learn more, see Set up a space icon.
Add space name: Name your member space.
Space group: The space group will be pre-filled based on where you initiated the new space. However, if you change your mind, you can choose a different space group from the dropdown.
-
(Optional) Add members from this space group: Enabling this toggle will automatically add everyone who is a member of the space group.
ℹ️ Note: This setting is only available to communities created before January 29, 2025. If you are using access groups, this setting will grant manual space access to these members separate from the access group. This means that the space grant given through this setting will appear under the Manually added section within the members' account (the Edit account page).
-
Select access level: Choose from open, private, or secret access. To learn more about space access, see Managing space access and visibility.
Click Create space.
Ready to customize your member space?
Check out the following article to learn more about member space customization: