Setting up AI filters and actions
Last updated: September, 2026
AI filters and actions supercharge your workflows using the power of AI. This article explains how to set them up in workflows.
AI filter
AI filter helps you automatically decide what kind of content can successfully trigger the workflow event. By describing your criteria in natural language, you can instruct on what to look for in posts and comments. If the member’s content doesn’t match your instructions, the workflow is skipped for the member.
This allows you to effectively moderate content and automate other actions.
AI moderation: Use the AI filter to automatically moderate content at scale. Just provide clear instructions about what to flag. You can then take moderation actions like reporting posts or comments, hiding it from featured areas, to reduce its visibility.
Automated actions: Decide which types of content should trigger a workflow, then automatically perform actions such as sending a direct message to a member, adding a tag, sending a push notification, and more.
Here’s what you need to know before using the AI filter:
Workflow availability: You can set up the AI filter only in automation workflows at the moment.
-
Eligible triggers: You can use the AI filter with the following triggers:
Published a post
Posted a comment
Setting up an AI filter
In the Filter conditions section, select Filter by audience and content with AI.
-
In the AI filter text field, enter your instructions. In addition to the AI filter, you can apply audience filters.
After reviewing your filter conditions, complete the Inputs section and click Continue to save the trigger step.
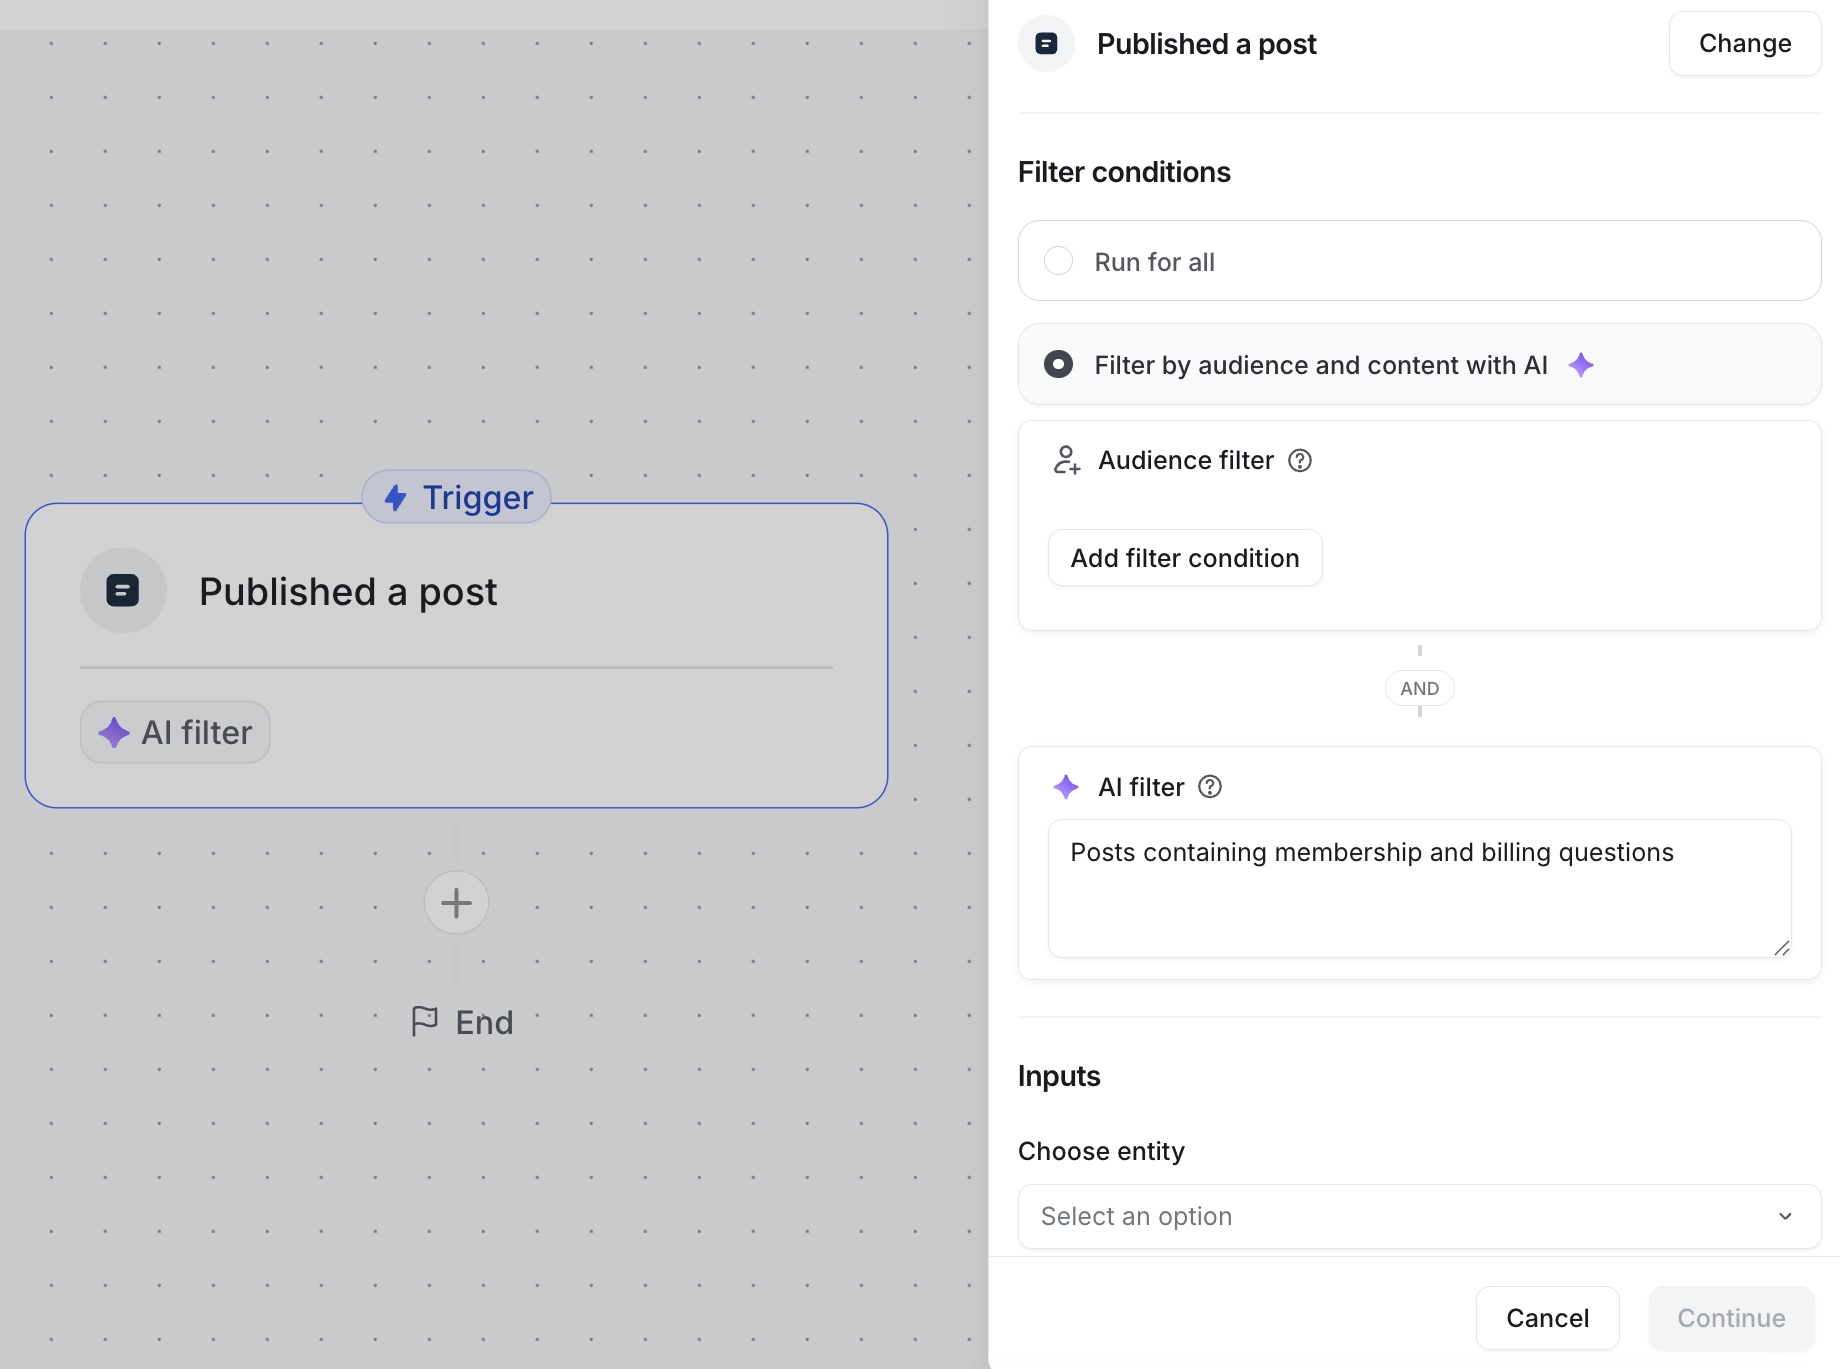
When an AI filter is applied to the step, an AI filter badge will also appear on the trigger step within the workflow editor.
Tips for writing an AI filter prompt
Your instructions should clearly describe what you want the AI to look for in the content. Think of them as guidelines for analysis. For example:
Identify content type: Ask the AI to flag content that contains frustrated or offensive language, or that goes against your community guidelines. On the other hand, you can ask it to identify posts with positive sentiment, personal success stories, or expressions of appreciation.
Look for specific keywords: Guide the AI to find specific words like “help”, “membership”, “refund” that should trigger follow-up actions.
AI actions
Supercharge your workflows by integrating actions powered by your AI agents and AI capabilities. These actions help you scale community engagement and moderation tasks, freeing you to focus on what matters most in your community.
Here’s what you need to know before using AI actions:
Workflow availability: AI actions are currently available only in automation workflows.
Dynamic availability: The actions you can use depend on the trigger you choose. For example, if you pick the “Posted a comment” trigger, you can only set up eligible AI actions, such as “AI reports comment” or “Agent sends direct message”. Other AI actions will be disabled.
Agents: When an agent powers the AI action, you need to choose one of the AI Agents you have created and enabled in your community. This is the agent that will carry out the action.ℹ️ Note: You can only choose from agents that are enabled. If an agent used in your AI actions is later disabled, any workflow actions that rely on that agent will fail. Other actions in the workflow that don’t use the disabled agent will still run when the workflow is triggered.
Filter conditions: Filter conditions are not available for AI actions.
When you are setting up an action, you can choose one from the AI actions section. The setup is similar to any other action; you can set up relevant options/criteria in the Inputs section.
Agent comments on post
This action allows your agent to automatically comment on a member’s post when the workflow is triggered. For example, you can have the agent:
Welcome new posts with a friendly message.
Answer questions member may have included in their post.
Encourage members to share more details.
ℹ️ Note: The agent will only post a comment once as part of the action. It won’t be able to follow up with members’ replies.
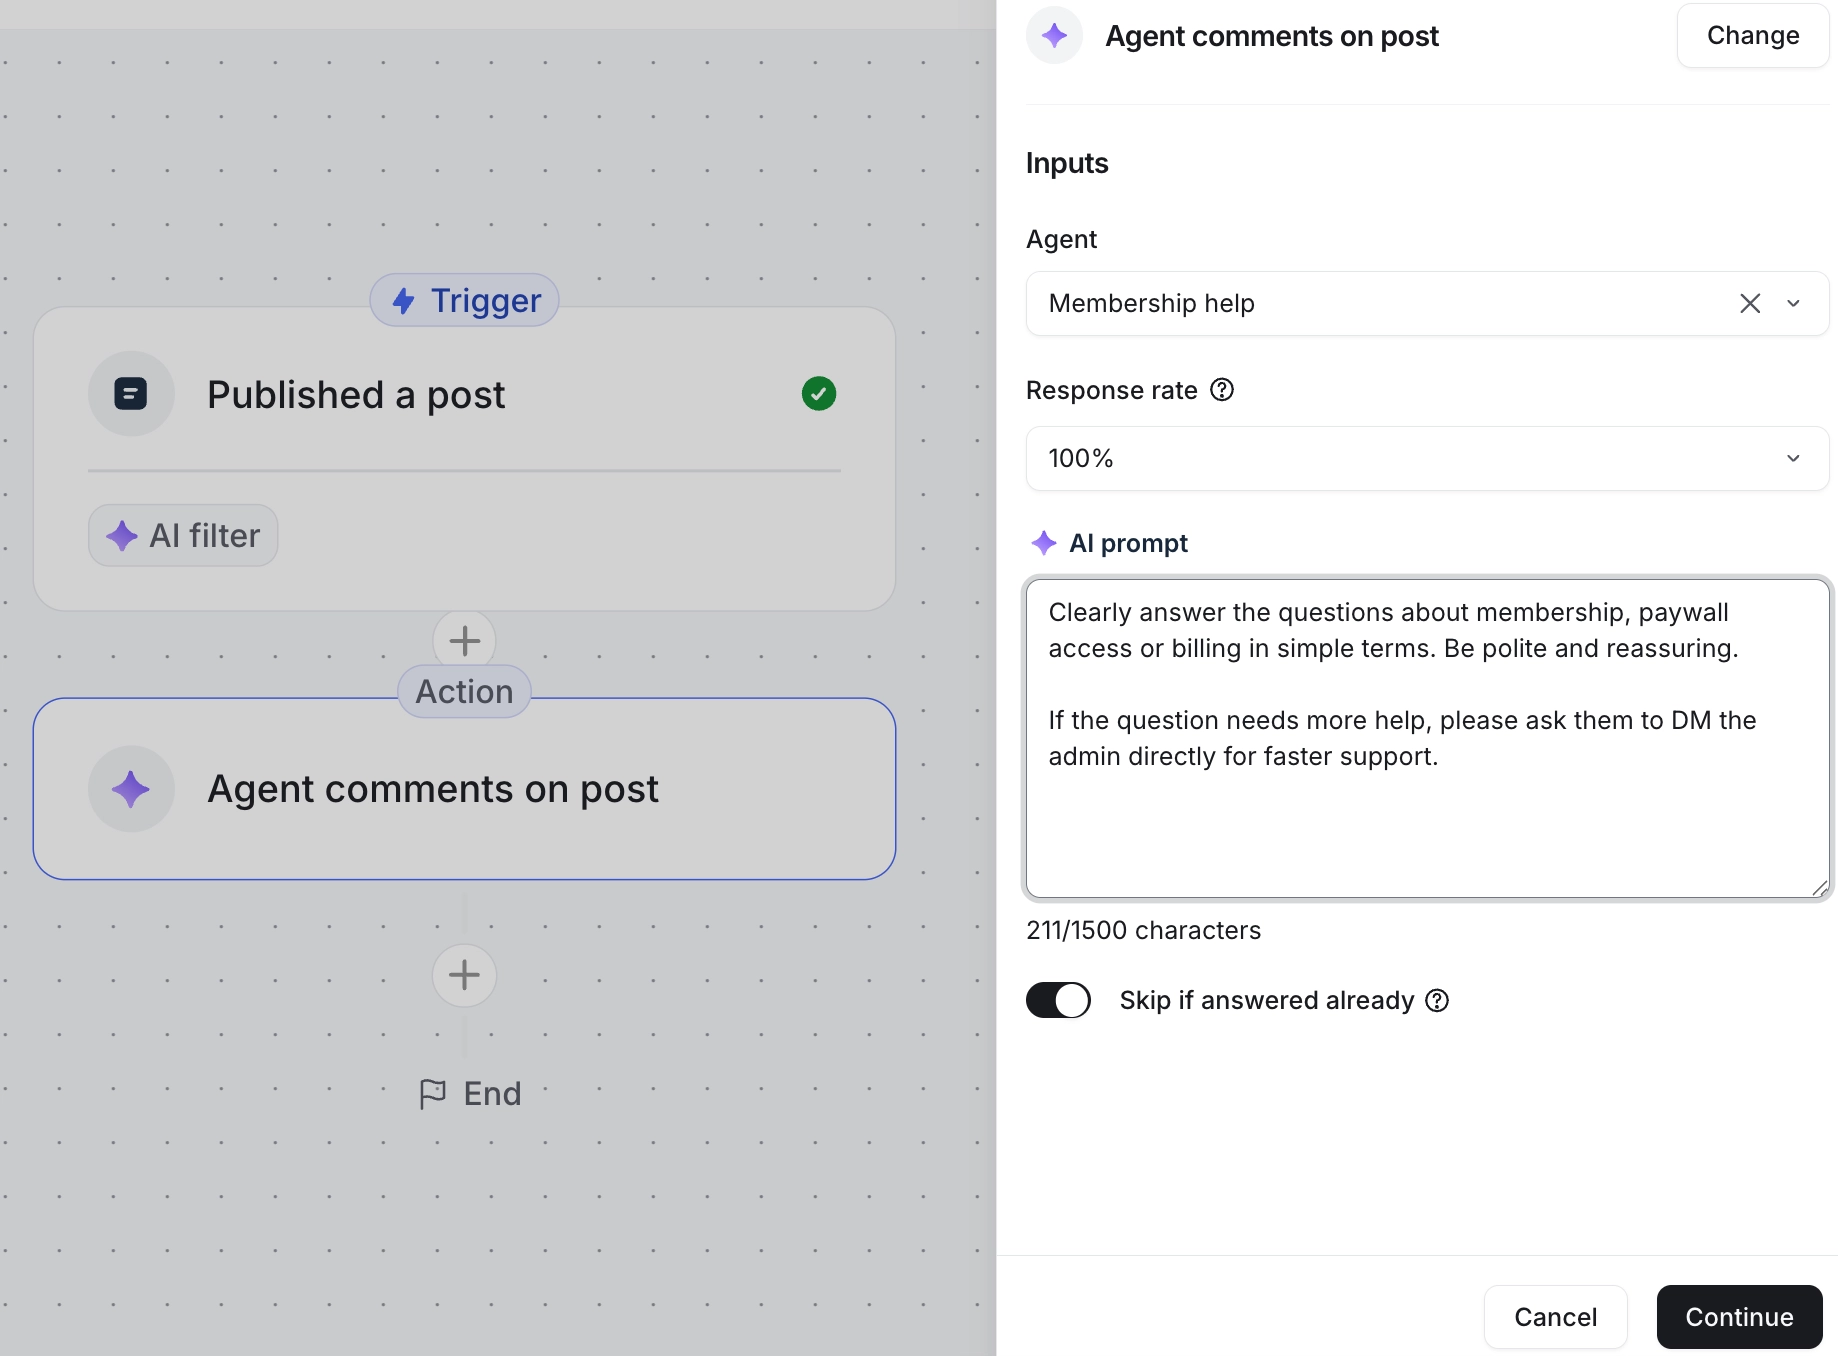
When setting up this action, configure the following:
-
Agent: Select the AI agent that will write the comment from the list.
Choose an agent that has the relevant knowledge and is set up with the desired behavior and style. This ensures the agent's comments match the output you desire.
-
Response rate: Choose the agent's response rate. This controls how often the agent comments on eligible posts. If you set it to 100%, the agent will comment on every eligible post.
If you choose a lower percentage, the agent will randomly respond to only a certain percentage of new posts. This is helpful in busy communities where too many automated replies could come across as spam. It makes the responses seem more natural and human.
AI prompt: You can provide additional instructions (up to 1500 characters) to guide the agent on how to write a comment. See below for more details on how you should write it.
Skip if answered already: When this toggle is turned on, the agent will skip commenting if another member has already commented on the post.
Tips for writing the AI prompt
AI prompt should be used to guide the agent in responding to a comment in a specific way. Since this helps the agent shape its single response, we recommend making it clear and complete so the agent gets it right.
When you’re writing a prompt for this workflow action, use the following test to make it effective. Here’s how:
Create a new conversation with the AI Agent via direct messages. You want to create a conversation with the same agent that you like to use for AI action.
In the conversation, write a new message asking to respond to a post. In your message, add your prompt and paste a sample post content.
Analyze the response you get from the agent. If you’re not happy with the result, tweak the instructions in your message until you get a reply you like. Then use those instructions in your AI prompt. This helps you create instructions that work for your use case.
Here’s how to use the AI prompt field:
-
Use the prompt to:
Control the format of the response. For example, you can tell the agent to keep it short, use bullet points, or add a greeting.
Reiterate the most important instruction or goal you want the agent to remember from its original purpose. If your Agent is meant to be friendly and helpful, you can remind it to sound welcoming.
Ask the Agent to include specific phrases or details. For example, you might say, “Please thank the user for sharing their content or story.”
-
Here’s what you should not do:
You should not use the field to change the agent’s core personality, tone, or behaviour traits that you originally added to the agent’s setup (using instructions field and tone configurations in the Behaviour tab of the agent’s setup).
Do not ask the agent to pretend to be a different character or add instructions that go against the agent’s original purpose.
Do not suggest that the agent ask follow-up questions in its response, as it cannot respond to follow-up questions.
Don’t reference the post author’s name or other comments. The agent has access only to the post content.
Viewing task history and managing agent response
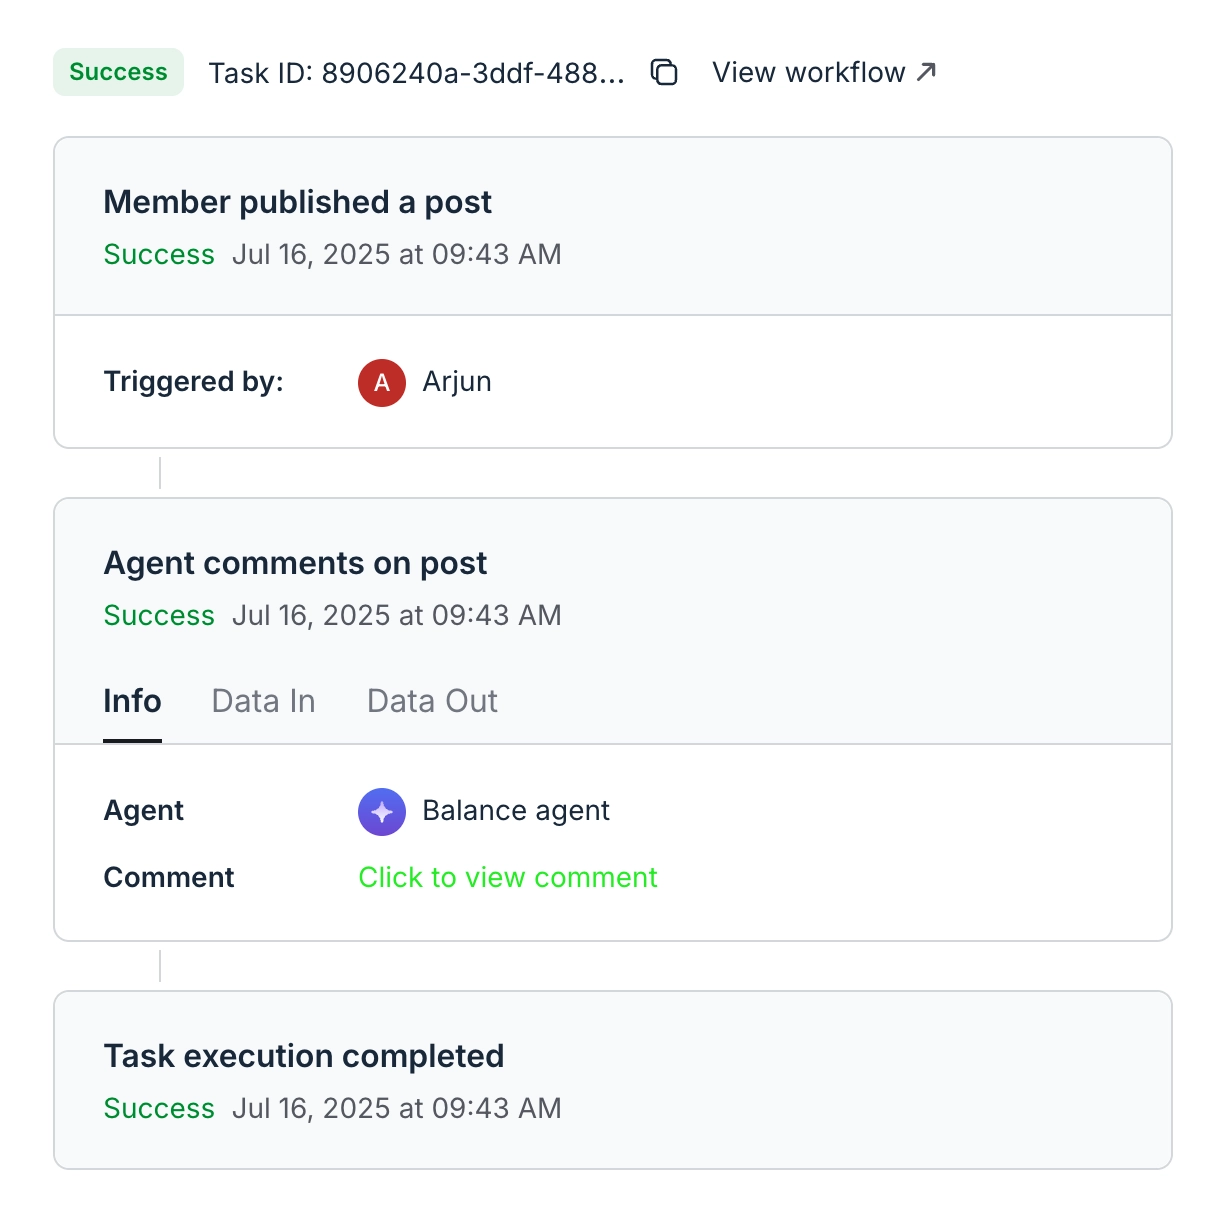
After your automation workflow runs, you can view the action-related details in the task history. When you open task history, go to the Info tab for the “Agent comments on post” action. You’ll see the name of the agent who made the comment and have the option to view the actual response. This is a handy option to go directly to a member's post and see the agent's response.
As an admin or moderator of the space, you can also edit or remove an agent’s comment if needed. To do so, go to the agent’s comment and click More actions (three dots) next to the comment and select the preferred option.
Interacting with the agent
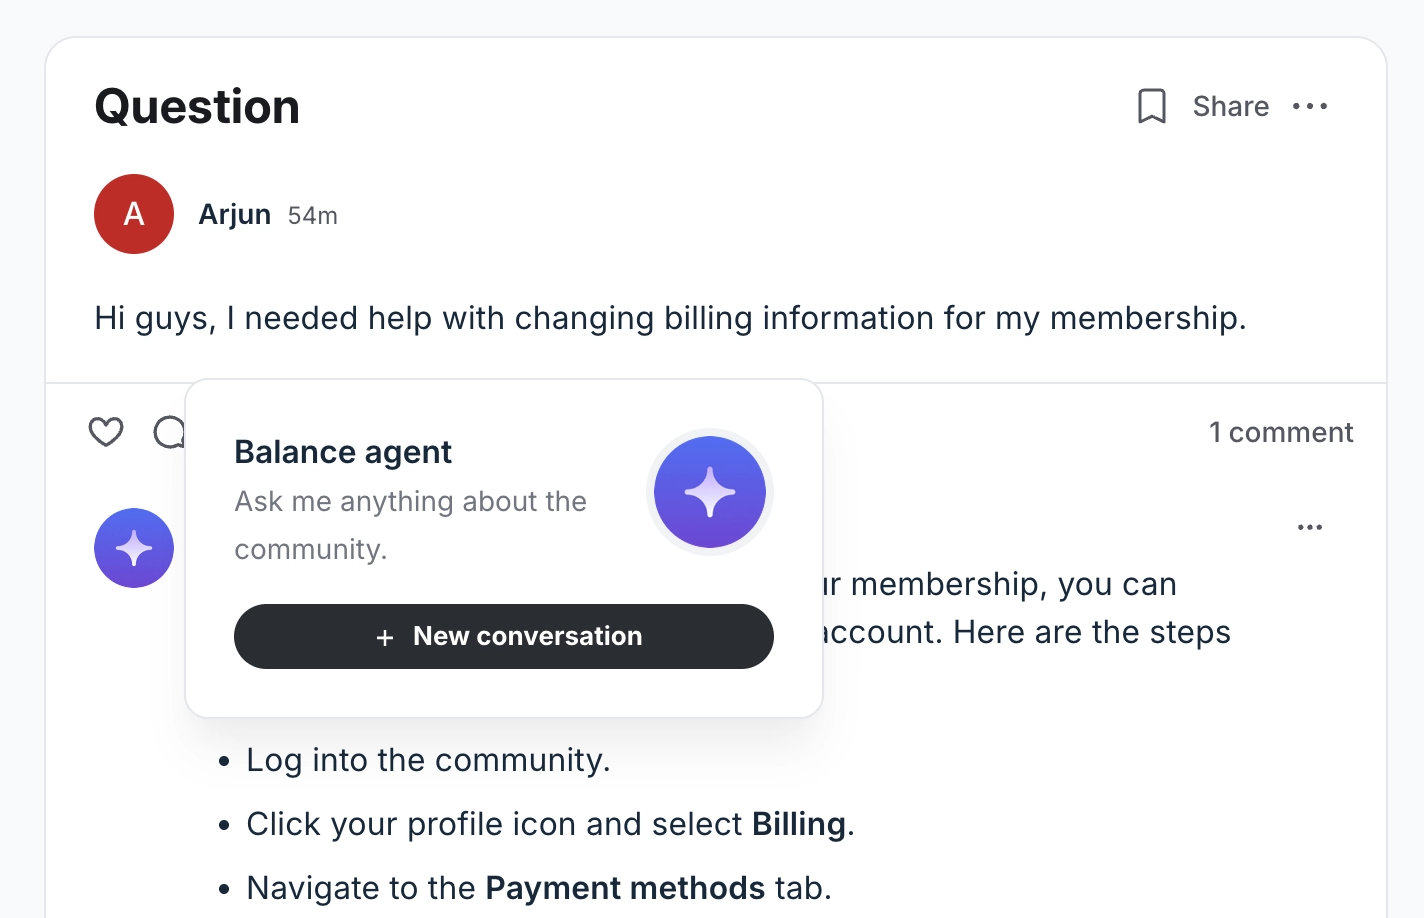
When the agent responds to a member’s post, the comment will appear with the agent’s metadata, including the name and an AI Agent tag.
When a member hovers over the agent's name or clicks it, they can view the agent’s profile, including the bio. If the member is part of the agent’s audience and the agent’s DM touchpoint is enabled, they can also start a new conversation with the agent. This helps make the agent feel like a real part of your community and encourages more engagement with it.
AI reports post
This action reports a post that triggers the workflow. This action is really useful to implement AI moderation, where you can set an AI filter to check for specific issues, such as inappropriate language, spam, or off-topic content, and have the AI report the post if it meets those criteria.
When you set up the action, you can let AI generate a context-specific reason for each report or enter a Manual reason. Manual reasons can be up to 500 characters and typically reference the rule or guideline that the content may be breaking (for example, “Contains hate speech” or “Promotes unrelated products”).
Each time the workflow runs and reports a post, the AI-generated or manual reason appears on the report. This gives moderators and admins clear, context-specific insight during review, helping them quickly understand why the post was flagged and decide on next steps.
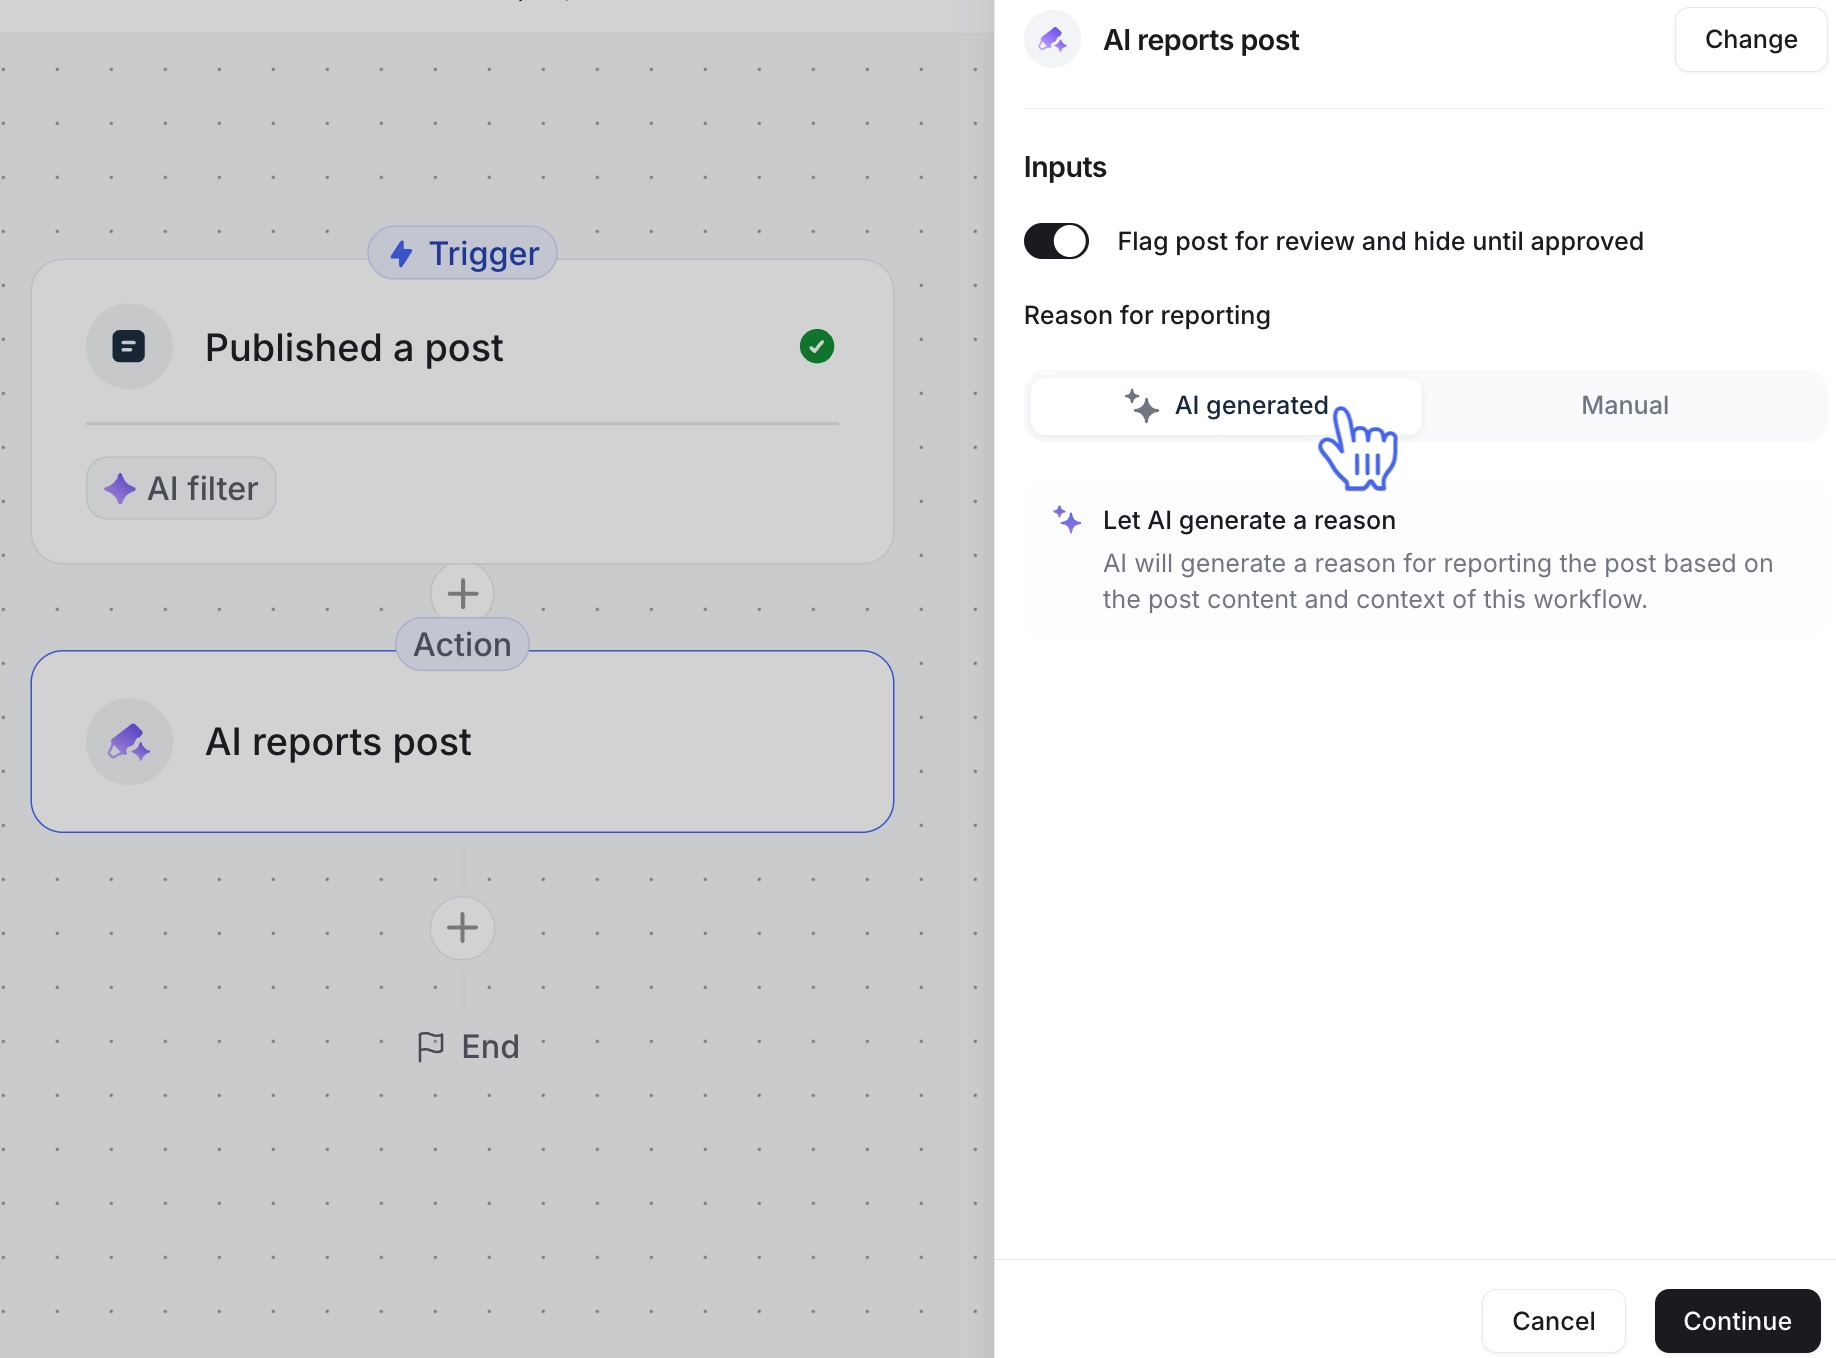
When reported by this action, you can also choose to Flag the post for review and hide it until approved.
AI reports comment
This action works much like reporting a post, but it targets comments instead. When a comment matches your trigger filter criteria (including AI filter if added), it can automatically report it.
When you configure the action, you can let AI generate a context-specific reason for each report or include a Manual reason. Manual reasons can be up to 500 characters and typically reference the rule or guideline that the content may be breaking (for example, “Contains offensive language” or “Off-topic spam”).
Each time the workflow runs and reports a comment, the AI-generated or manual reason appears on the report. This gives moderators and admins clear, context-specific insight during review, helping them quickly understand why the comment was flagged and decide on next steps.
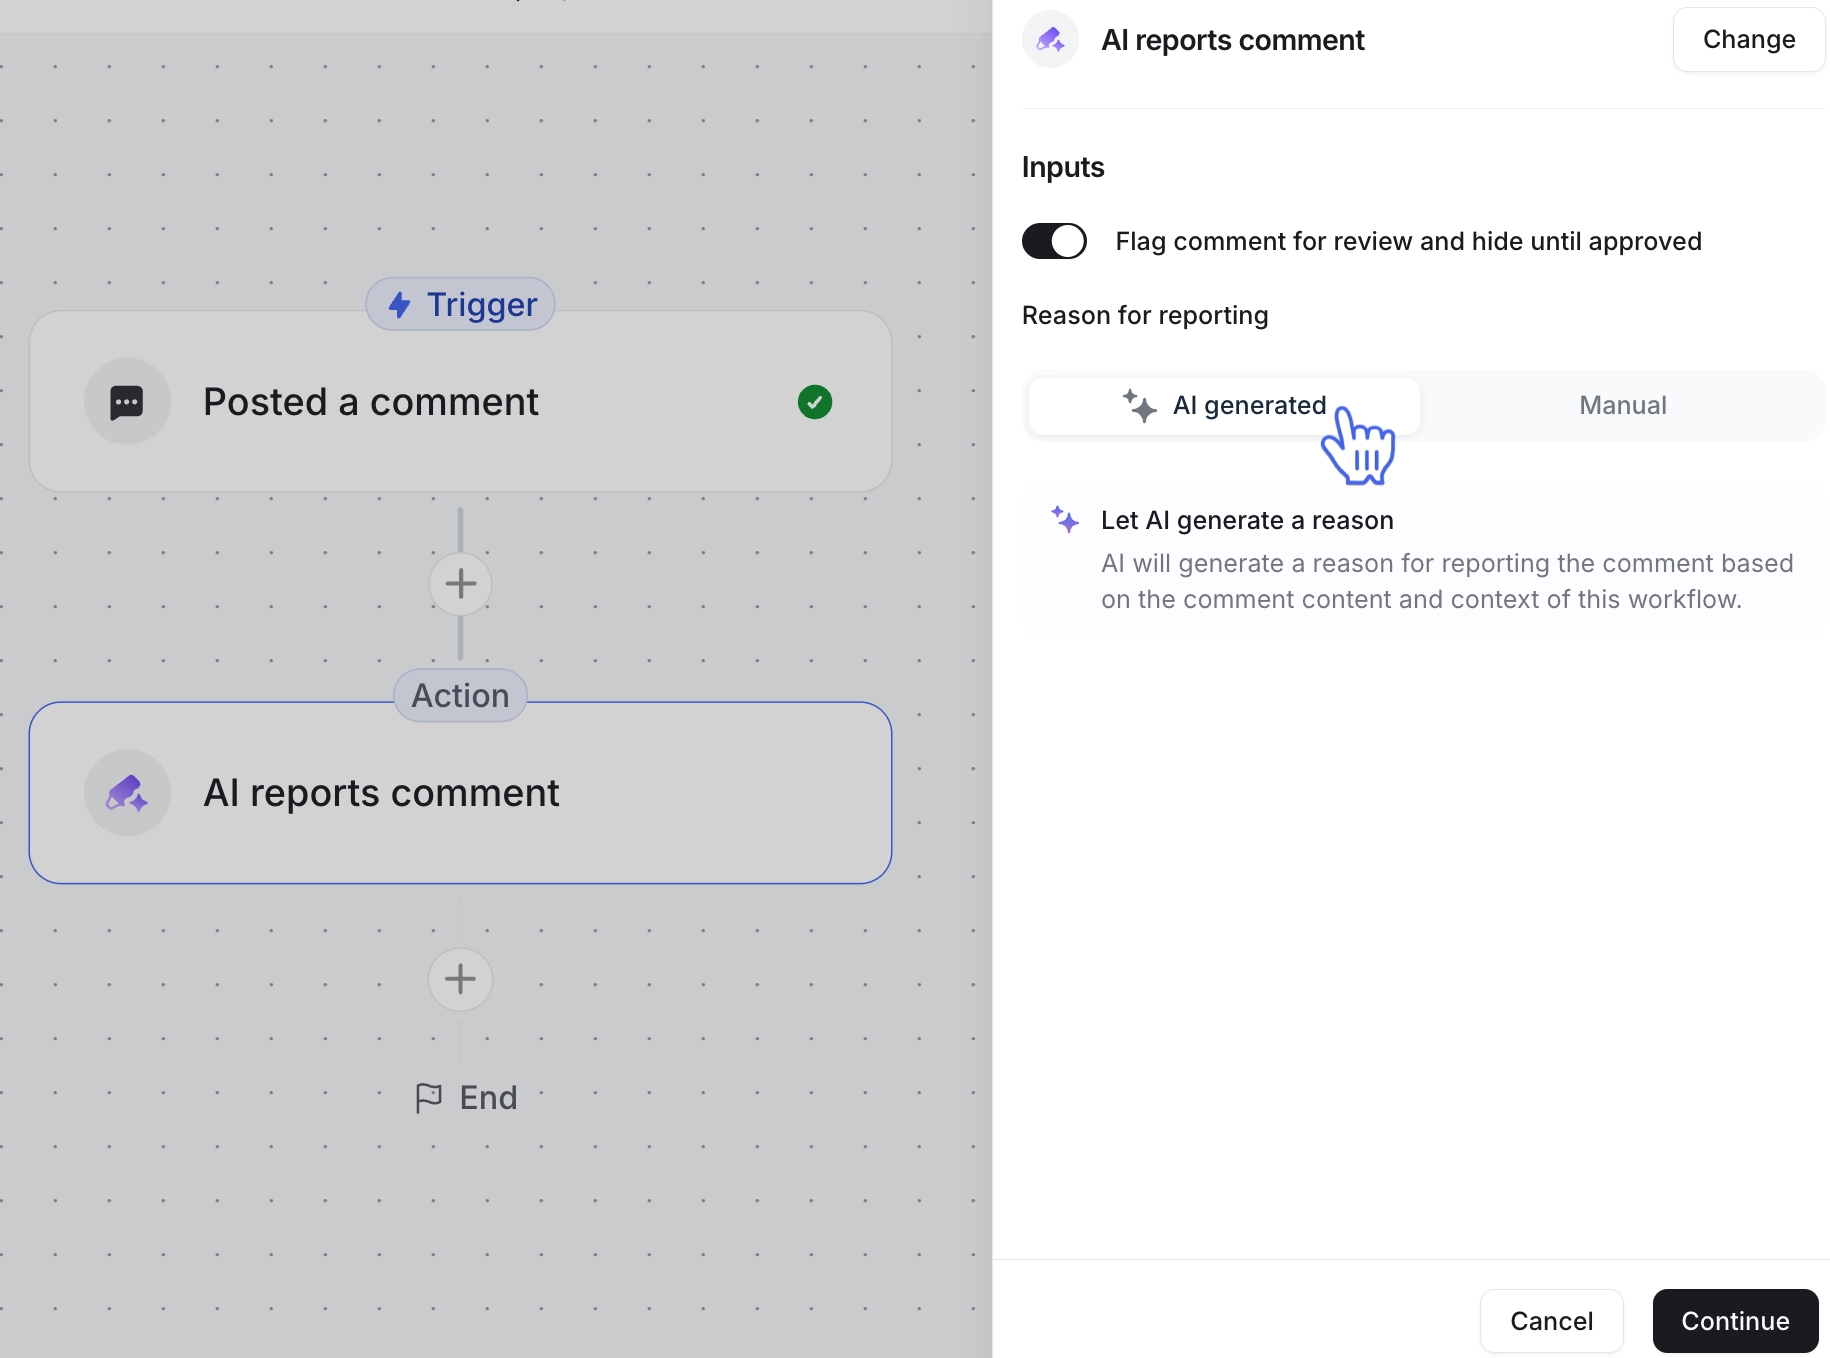
When reported by this action, you can also choose to Flag the comment for review and hide it until approved.
AI edits topics
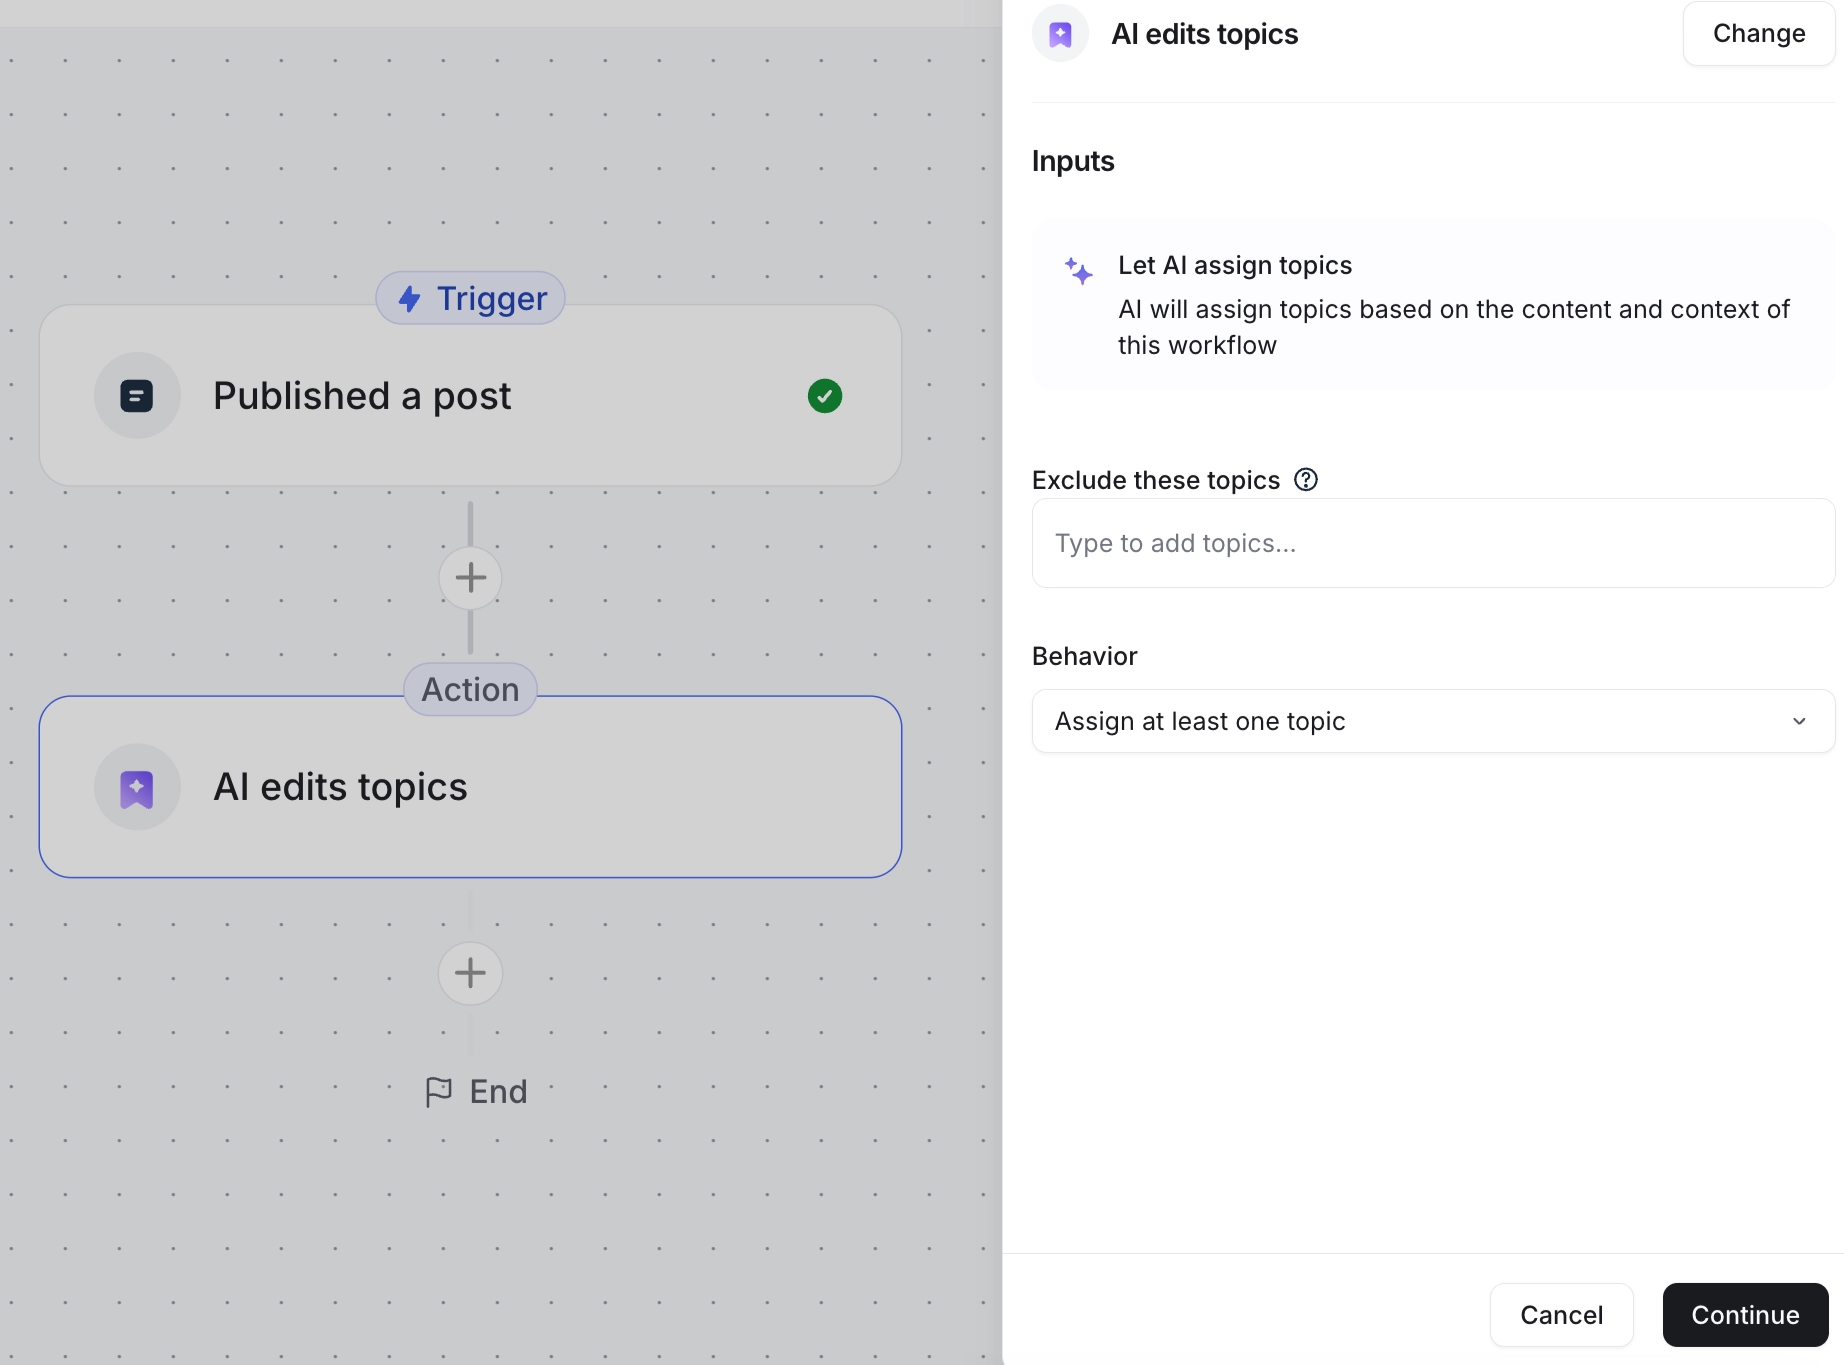
This action automatically assigns topics to published posts. It uses AI to review the content of a post and, based on the topics available in your community, assigns the ones that best match.
When setting up the action, you can configure the following settings:
Exclude these topics (optional): AI will never assign any of the topics you select here.
-
Behavior: Choose from the following options to tell the AI how to proceed:
Assign at least one topic: Choose this for the AI to assign the most relevant topics. If there are no clear matches, AI will assign the closest match.
Don’t assign any topics when there are no clear matches: Choose this option for the AI to skip assignment if there are no relevant topics.
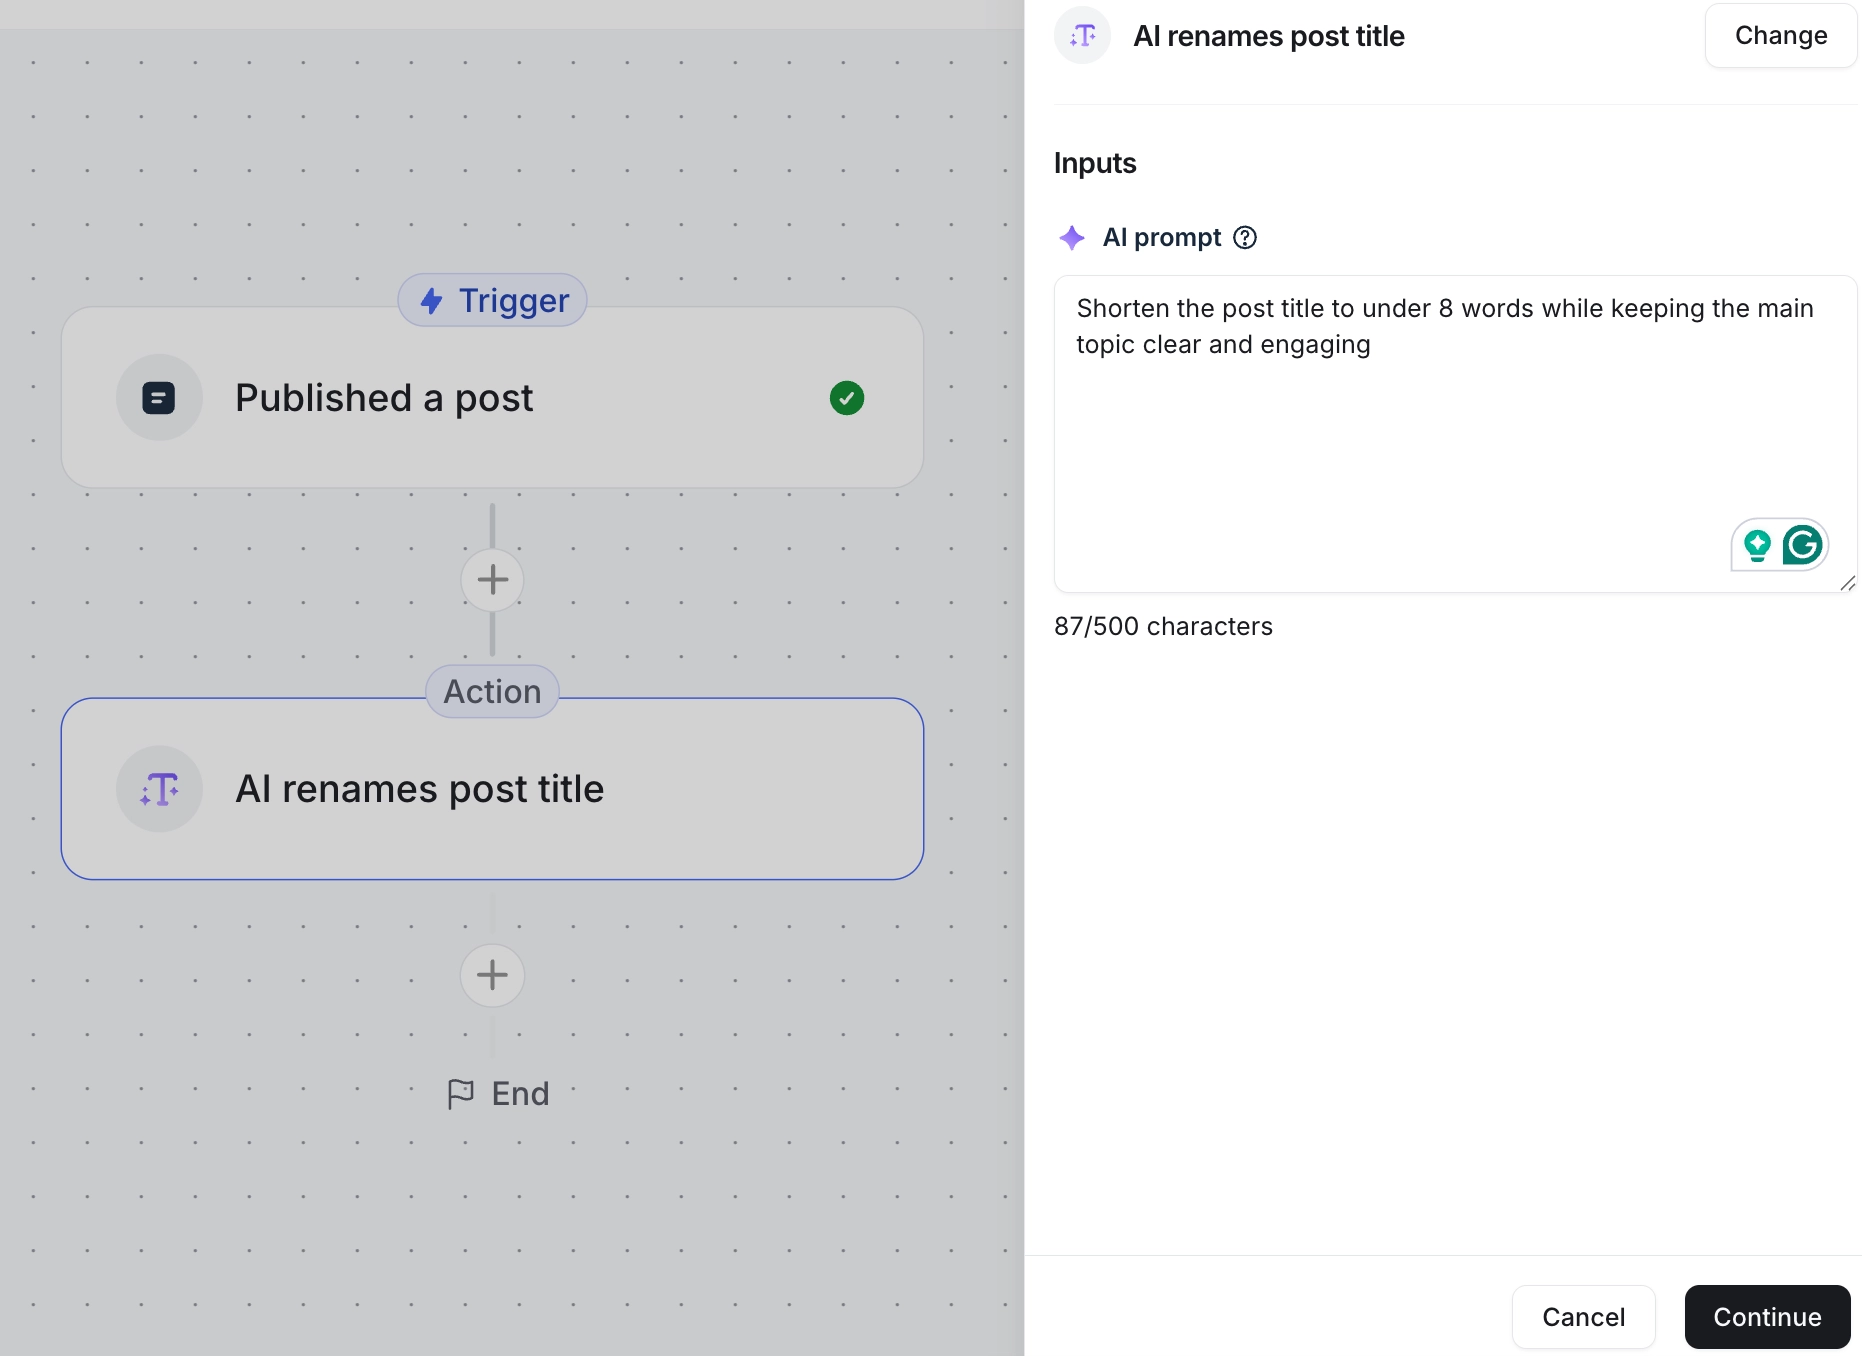
AI renames post title
This action automatically updates a post's title using AI based on your specific instructions. It’s especially useful for keeping titles clear, consistent, and aligned with your preferred style without manual editing.
When setting up the action, you can provide an AI prompt with clear instructions (up to 500 characters) on how the title should be updated. For example, you might ask it to:
Shorten a long title to make it easier to read, or lengthen it by adding helpful context.
Adjust the tone or style, for example, making it sound more formal, more casual, or more attention-grabbing.
Rewrite the title for clarity, so the post’s purpose is obvious at a glance.
Modify the title to reflect the main theme or focus of the post's content.
Agent sends direct message
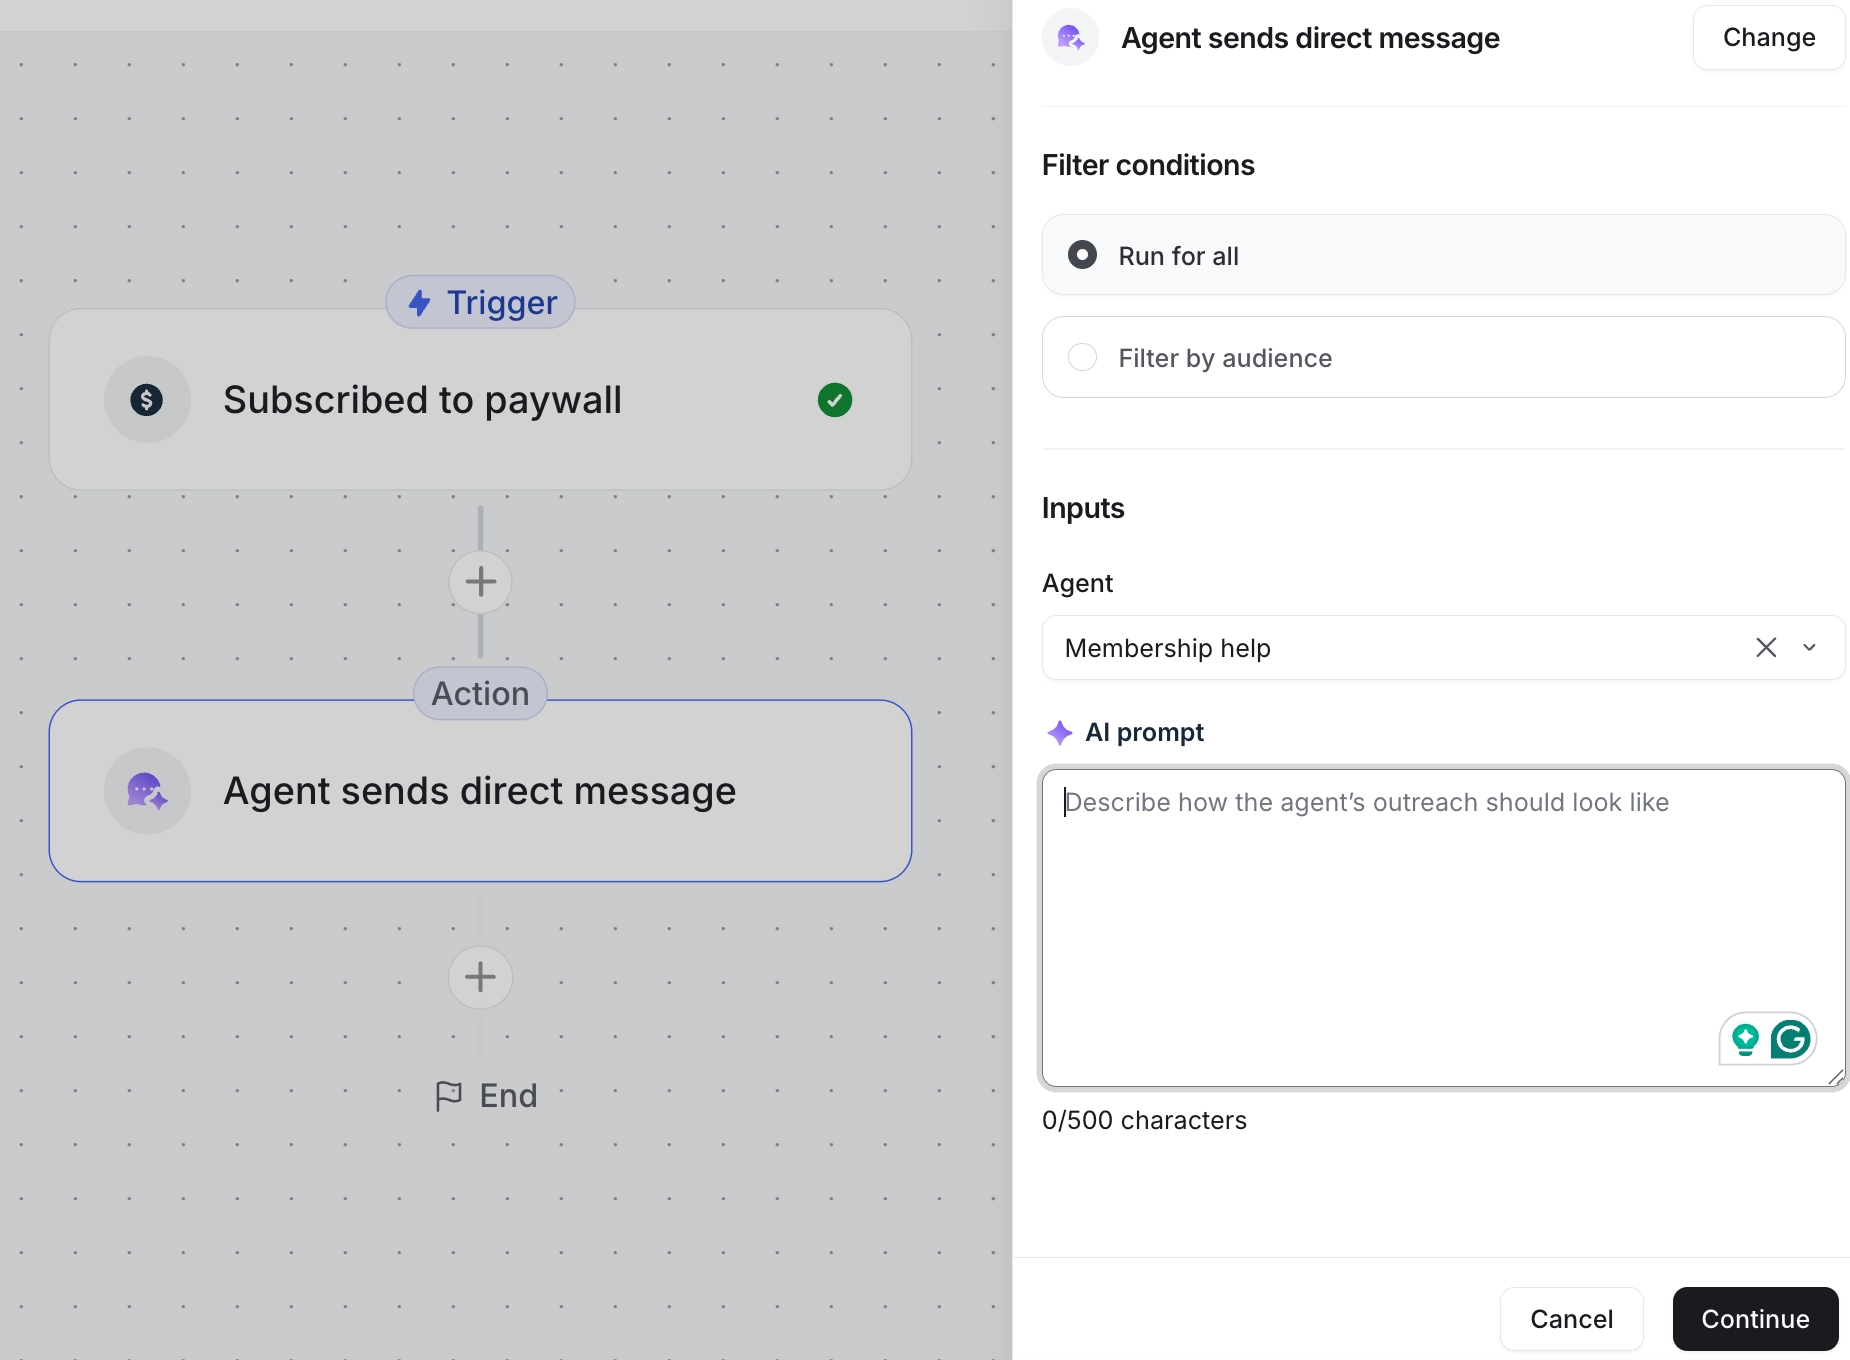
This action lets your AI agent automatically send a private DM to members whenever a specific workflow trigger occurs. This helps you build stronger connections, guide members at the right time, and offer support without having to reach out manually.
How it works
-
When a workflow is triggered (for example, when a member finishes a course section), the selected agent automatically sends a direct message. To draft a direct message to a member, the agent uses the following inputs:
Context, depending on the trigger. For example, for the failed quiz trigger, the agent receives information about the quiz content, the member’s answers, and the correct answers.Your AI prompt from the workflow setup.
The agent’s knowledge and instructions from its setup.
The member receives an in-app notification indicating that the agent has sent a message. They can also access the message directly in the Agents tab of their direct messages.
The member can click the notification to open the conversation and send a reply to continue the conversation with the agent.
Common use cases
This action can support many use cases across your community:
-
Courses:
Offer hints or tips when a member fails a quiz so they feel supported before retrying.
Celebrate course completion with a message that outlines next steps, such as advanced courses or community discussions.
-
Moderation:
Send a private message when a member’s post or comment is flagged, including guidance on community standards.
Inform members when their content is rejected and provide constructive context on community guidelines.
-
Paywalls:
When a member subscribes to a paywall, send a welcome message that highlights perks and introduces the agent as a support resource.
If a trial ends without a subscription, send a friendly follow-up to gather feedback or offer support.
-
Posts and comments:
When a member publishes a post with a certain sentiment or a question, the agent can follow up with a helpful DM.
If a member asks a question in a comment, the agent can send a direct message offering resources or answers.
Setting up this action
When configuring Agent sends direct message, you’ll need to set:
Agent: Choose which agent will send the DM. Pick an agent that has the right knowledge and is set up with the tone and behavior you want members to experience. For example, you might use a “Support agent” for moderation workflows or an “Onboarding agent” for welcoming new members.
AI prompt: This is where you explain (in up to 500 characters) how the agent should write the message. Use it to shape the message, include specific details, and highlight important information. AI agents can also read profile fields and reference this data to personalize messages. In the prompt, simply ask the agent to reference profile fields, for example, you can type: Reference the member's profession and company name to personalize the welcome message.
Tips for writing effective prompts:
Similar to the “Agent comments on post” action, this prompt should guide the agent in forming the direct message. We recommend avoiding asking the agent to pretend to be a different character or add instructions that contradict the agent’s original purpose.
Use the prompt to reiterate the most important instructions, such as including specific phrases or particular details you would like the agent to include.
You can test the workflow yourself before rolling it out to members. Set up the workflow and use the audience filter (for example, the Name filter with your name) for the trigger step so it only triggers for you. Now perform the action that triggers the workflow. Check how the agent’s DM looks and adjust the prompt if needed by editing the workflow. Once you’re happy with the message, remove that audience filter and finalize the workflow setup.