Create email content using the text builder
Last updated: October, 2026
The text builder helps you create clean, simple emails focused on your message. In this article, we’ll walk through the text builder’s features and how to use them to draft your emails.
About the text email builder
The text email builder is a lightweight editor designed for text-based formatting and embeds. You can apply formatting, add images, attachments, and buttons.
Ways to access the text email builder
When creating a new broadcast or setting up a Send an email action in workflows, you’ll have two options to start writing your email from the Content section:
Choose to start from scratch: When starting from scratch, select Text builder to get started.
Select template: If you’ve saved templates that were created in the text builder, you’ll find them labeled with the Text badge. You can also filter templates using the Type dropdown menu.
Once you’ve made your choice, the text builder will open, and you can begin writing your email content right away. For the broadcast or workflow you’re working on, you can always leave and return later to finish your draft.
📚 To learn more about setting up a broadcast or workflow action, see our step-by-step guides on Create email broadcasts and Set up email workflows.
Who can use the text email builder
Only community admins can create broadcasts and set up email workflows with the text builder. As an admin, you can access the builder from the desktop app and web browsers.
Get to know the text builder interface
The text builder layout is simple and designed to help you focus on writing. Here’s what you’ll see:
Header: At the top, you’ll find quick actions to send a test email, save and exit, and manage templates.
Toolbar: Just below the header, the toolbar includes all your main tools, such as formatting options, links, attachments, buttons, and more.
-
Text editor: This is your main workspace. Write your email here and use the toolbar to format text, add links, or include media and buttons.

Saving your draft
When drafting your email, make sure to save your work before leaving. Click the Save and exit button in the top right of the builder to ensure your progress is not lost.
Templates
The dropdown next to Save and exit gives you the following options:
Save template: Save your current draft as a new template. If you loaded a template and made changes, you can also save them to the existing template instead of creating a new one.
-
Change template: Load a different template to replace your current draft with template content.

📚 To learn more about creating and managing email templates, please refer to our guide here.
Compose and format text
Let’s take a look at how you can use key icons on the toolbar to style your content:
Command menu: Click the ➕ icon to access AI content writer, formatting tools, and upload options within the editor.
Text styling: Use the dedicated icons for bold, italic, strikethrough, or underline to emphasize important points.
Heading and paragraph: Click the T icon to switch between the body text, H1, H2, or H3 headings. This allows you to structure content and make it easy for recipients to scan and read.
Emojis: Use the Emoji icon to add visual elements to convey tone and emotion.
Alternatively, you can use the following methods to access various options:
-
Command menu shortcut: Type forward-slash (/) in the editor anywhere to quickly access the command menu.
-
In-line formatting: To format existing text, highlight it by selecting the text. A formatting toolbar will appear, giving you easy access to AI content writer, bold, italic, underline, and more.
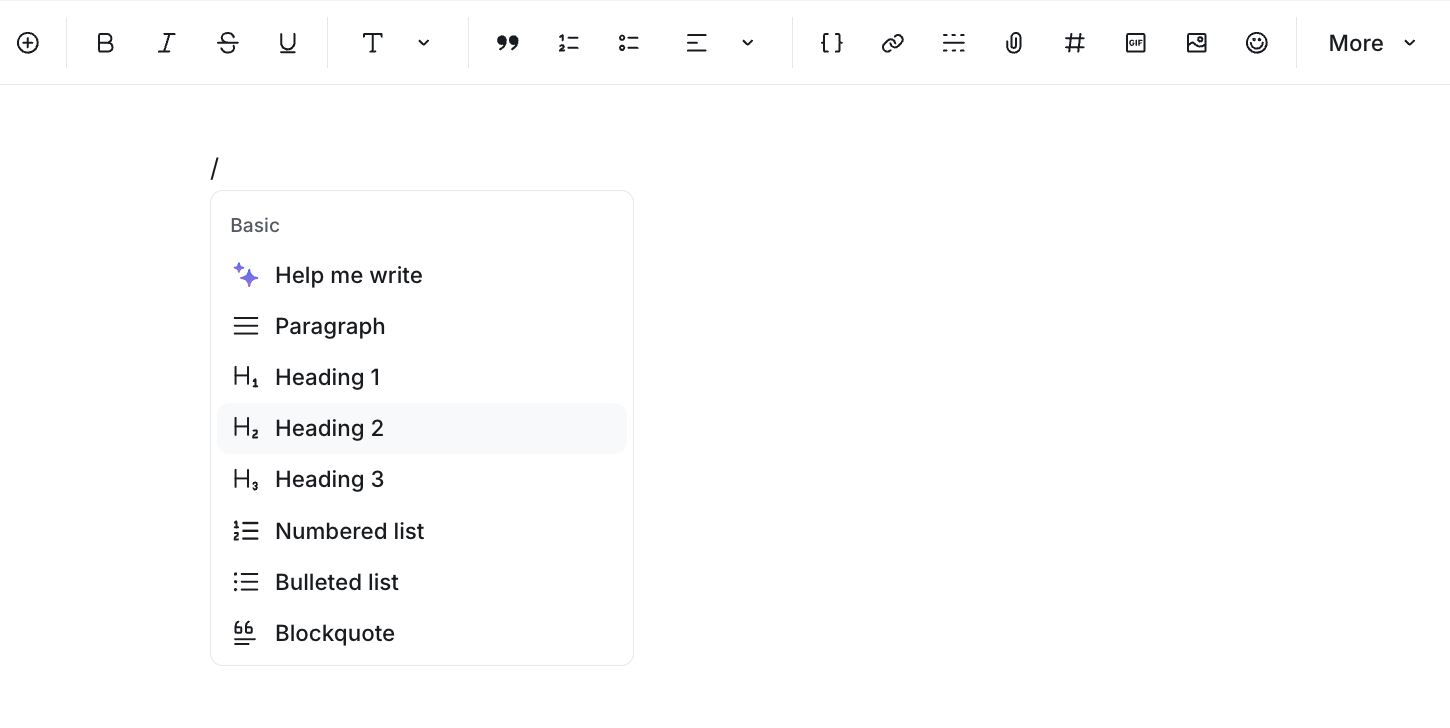

Using AI content writer
The content writer helps simplify the writing process by generating content ideas, introductions, paragraphs, and more in a conversational tone.
At the left of the toolbar, click the ➕ icon, and select Help me write from the menu. Choose an option from the dropdown and complete the prompt, or type your custom prompt in the field.
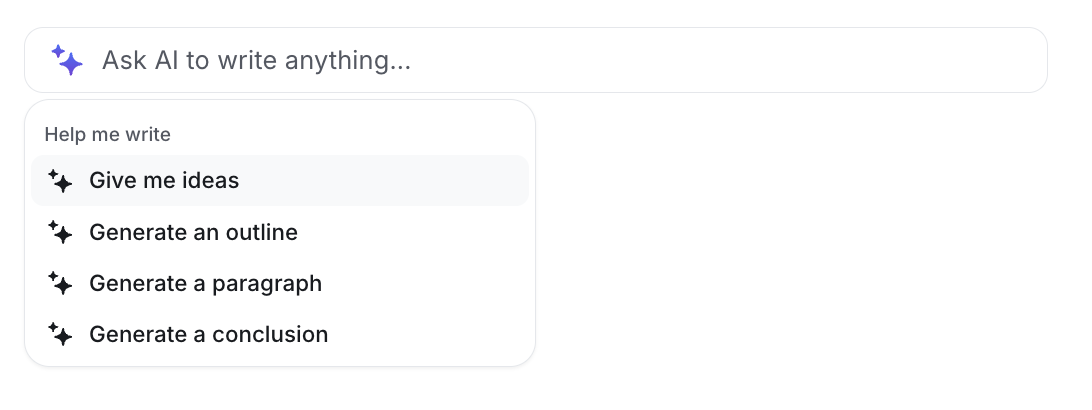
Add quotes and lists
To add more structure to your content, you can utilize quotes and list options. You can access both of these options directly from the toolbar or by highlighting a line of text.
Blockquotes are useful for highlighting testimonials, important statements, or key information.
You can create bulleted or numbered lists to organize your content clearly, ideal for steps, tips, or features.
Add dynamic variables
Personalize your email by adding dynamic variables that automatically insert personalized information for each recipient. For example, you can greet the recipients at the start of the email by adding a member name variable.
To insert a variable, type curly brackets {{ in the editor or click the Add variable {…} icon on the toolbar, then select a variable from the list. The following variables are available:
{{member.first_name}}
{{member.last_name}}
{{member.name}}
{{member.email}}
{{member.public_uid}}
{{community.name}}
{{community.url}}
Fallback value
You can also set a default value for variables in email broadcasts so messages read naturally when member data is missing. Add a fallback directly in the variable using | [fallback text] within the curly brackets.
For example, to set a default value for the member’s last name, write: {{member.first_name | student }}. If a member hasn’t added a first name to their profile, the email will show student instead of leaving it blank
When the email is sent, Circle checks whether each recipient has a value. If they do, Circle uses the member’s data. If not, it inserts the default value you provided.
Hyperlink text
Linking to external resources is a great way to encourage your audience to explore further content or access important resources directly from your email.
To add a link to your text:
Highlight the text you want to hyperlink.
Click Link (🔗) on the formatting toolbar.
Enter the URL you want to direct the reader to and click Save.
💡 Tip: Avoid adding too many links to your email content. Ensure that all links are properly formatted and link to reputable sites. Links that look suspicious or lead to untrusted domains can trigger spam filters and may discourage recipients from clicking.
Add page dividers
To break up sections of your email and improve readability, you can add page dividers. These horizontal lines separate different parts of your message. Use them between sections like announcements, updates, or calls to action to create a clean and structured layout.
To add a divider, click the Divider icon or type the forward-slash (/) and select Divider from the menu.
Link to community content
You can link to various community content, such as posts, spaces, events, and lessons within your email. This is especially useful for boosting engagement and driving traffic back to key areas or content within your community.
To link community content, click the # icon on the toolbar or simply type the Hashtag # followed by the content title, such as the space name. As you type, suggestions will pop up. Then select the content you want to link from the results.
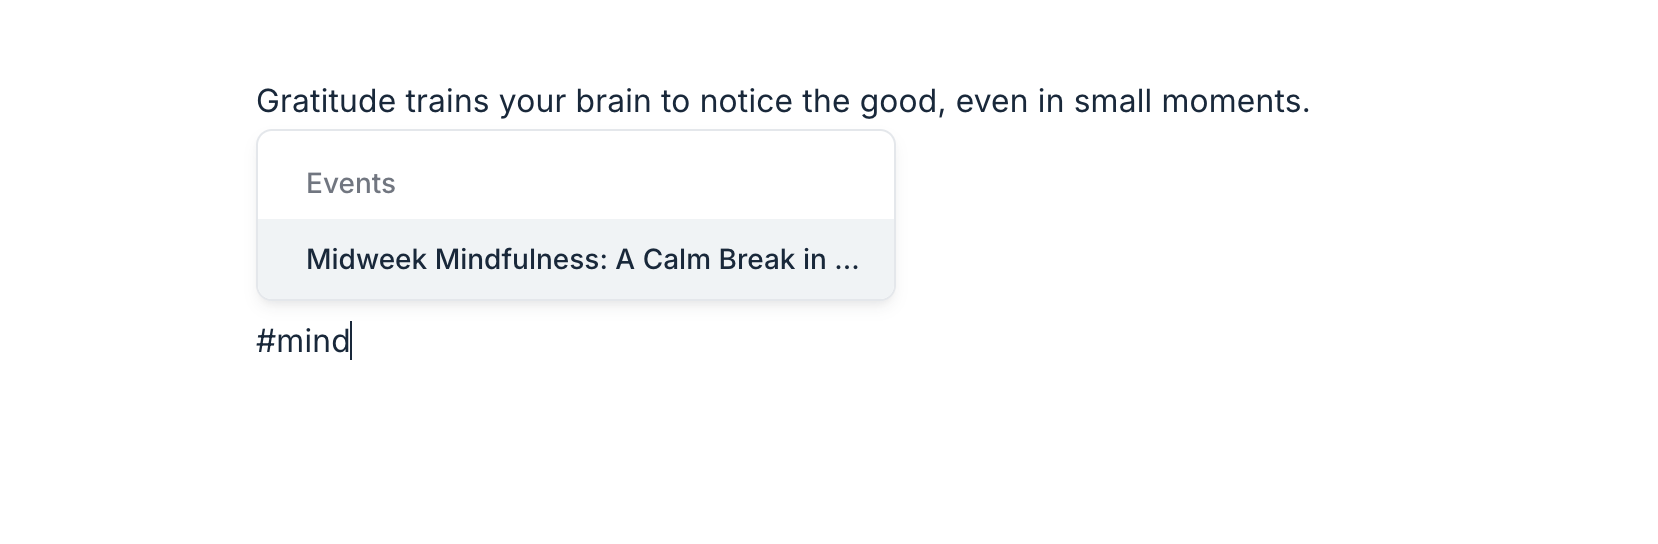
Once the link is added to your email, it will appear with a content title. When recipients click the link, it will open the community content in the new tab.
Add images and GIFs
Incorporating images or GIFs can make your email content more engaging and visually appealing. Visuals can help emphasize key points and make your emails more interactive.
💡 Tip: Try to achieve a good balance of text and images and avoid adding too many images or overly large image files, as it could trigger spam filters.
Adding images
Click the Image icon on the toolbar.
-
You'll see three tabs in the dialog to insert an image:
Upload: Select an image from your device to include in the email. Supported image file formats include JPG, PNG, and GIF. Note that images will be uploaded in their original size, making this an ideal option for logos.
Unsplash: Browse and insert high-quality stock images directly from Unsplash.
Embed link: Paste the URL of an image hosted online.
Adding GIFs
Click the GIF icon on the toolbar.
In the dialog powered by Giphy, search for a GIF by entering a keyword or browsing through popular options.
Select the GIF you want to insert, and it will be added automatically.
ℹ️ Note: You can upload your own GIFs by following to same steps to upload an image. Just select a GIF file instead of an image.
Adjusting image and GIF alignment
Once you’ve inserted an image or GIF, you can customize its alignment within your email to enhance the layout.
To adjust the alignment:
Hover over the uploaded image or GIF. The floating toolbar will appear above the image.
-
Click the Left, Center, Full width or Right alignment icon.
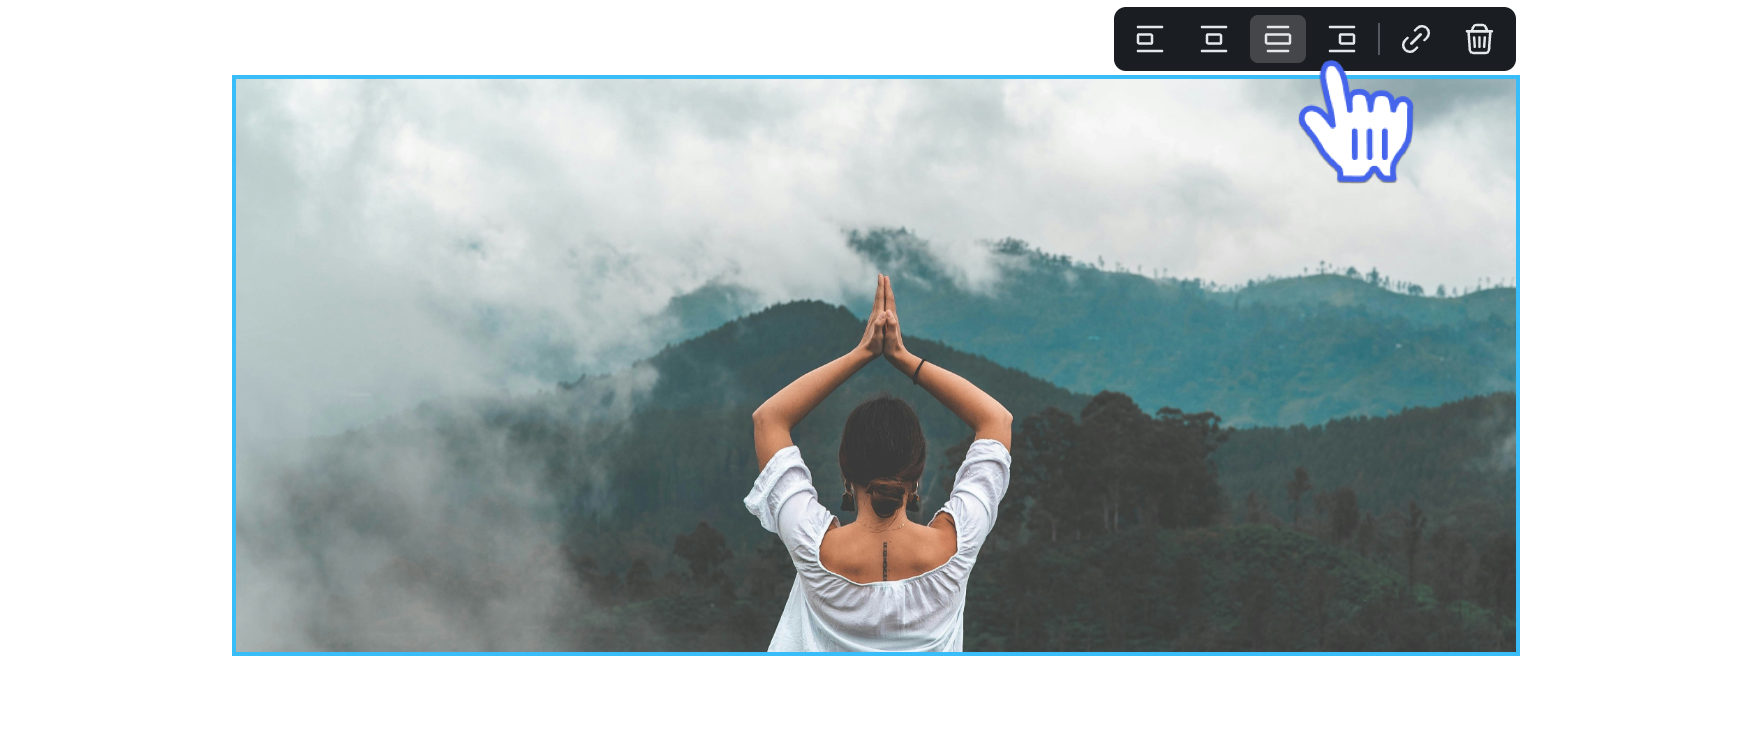
Adding a link to images and GIFs
You can now attach links to images and GIFs to direct your audience to external sites or a page within the community.
To hyperlink an image or GIF:
Hover over the uploaded image or GIF. The floating toolbar will appear above the image.
Click the Link icon. A link editor modal will appear, prompting you to insert a URL.
Paste or type the URL into the link box and click Save.
Deleting images and GIFs
To delete images and GIFs, hover over the item and click the Delete icon in the top right corner, or you can conveniently press the Delete or Backspace key on your keyboard.
Add attachments
You can add video files, PDFs, audio files, and more to your email content. These attachments will appear as clickable links within your email, displaying the file title. When recipients click the link, the file will be downloaded to their device.
To insert a file as an attachment, click the Attachment icon on the toolbar and upload the file from your device.
💡 Tip: Ensure the file name is descriptive so recipients know exactly what they are downloading.
Add buttons
Buttons are an effective way to create clear and actionable calls to action in your email. They stand out visually and can direct your recipients to important destinations such as your website, a product page, a sign-up form, or other key resources.
To insert a button:
Click the Button on the toolbar.
-
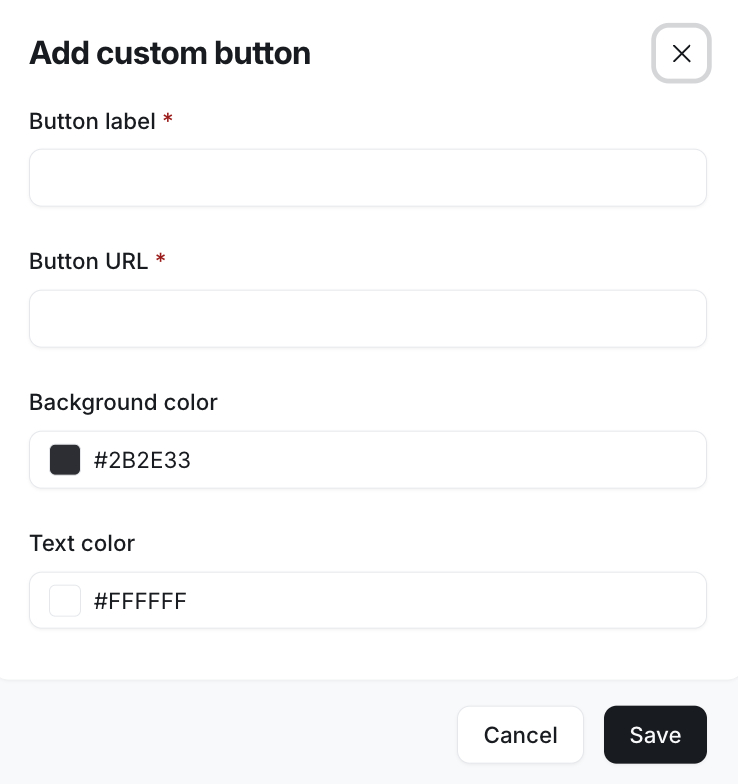
In the button editor, enter the following:
Enter the button label–this is the text that appears on the button (e.g., "Learn More”).
Add the URL or link where the button should direct recipients when clicked.
-
Customize the button color to match your branding. You can either enter the desired HEX code or click the current color to open the palette and choose a color visually.
Click Save.
💡 Tip: Avoid certain words and phrases that can trigger spam filters or make your email feel pushy, such as “Act Now”, “Free”, or “Click Here.” Instead, use positive, engaging language that emphasizes value, such as “Discover tips.”
Adjust button alignment
You can control how your button is aligned within the email body to optimize its visual impact:
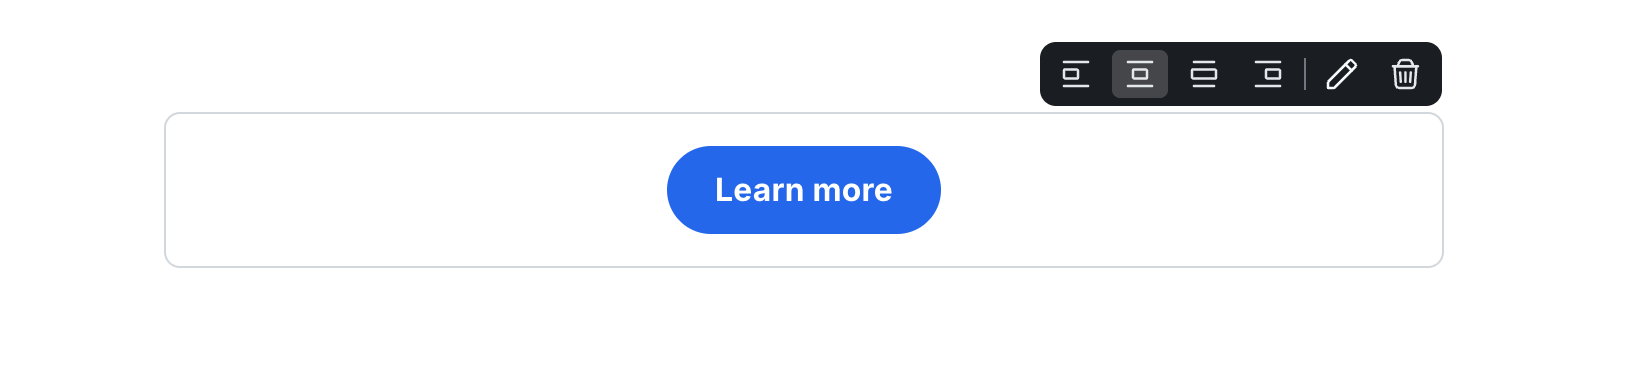
Position the button left, center, or right.
Expand the button to span the entire width of the email body for a prominent call to action.
To adjust the alignment, hover over the button. Then, click the icon corresponding to the alignment style at the top-right of the button.
Edit or delete buttons
You can easily manage the buttons you’ve added to the email by hovering over the button and selecting the relevant icon that appears at the top-right of the button.