Import contacts
Last updated: October, 2026
Add non-member contacts to your community to grow your audience beyond community members and streamline your marketing communications. This article walks you through preparing your import file, setting up the import process, and reviewing bulk import logs.
About importing contacts
The import feature allows you to add multiple non-member contacts to your community at once. Before you begin, here are some key details to keep in mind:
Supported file formats: You can import contacts using either CSV or Excel files.
Adding profile information: You can include profile field information in your import file to add all necessary details in a single step, ensuring your contacts’ profiles are fully populated.
Mapping columns: Easily map your file’s columns to Circle’s CRM fields for a seamless import process.
Error handling: Our import tool detects errors in your file and provides instant alerts, allowing you to fix issues before finalizing the import.
Updating data within the import file: Before finalizing your import file, you can add new rows, edit information within cells, find and replace values, and even delete rows—all within our powerful import tool.
Import limits
To ensure responsible use and prevent abuse, we've set a limit on how many contacts you can add using the contact import feature:
-
Communities on paid plans: If you are on any of our paid plans, the following limits apply:
Per import limit: You can add up to 25,000 contacts per import.
-
Total import limit: You can add up to 50,000 contacts in total using the import.
ℹ️ Note: If you need to add contacts beyond these limits through import, please reach out to Circle support for assistance.
Communities on trial: If your community is currently on trial, you can import up to 5,000 contacts total.
❗ Important: These limits apply only to the contact import feature. Other ways of adding contacts (such as by inviting new members to your community, collecting form submissions, or when someone subscribes to your email marketing) aren't impacted by this import limit.
Reimporting contacts
You can reimport existing contacts to update their profile information in bulk. The system handles updates differently based on the field type:
Text, link, dropdown, and number fields: The old value will be replaced with the new value provided in the file.
Checkbox and picklist fields (e.g., tags): New selections will be added to the existing ones. For example, if a contact already has the "Pro" tag and you reimport with a "Coach" tag, the contact will now have both "Pro" and "Coach" tags assigned.Note: Reimporting contacts who are already unsubscribed will not automatically resubscribe them to marketing emails. Non-member contacts must manually resubscribe either by updating their email preferences in the footer of a marketing email they’ve received or by resubmitting their information via a form to opt back in.
Preparing import files
To ensure a smooth and successful import, it’s important to prepare your file with accurate data, particularly for email addresses. Here are some tips:
An email address is required for each contact, so ensure this field is populated for every entry. We also recommend including a name for each contact to simplify searching and referencing them later.
When using a CSV file, fields that support multiple values, such as tags or checklist-type fields, enclose the values in double quotes and separate them with commas, without spaces after the commas (e.g., "tag1,tag2").
When using an Excel file, for fields that support multiple values, such as tags or checklist-type fields, separate the values with commas, without spaces after the commas (e.g., tag1, tag2).
Data you can include in your import file
Your import file can contain the following details for each contact:
Name
Email address
Tags
Profile fields, including headline and other custom profile fields
Using a template for easy setup
If you’re starting from scratch, you can download an Excel template that includes all the necessary columns, including your community’s profile fields. Here’s how to access it:
Click Audience in the left sidebar, then select Audience.
Click Add in the top-left corner and select Import contacts.
Click the Upload file button.
On the upload screen, click the Download Excel template in the bottom-left corner.
Exit the import process by closing the upload screen and clicking the X icon in the top-right corner. Then open the template to add your contact information.
Already have a file ready?
If you already have a file prepared, you can proceed directly to the import process. The tool allows you to map your file’s columns to Circle’s CRM fields and remove any unnecessary columns before finalizing the import, ensuring a seamless integration of your data.
Initiate import
Once your file is ready, follow these steps to access the import tool:
Click Audience in the left sidebar, then select Audience.
-
Click Add in the top-left corner and select Import contacts.
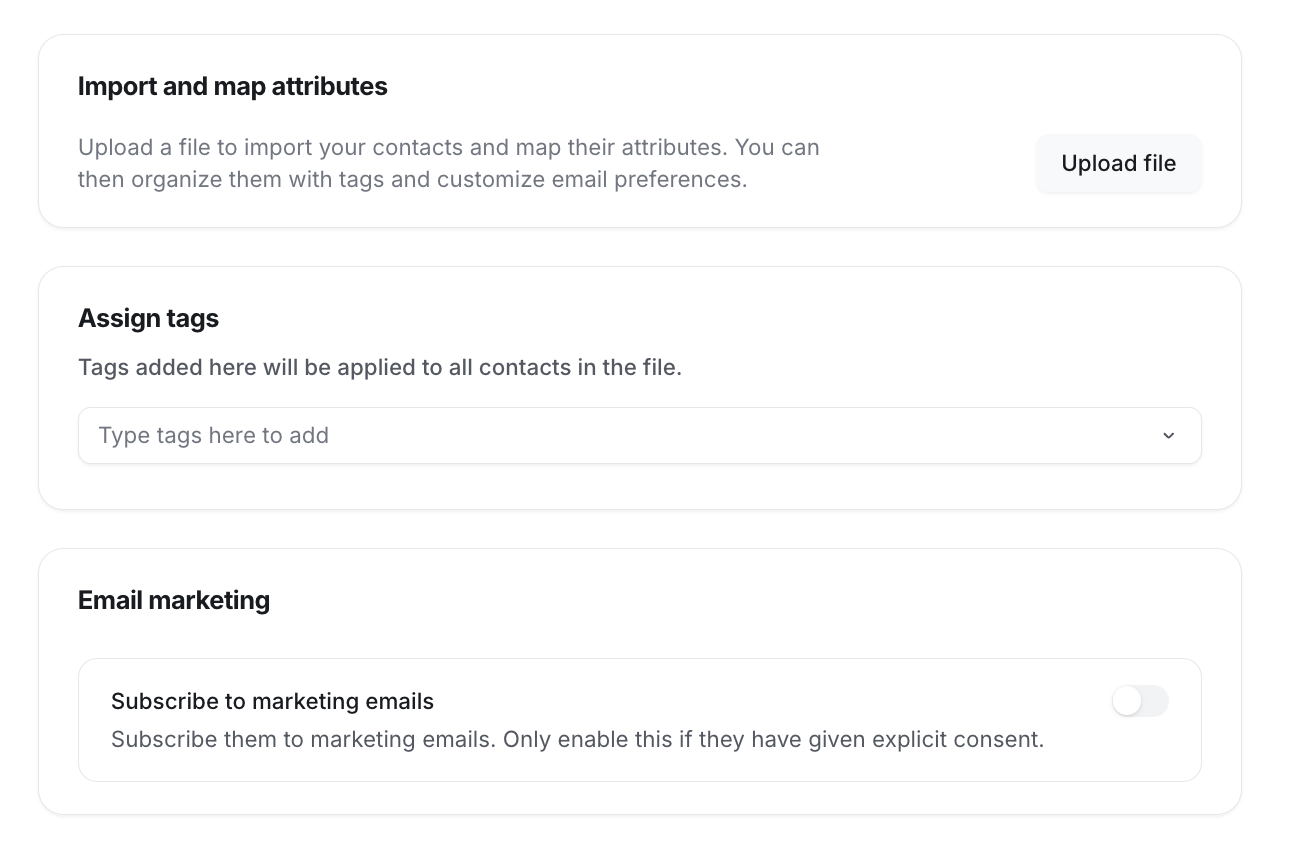
On the Import contacts page, add all the details as described in the following sections.
Upload the import file
To begin:
Click Upload file to navigate to the upload screen.
-
Drag and drop your file on the screen or click anywhere inside the dotted border to open the file uploader and select your file.
-
Pick the row in your data that contains the column headers. This helps the import tool understand and map your columns correctly.
-
Review uploaded columns with the template columns. See the Map columns section below for more details.
-
ℹ️ Note that after you move to the next step, your column mapping will be saved. You won’t be able to undo these changes without exiting and starting over with a new file upload.
-
-
Review and finalize the data. In this step, you can map columns, add more rows, find and replace values, and even export the updated version. For more information, see the following sub-sections within this section.
Once you’ve reviewed and made all necessary changes, Click Upload file.
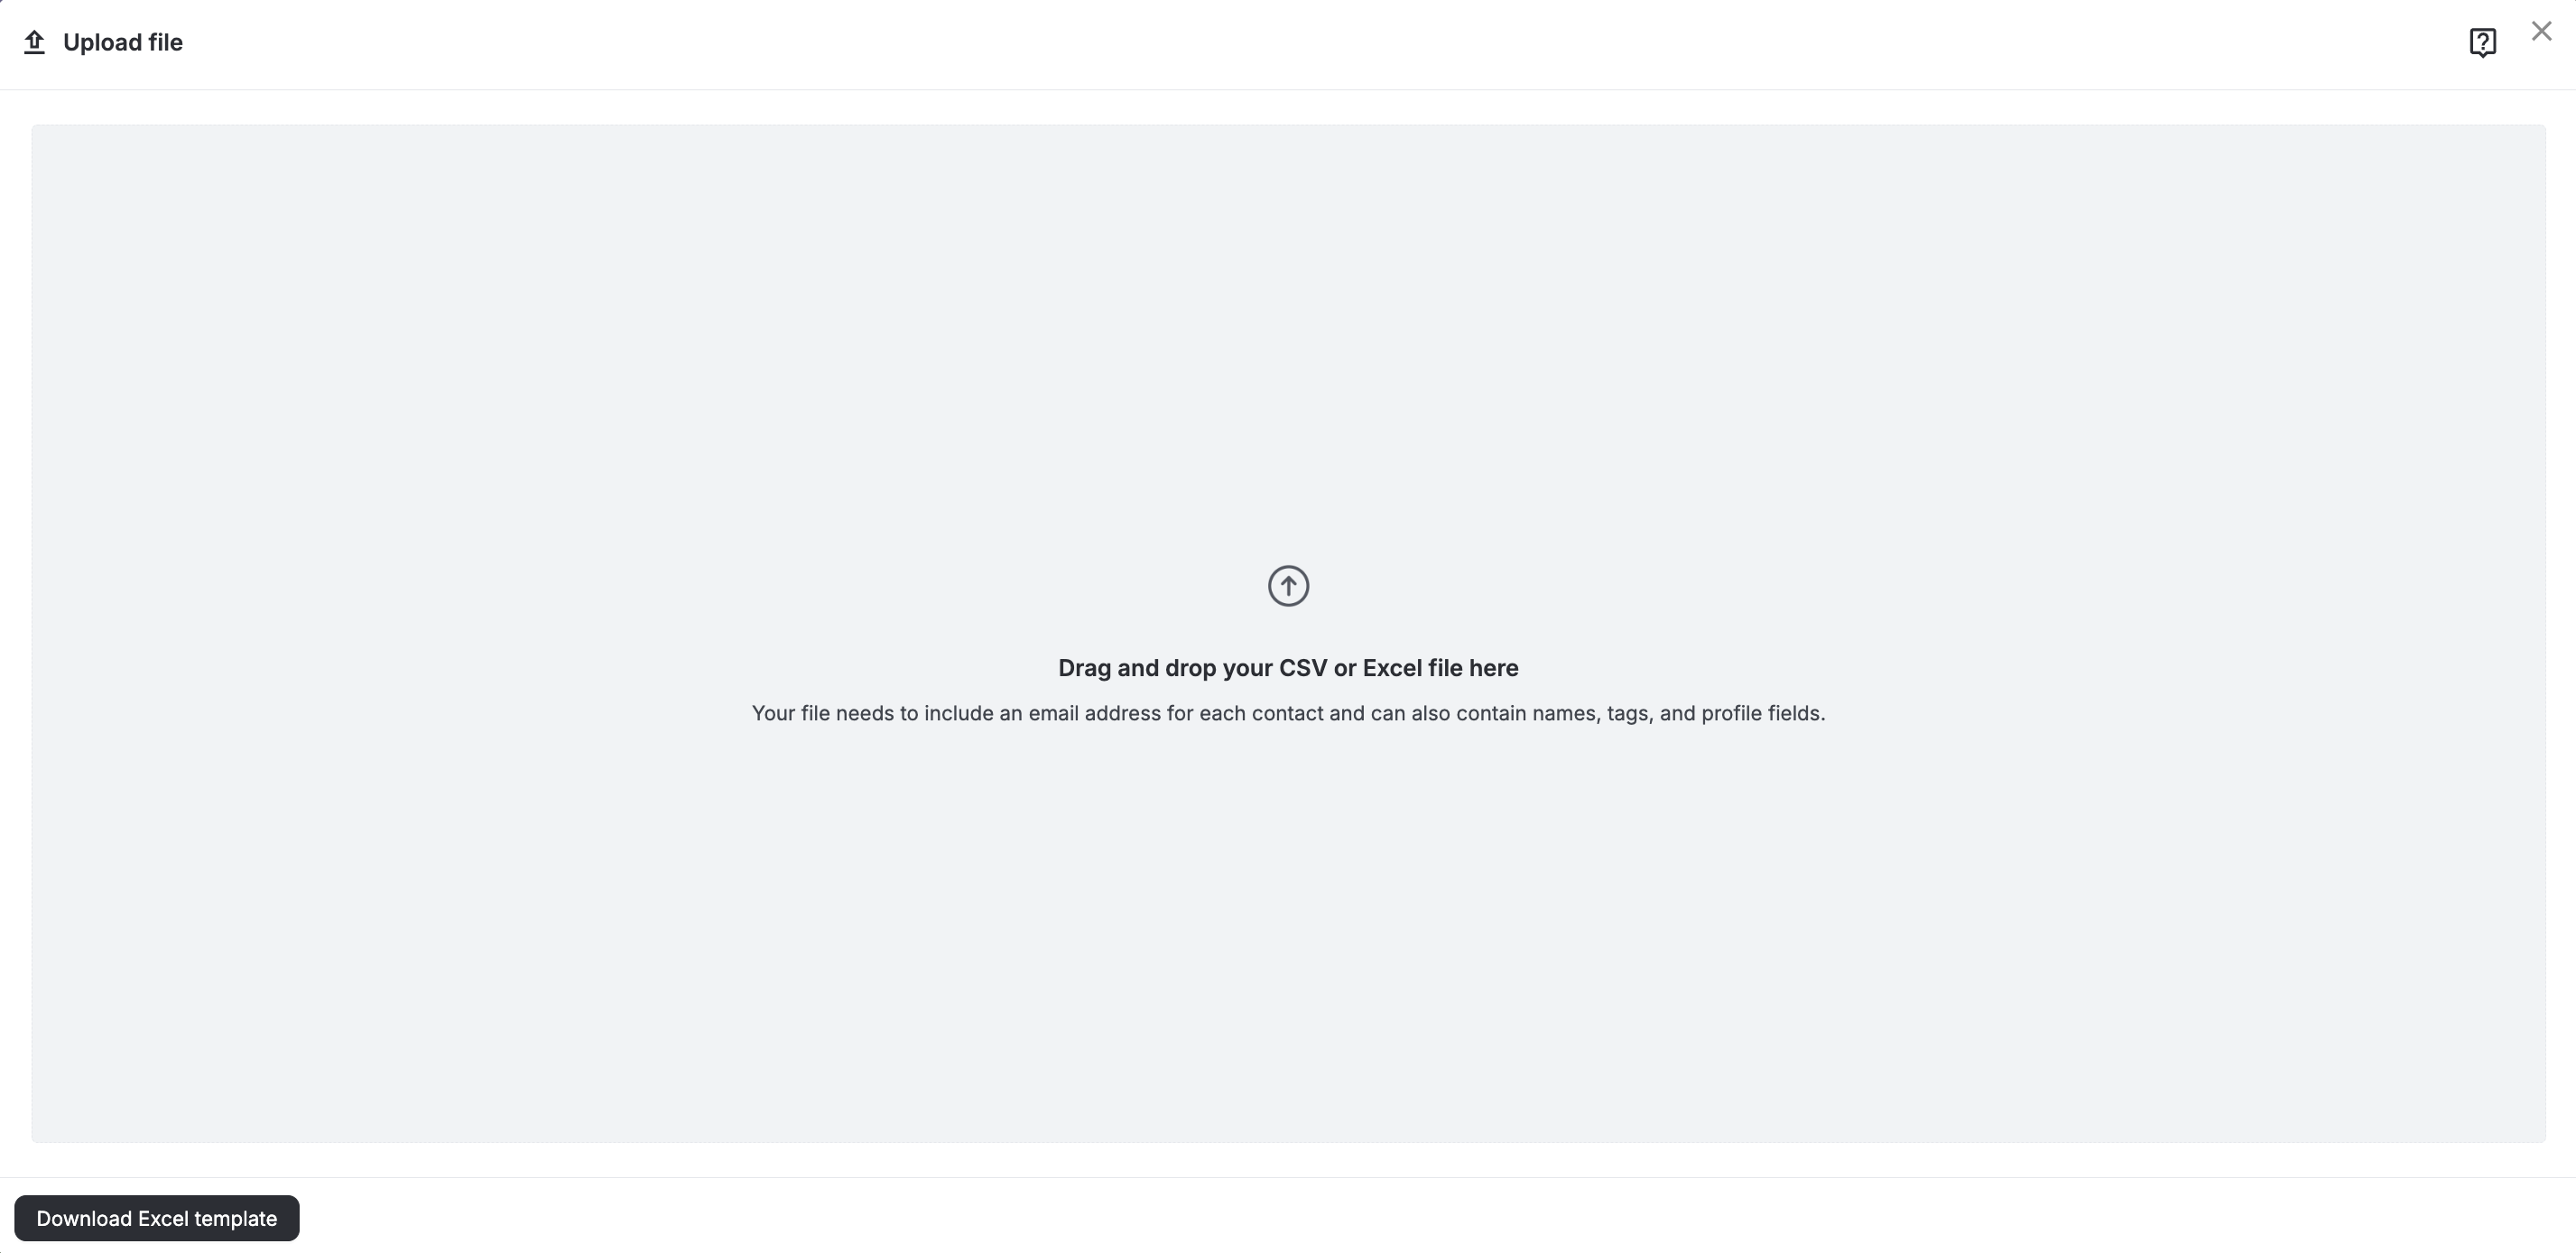
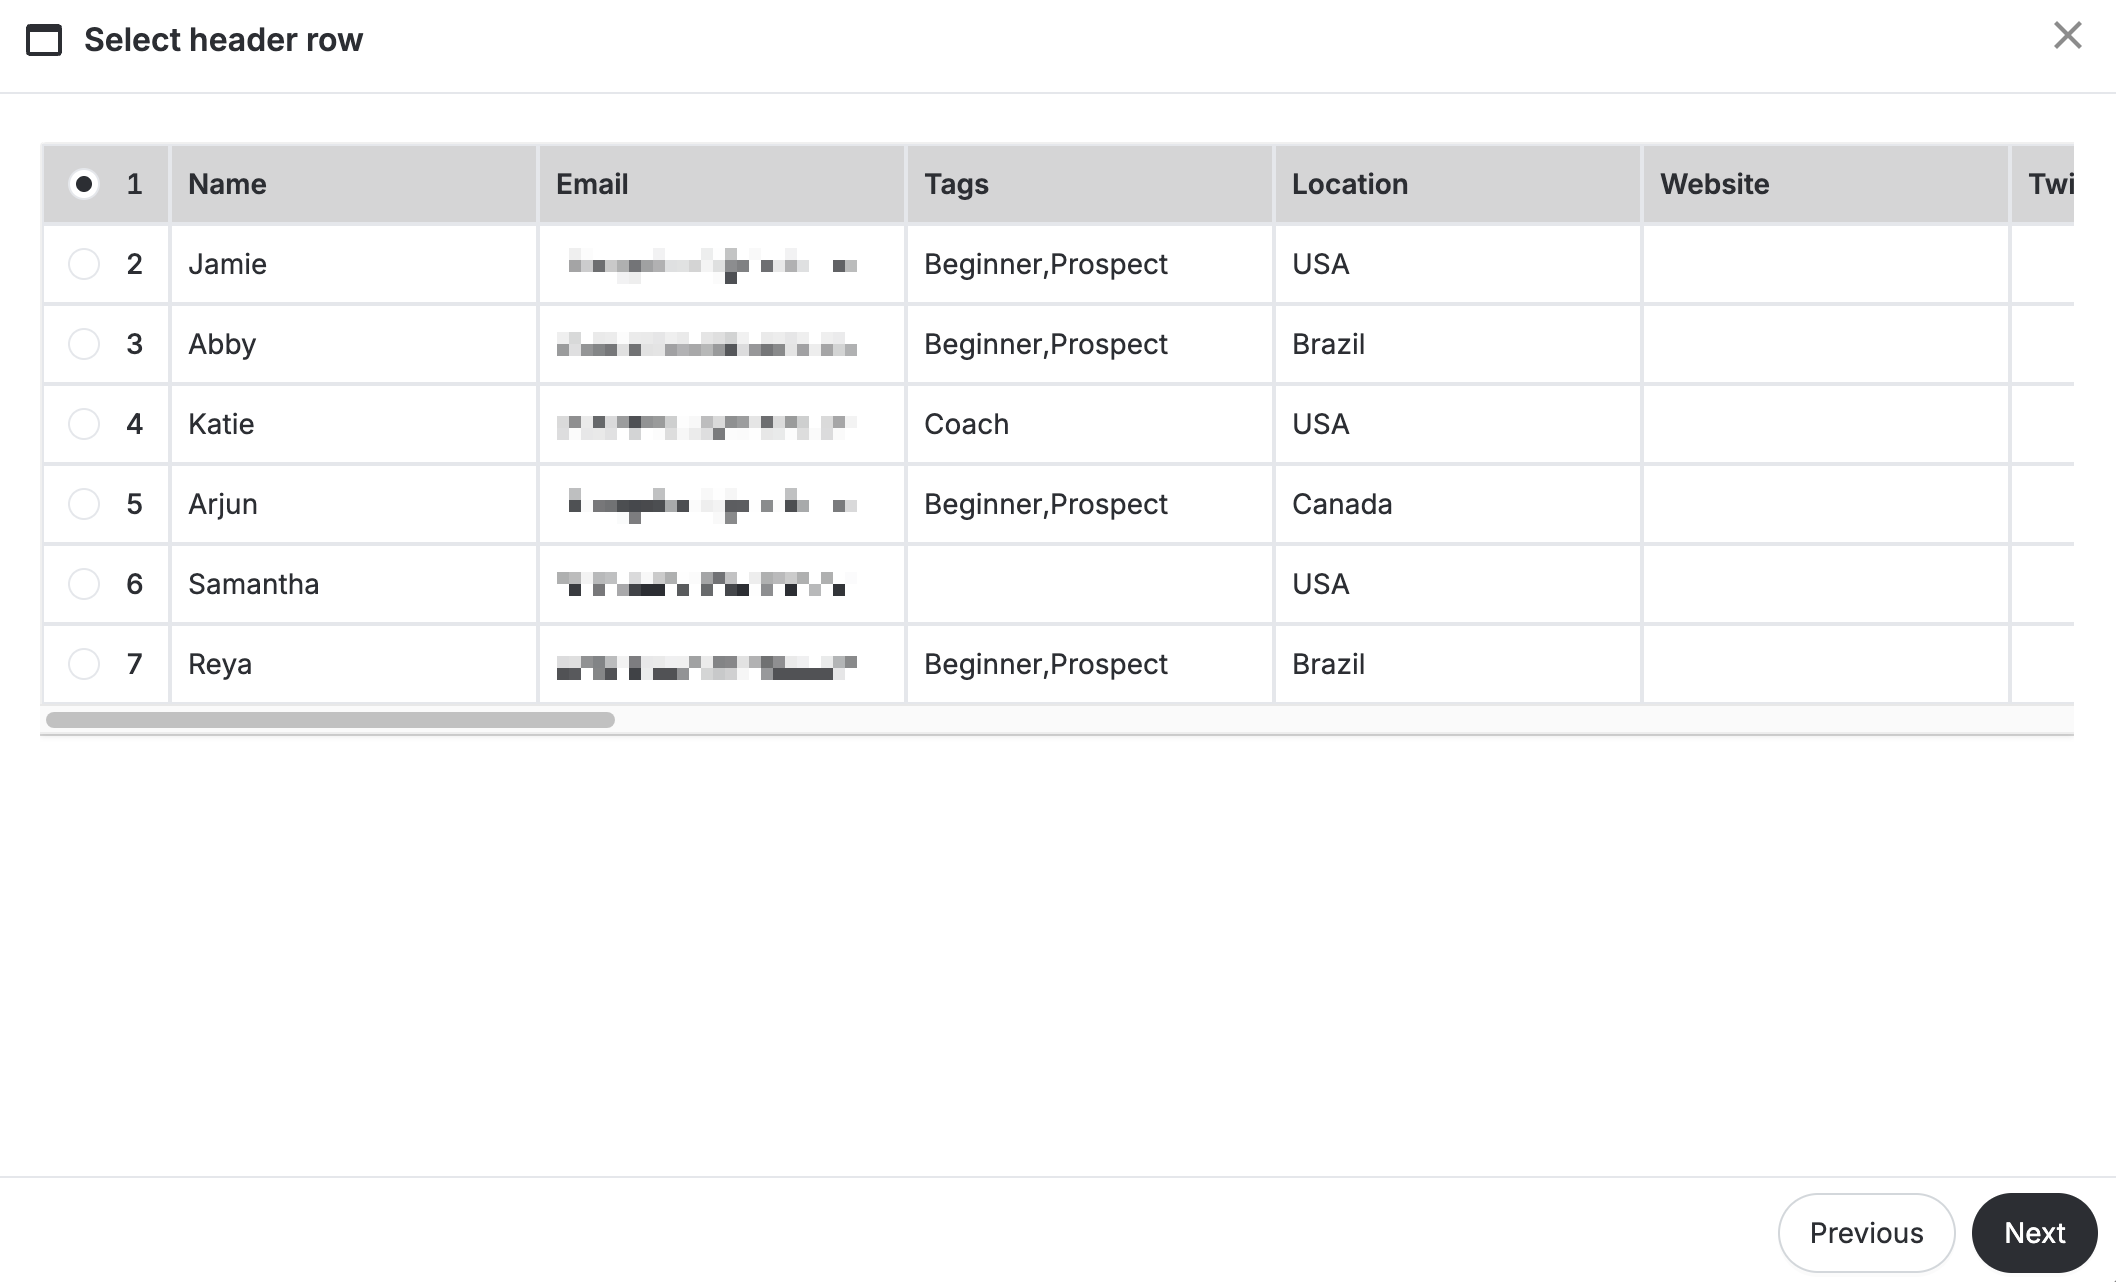
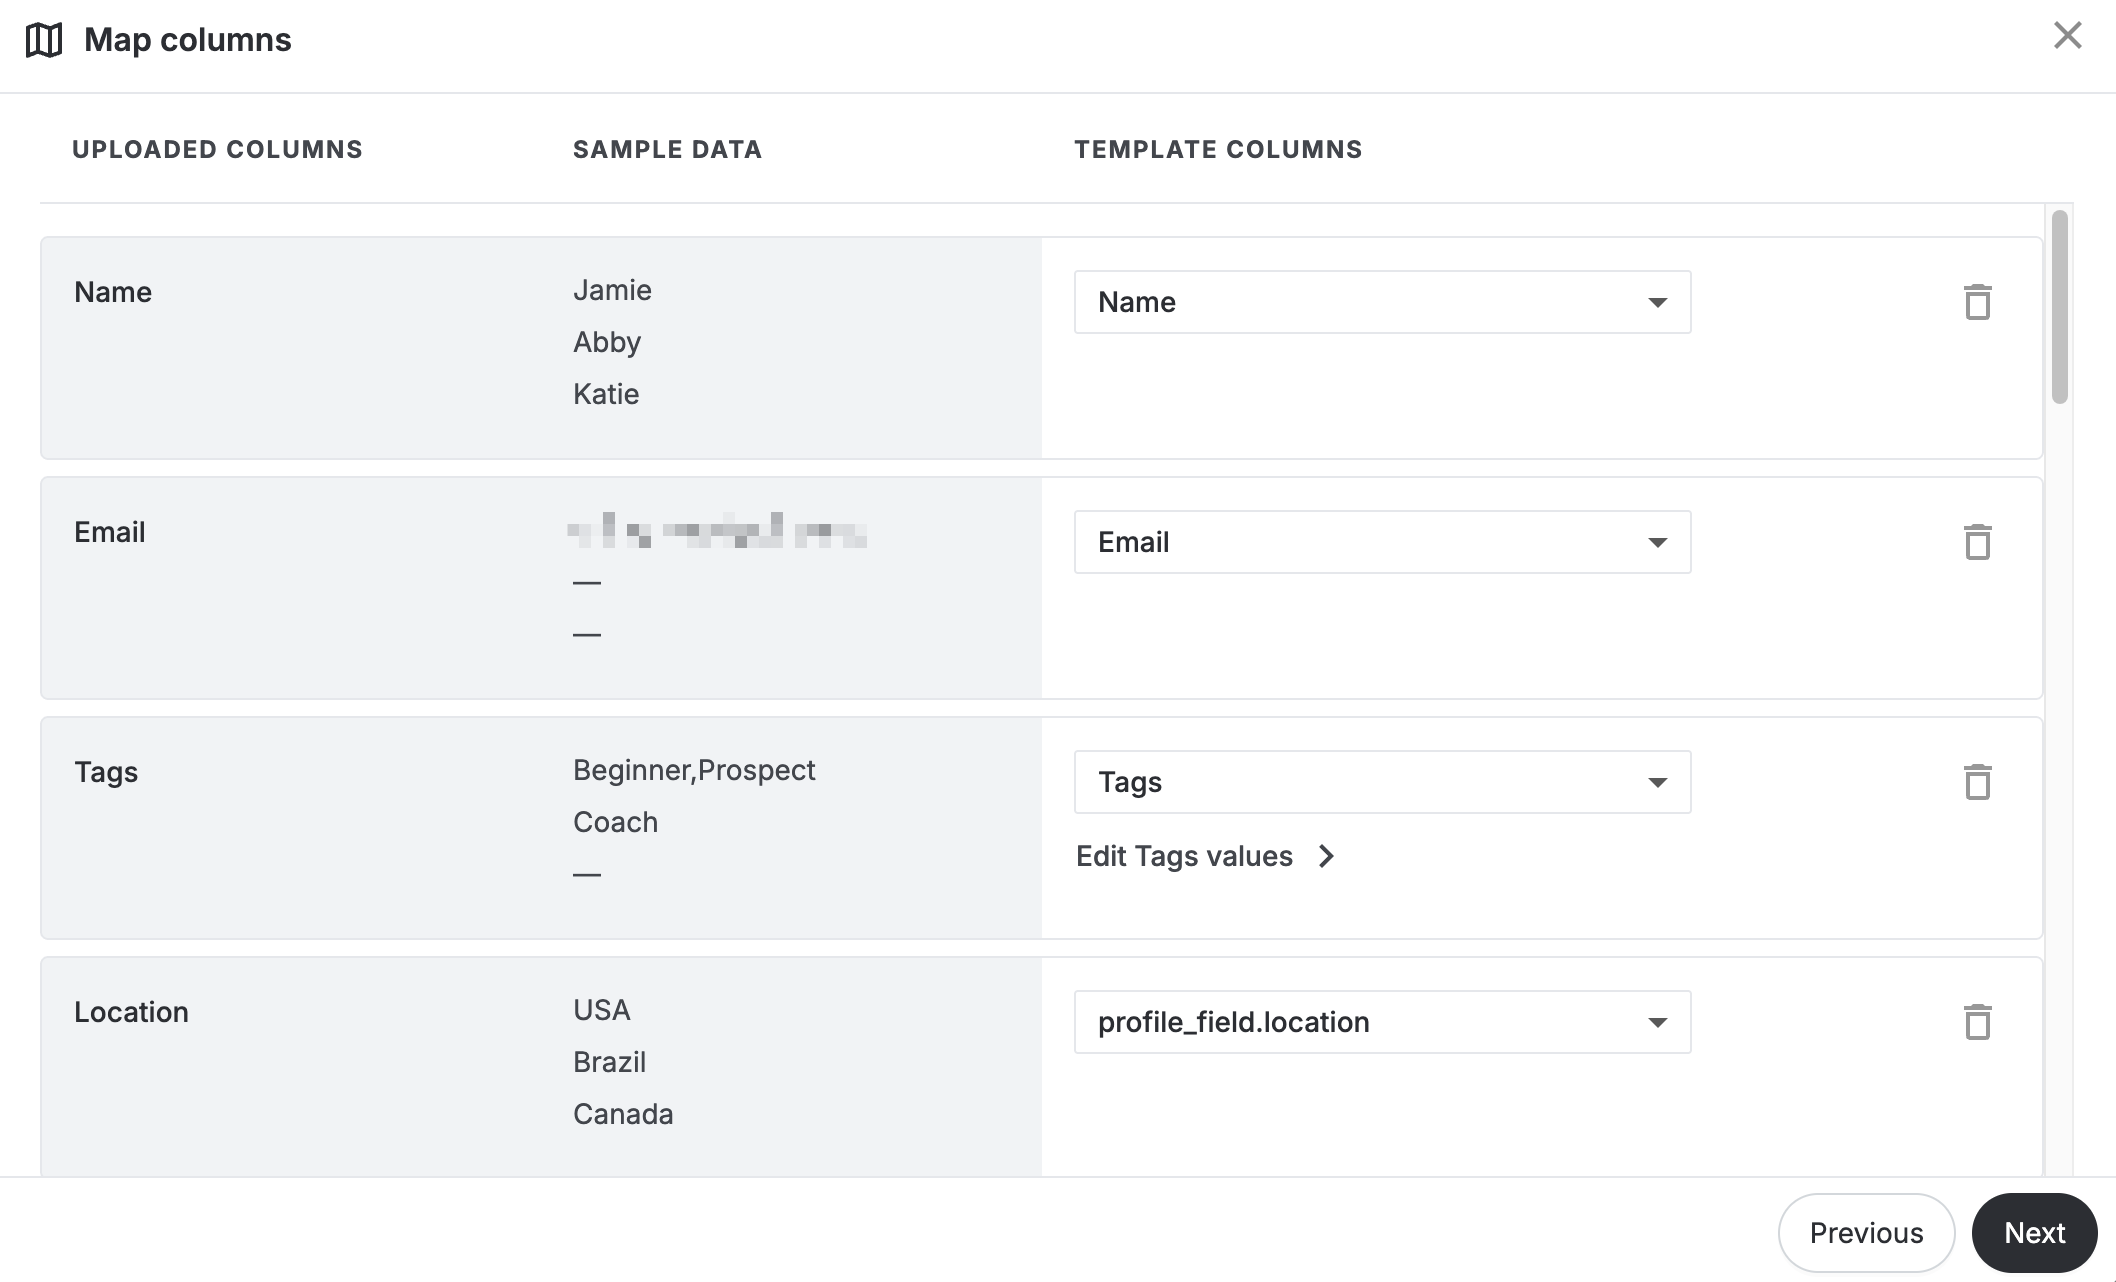
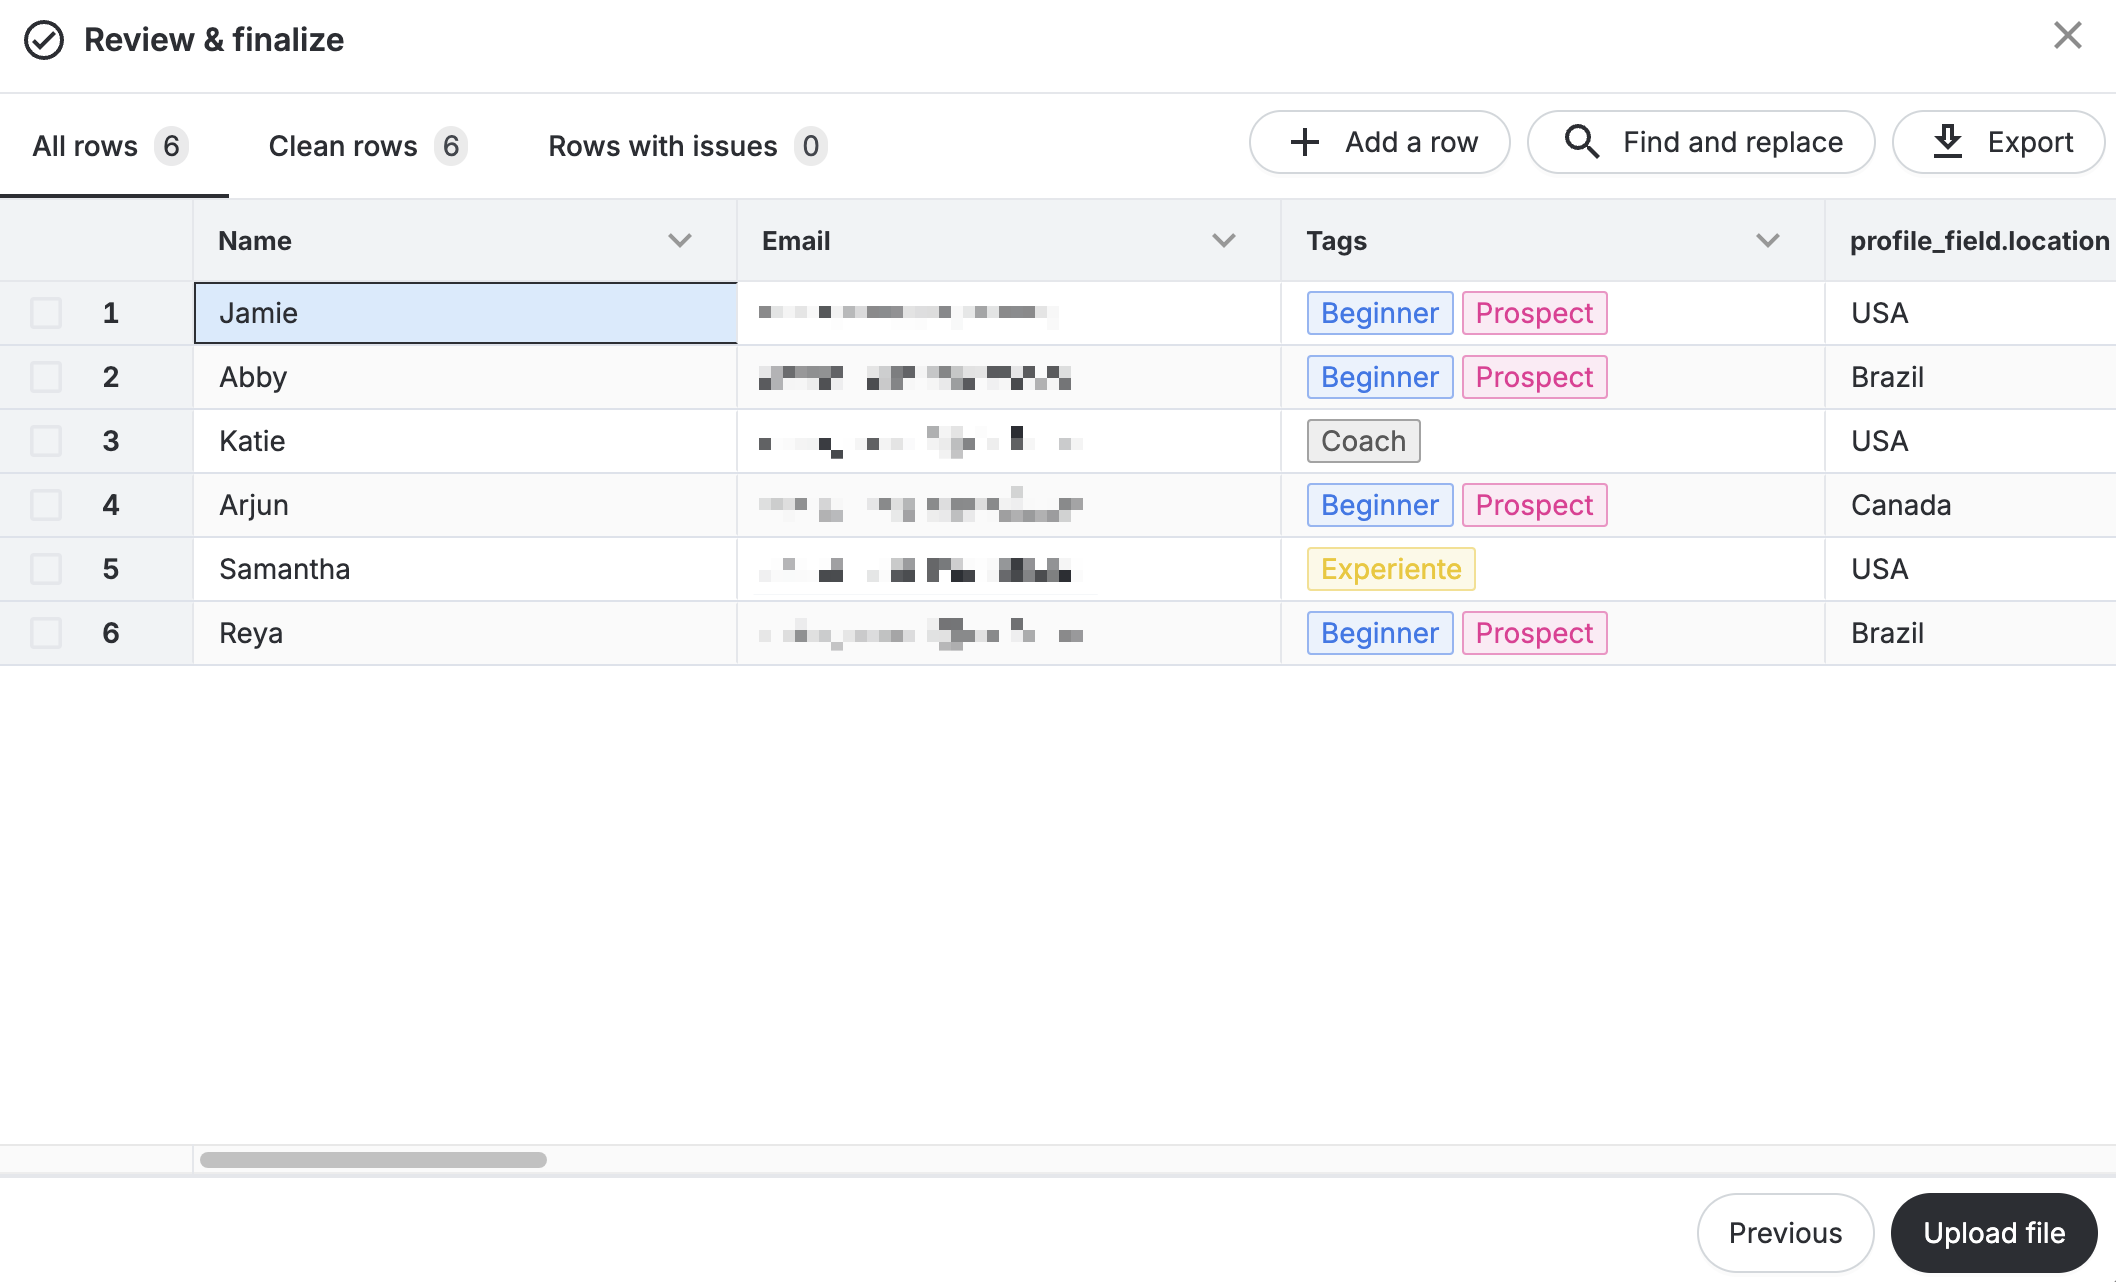
Let’s explore the following sub-sections for additional details on what you can accomplish during the Review & finalize step.
Manually enter new information
You can click cells to manually enter contact information.
For list, dropdown, or checkbox type fields double click the cell or start typing to open the list with available values you can choose from.
You can also add new rows to your uploaded files to manually enter new contacts. To do so simply click Add a row at the top.
Map columns
After uploading, you can match your file’s columns to the appropriate fields in Circle’s CRM. This ensures that contact details such as names, emails, tags, and profile fields are properly aligned.
There are several ways you will be able to map columns:
After uploading a file: Once you upload your file, the system will analyze its data and prompt you to map columns in the next step if needed.
During the review & finalize step: If you’re already in the Review & finalize step, you can access the mapping interface by clicking the Map columns button at the top of the screen. Note that if all your fields were correctly mapped and confirmed earlier in the process, this button may not appear.
Remapping via column headers: At any point in the Review & finalize step, you can remap a specific column by clicking the dropdown arrow next to the column header and selecting Remap this column.
Here’s how the mapping process works:
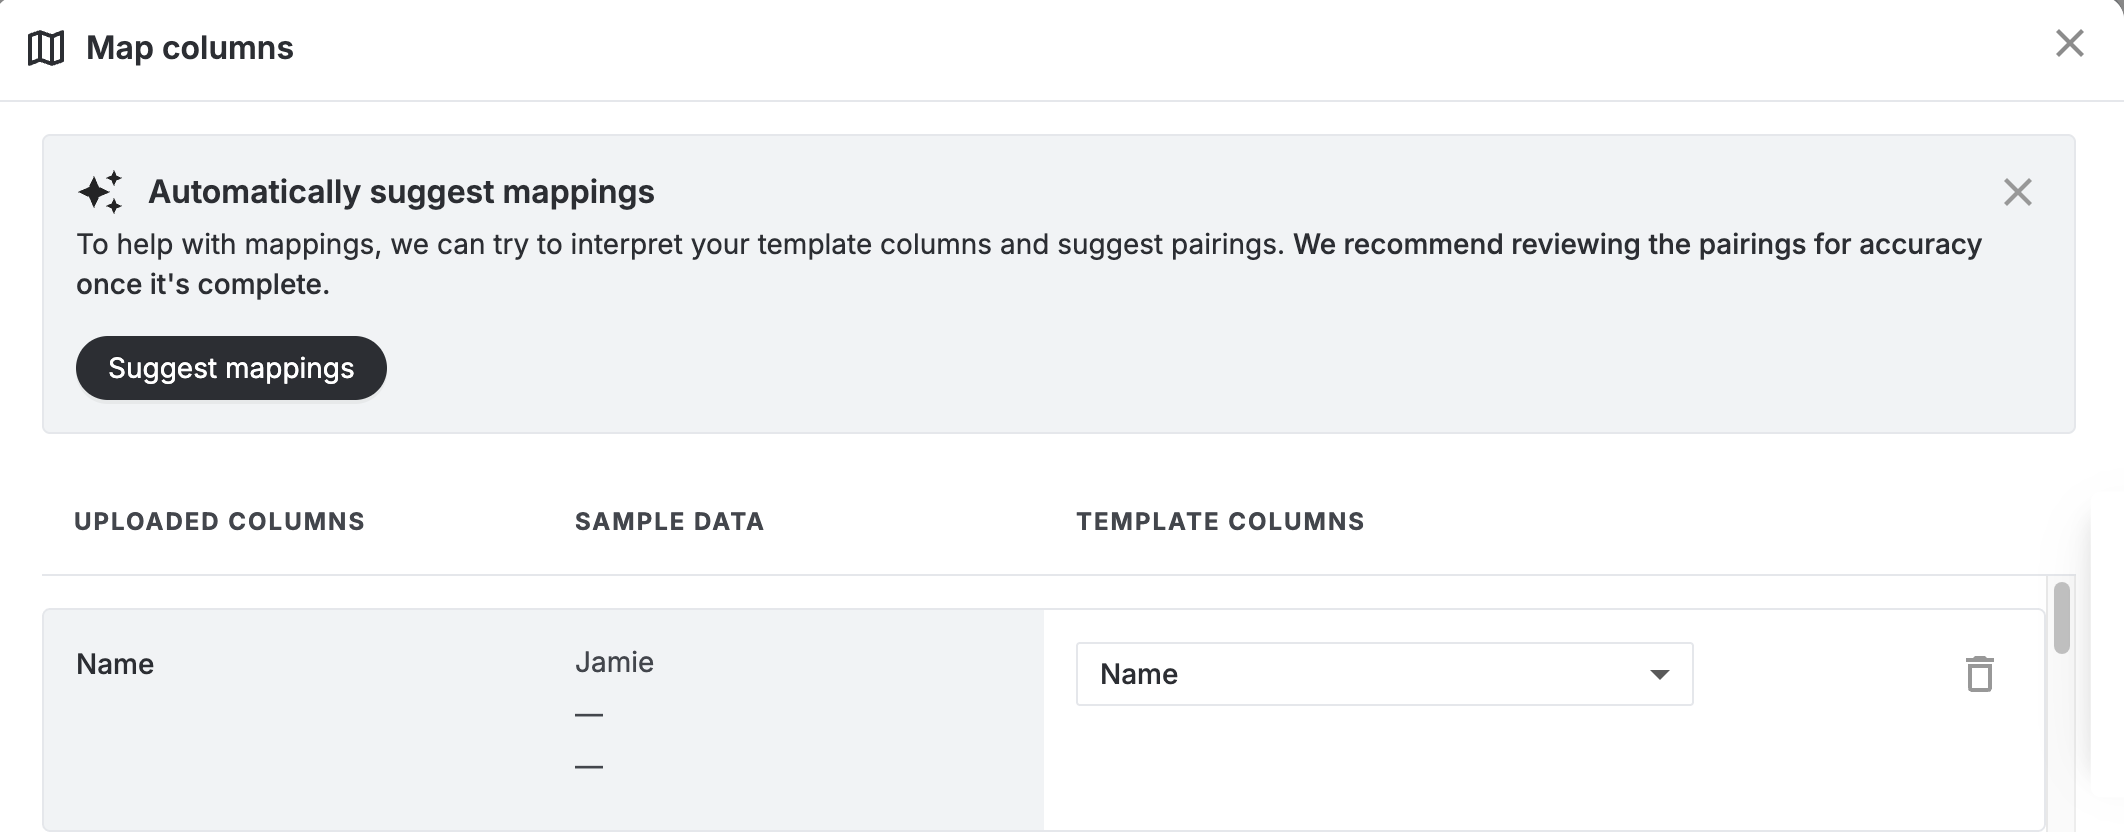
Mapping feature interface: The screen displays all your uploaded columns, sample data, and template columns where you will see mapped CRM fields.
Automatic mapping: If a column name in your file matches Circle’s CRM field, it will be mapped automatically in the template columns.
-
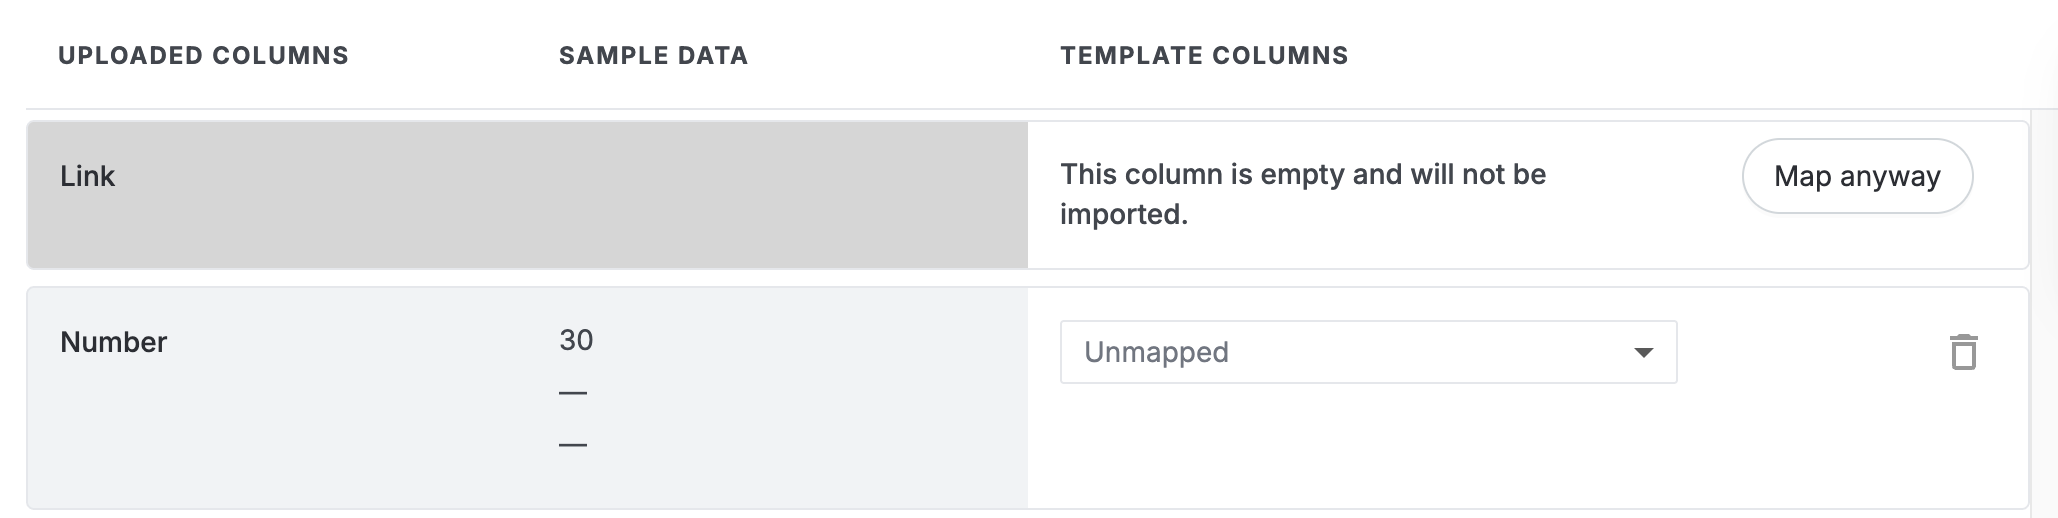
Unmapped columns: Columns that the system doesn’t recognize will be labeled as "Unmapped." You can manually map these by selecting a CRM field from the dropdown menu under the template column.
ℹ️ Note: If any columns remain unmapped when you finalize the mapping, they will be excluded from the final file. This also includes columns that are completely empty. You will see the “This column is empty and will not be imported.” message for the column.
Removing unnecessary columns: You can remove unnecessary columns that you don’t want to import. To do so, click the Delete icon next to the column.
-
Mapping suggestions: To help you with mappings, you may see an automated Suggest mappings option at the top when the system has suggestions. If selected, the system will analyze columns and attempt to automatically pair them with the appropriate template columns. We recommend reviewing the suggested mappings for accuracy before proceeding with the upload.
-
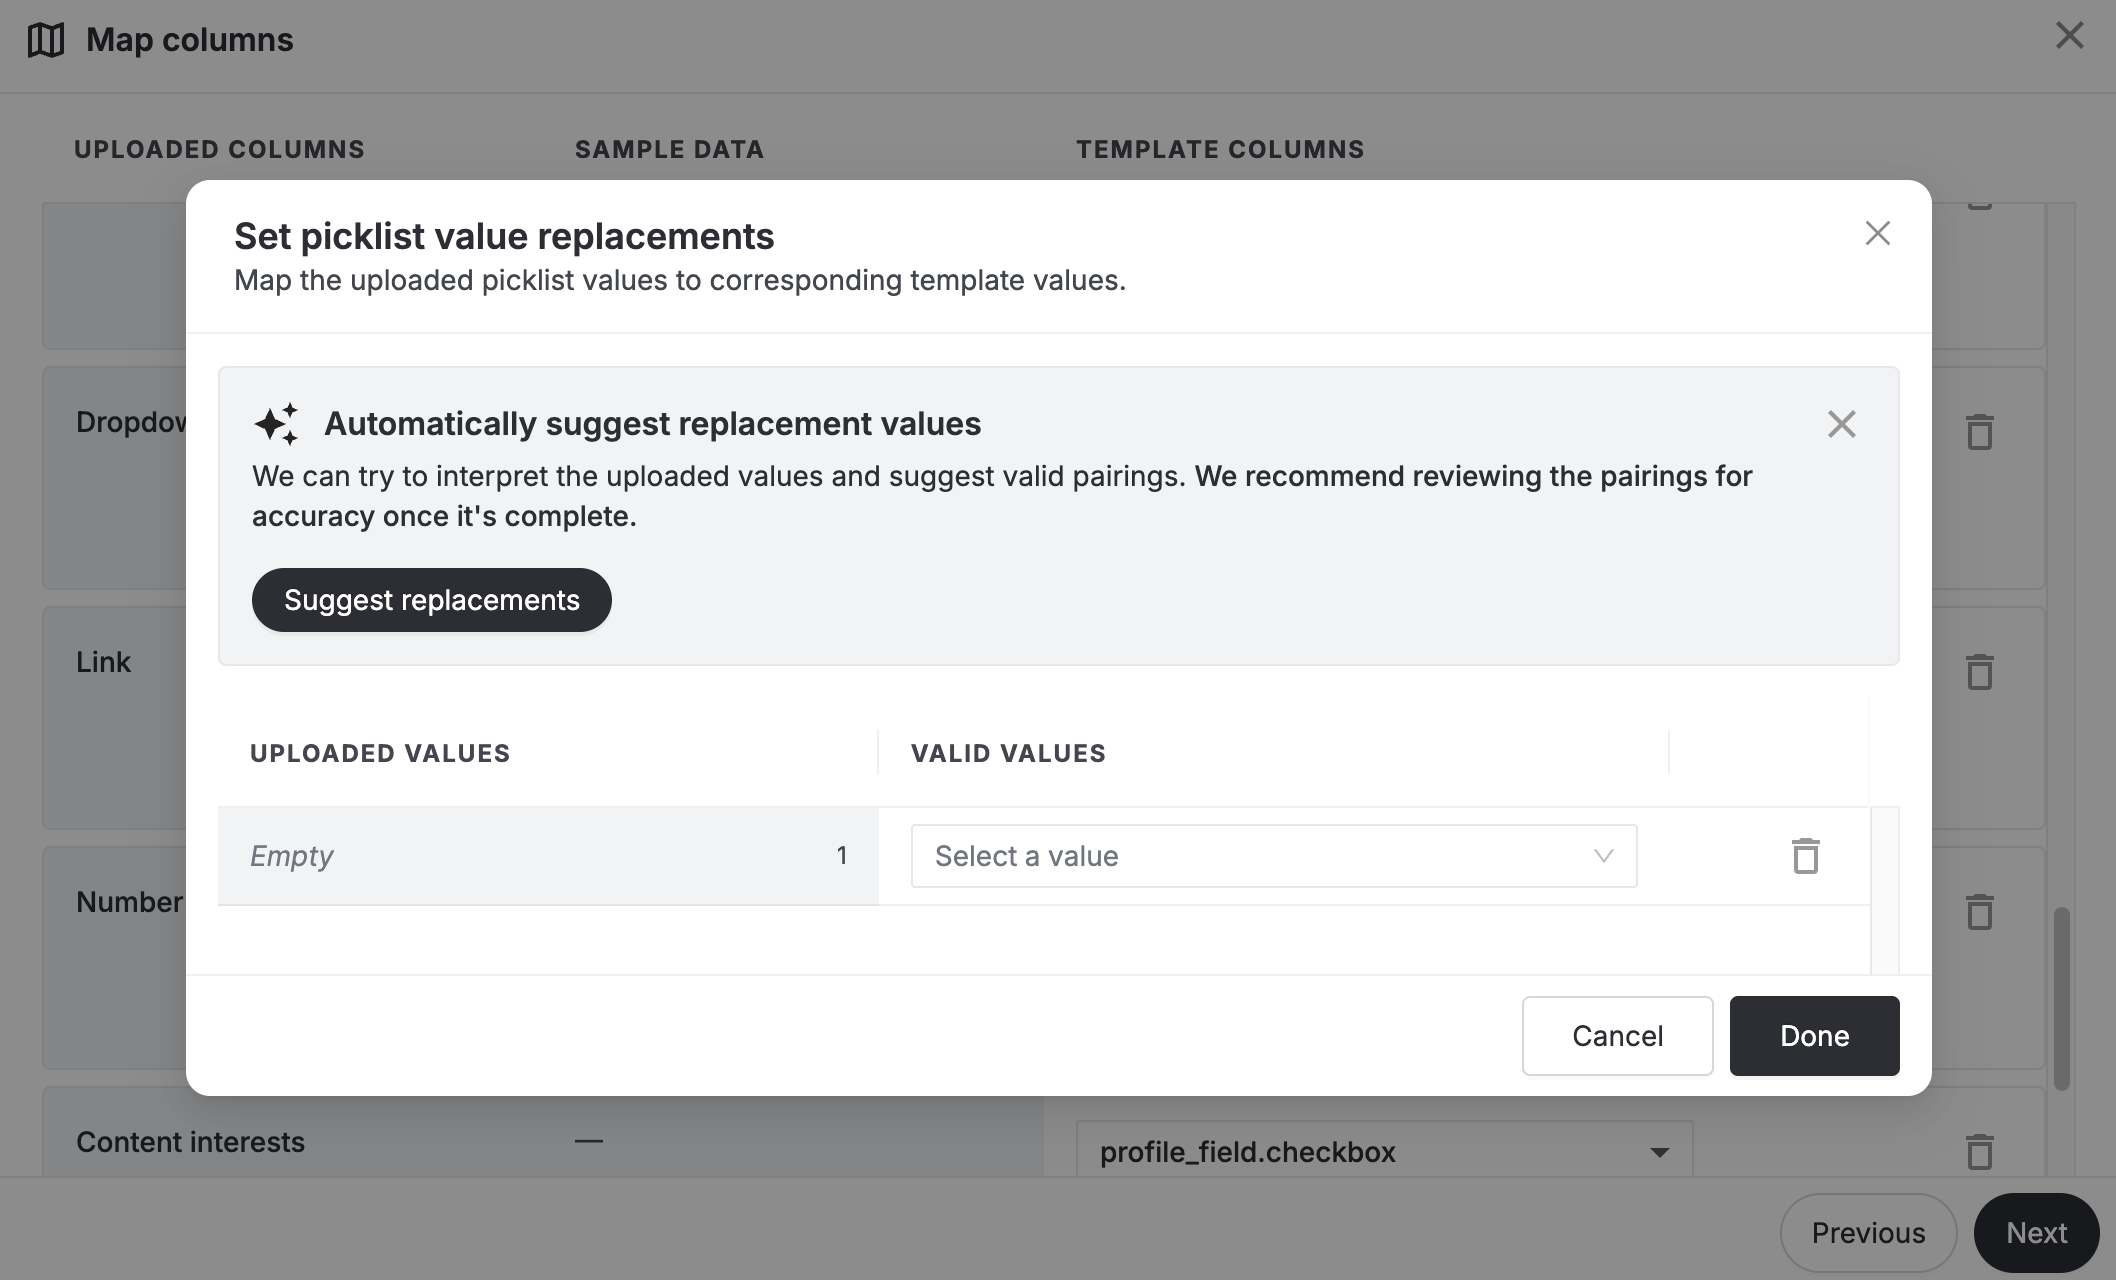
Handling picklist values: If the system identifies mapped fields with picklist values (such as dropdowns or checklist-type fields) that are either empty or contain unrecognized values, you will see the Edit values option. You can either select "Suggest replacements" to let the system propose valid values for these fields, or manually choose the appropriate values from the provided "Valid values" dropdown menu. Once you’ve reviewed and adjusted the mappings and values, click Done.
-
Use column actions
During the Review & finalize step, you can manage your data at the column level using the Column actions feature. This allows you to perform bulk actions on a specific column to efficiently clean or adjust your data.
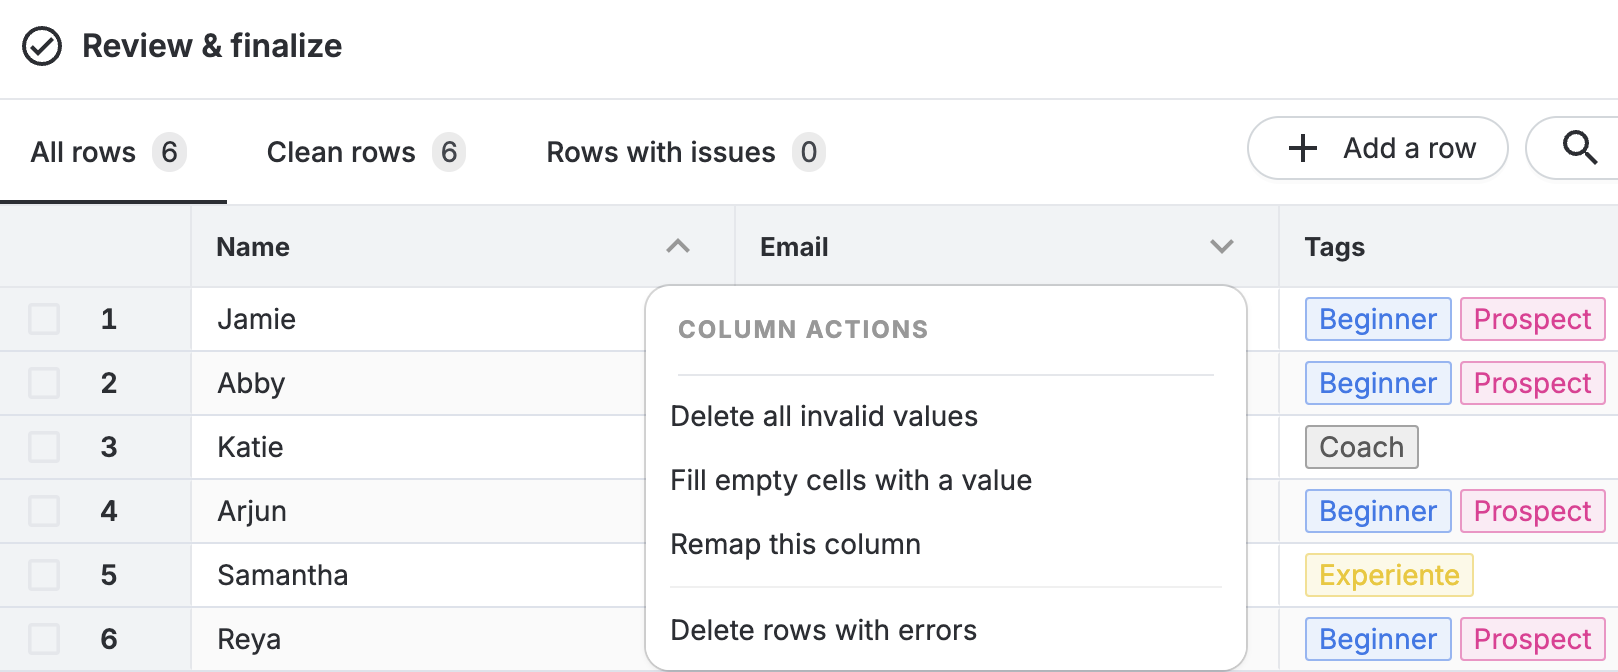
To access the column actions, click the dropdown arrow next to a column header. A dropdown menu will appear with the following options:
Fix all formatting errors: If any cell has a formatting error, you will see this option in the menu. This action automatically corrects fixable formatting issues across all rows in the column by applying valid replacements. We recommend reviewing the changes after using this option to ensure accuracy.
Delete all invalid values: Clears all invalid entries in the column, leaving those cells blank. This is helpful for removing incorrect data without deleting entire rows. If the column requires a value (e.g., an email field), a new “Suggested transform" section will appear, allowing you to fill the empty cells with values from another column.
Fill empty cells with a value: Lets you specify a default value to fill all empty cells in the column, ensuring no cells are left blank.
Remap this column: Redirects you to the column mapping, where you can reassign the column to a different CRM field. This is helpful if the column’s data type doesn’t match the current mapping.
Delete rows with errors: Deletes all rows that contain errors in the selected column, ensuring only clean data is imported. Use this option with caution, as it deletes the affected rows from the uploaded file. If you need to take a different action, you’ll need to exit the import process and re-upload the file.
Fix issues
On the Review & finalize step the system automatically identifies and highlights any issues in your dataset that must be resolved before the import can be completed successfully. This ensures your data is clean and compatible with the CRM.
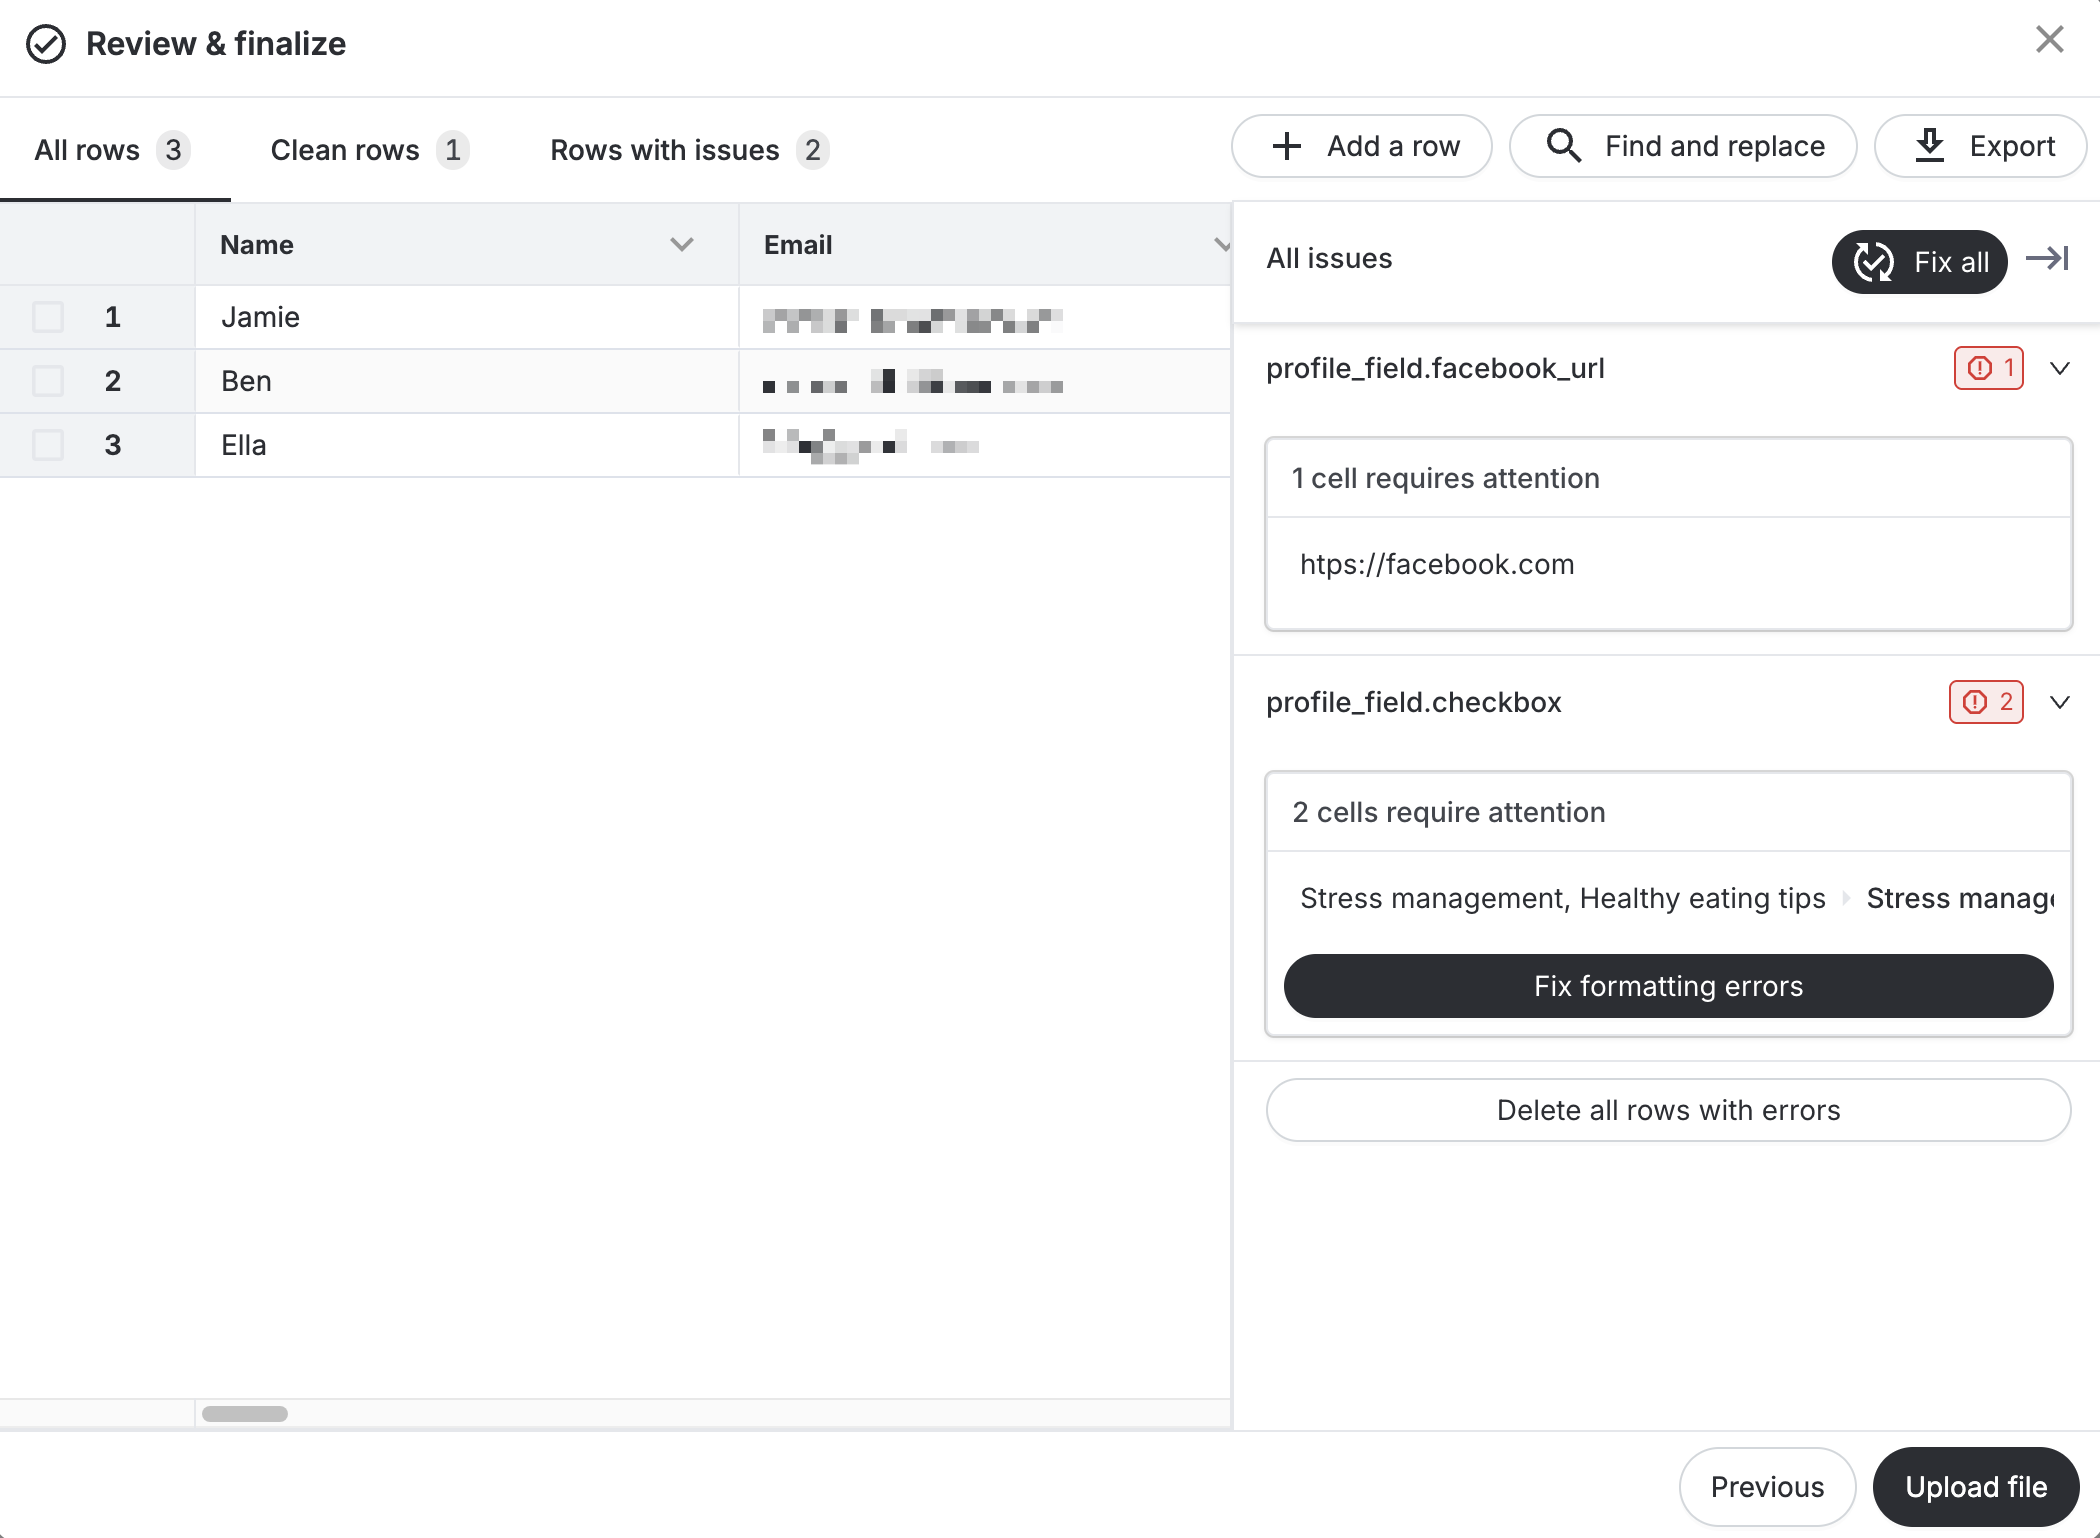
At the top of the screen, you’ll see tabs displaying the total number of rows, clean rows, and rows with issues. You can switch between these tabs to view your data organized accordingly.
Managing all issues
When errors are detected, a right sidebar will appear, listing All issues. Here’s how you can address them:
Automated error fix: If the system can automatically resolve certain errors (e.g., formatting issues), you’ll see a fix error option below the specific issue. Additionally, a Fix all option at the top of the sidebar allows you to correct all fixable errors in one go. We recommend reviewing the changes after using this option to ensure accuracy.
Navigate to cells: In the issue listing, click the cell value to jump directly to the affected cell. Then, you can click the cell value again to view the error prompt.
Delete all rows with errors: Use this option to remove all rows with issues, ensuring only clean data is imported. Use this cautiously, as it deletes the problematic rows. If you need to take a different action, you’ll have to exit the import process and re-upload the file.
💡 Tip: To collapse the All issues sidebar, click the Collapse icon located at the top right of the sidebar. Once collapsed, a floating error icon will appear at the top right of the screen which you can click to expand the All issues sidebar again.
Resolving errors
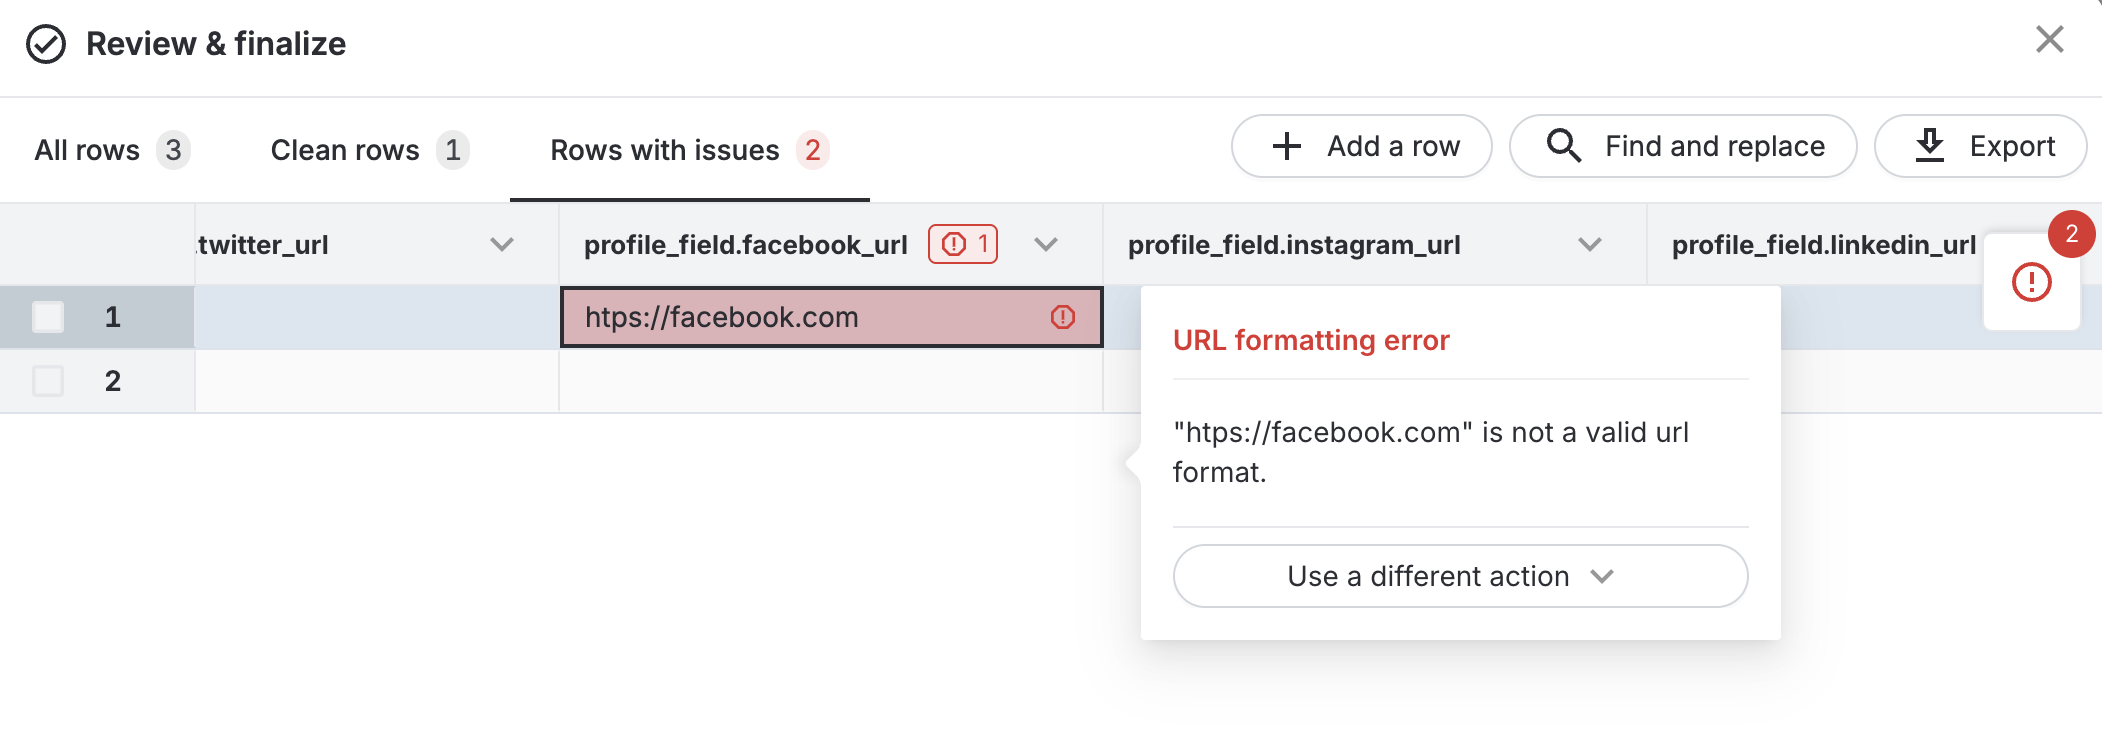
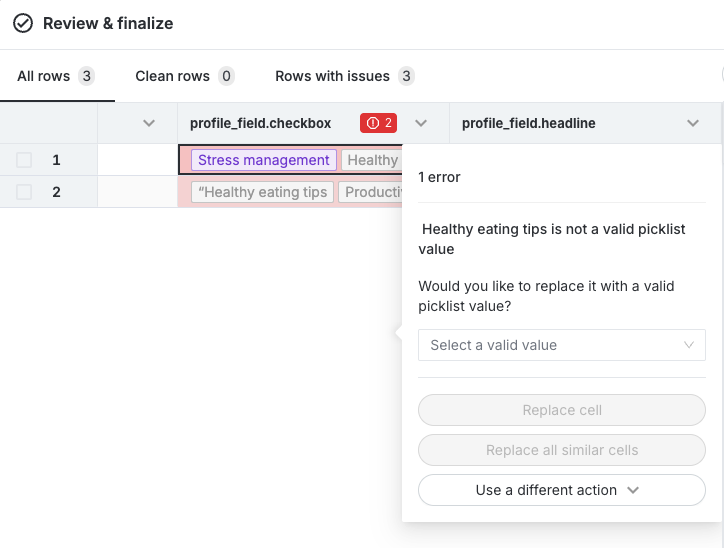
On the main screen, clicking a cell with an issue opens an error prompt with options tailored to the error type. For example:
-
If a URL is invalid, you can manually correct it by entering a valid link.
-
If a value in a picklist field is invalid, you can select a valid option from a dropdown menu to replace it. You can then choose to replace the selected cell (use the Replace cell option) or all cells with identical errors within the column (use the Replace all similar cells option).
Using the different action dropdown
The error prompt includes a Use a different action dropdown menu, offering additional ways to handle issues at the column level:
Fix all formatting errors: Automatically corrects fixable formatting issues across all rows in the selected column by applying valid replacements. We recommend reviewing the changes after using this option to ensure accuracy.
Delete all invalid values: Clears all invalid entries in the column, leaving those cells blank. This is helpful for removing incorrect data without deleting entire rows. If the column requires a value (e.g., an email field), a new “Suggested transform" section will appear, allowing you to fill the empty cells with values from another column in the same row.
Fill empty cells with a value: Lets you specify a default value to fill all empty cells in the column, ensuring no cells are left blank.
Remap this column: Takes you back to the column-mapping step, where you can reassign it to a different CRM field. This can resolve errors caused by data type mismatches.
Delete rows with errors: Removes all rows with errors in the selected column, ensuring only clean data is imported. Use this option with caution, as it deletes the affected rows from the uploaded file. If you need to take a different action, you’ll need to exit the import process and re-upload the file.
Find and replace data
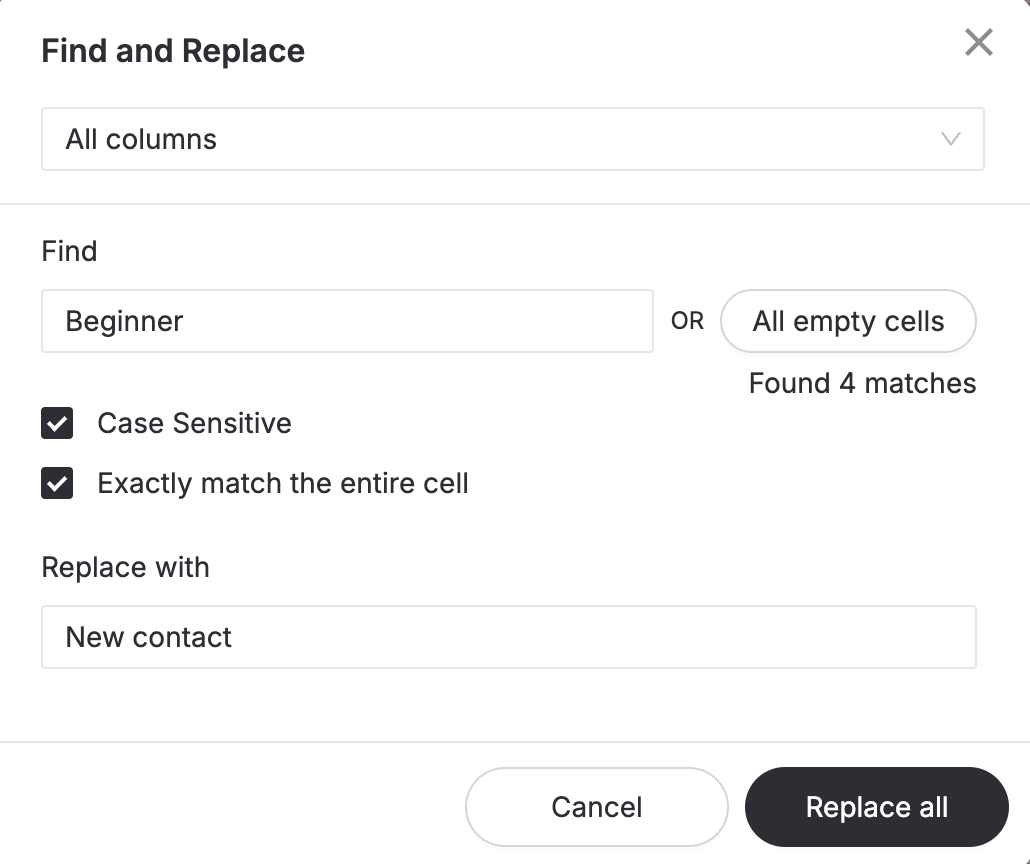
The find and replace feature allows you to search for specific values in your imported data and replace them with new values across selected columns.
Here’s how you can use this feature:
Access the feature: In the Review & finalize step, click Find and replace at the top.
Select the scope: You can choose which columns to apply the find and replace action to by selecting from the dropdown menu labeled "All columns." This allows you to target specific columns (e.g., name, headline) or apply changes across all columns.
-
Define the find criteria:
Enter a value: Input a specific value you want to search for in the Enter a value field. Alternatively, you can select the All empty cells option to target all cells within your defined scope that are blank.
Case sensitivity: You can refine your search by checking the Case sensitive box to differentiate between uppercase and lowercase letters.
Exact match: Check the Exactly match the entire cell box to ensure the search only matches cells with the exact value you entered, not partial matches.
See the number of matches: You will see how many matches are found based on your criteria.
Define the replace action: In the Replace with section, enter the new value to replace the found values. For example, you could replace all instances of blank text-type field cells with “N/A” or a standardized value like "Not Provided."
Execute the replacement: Once you’ve set your criteria, click Replace all to apply changes across the selected columns.
Export reviewed data
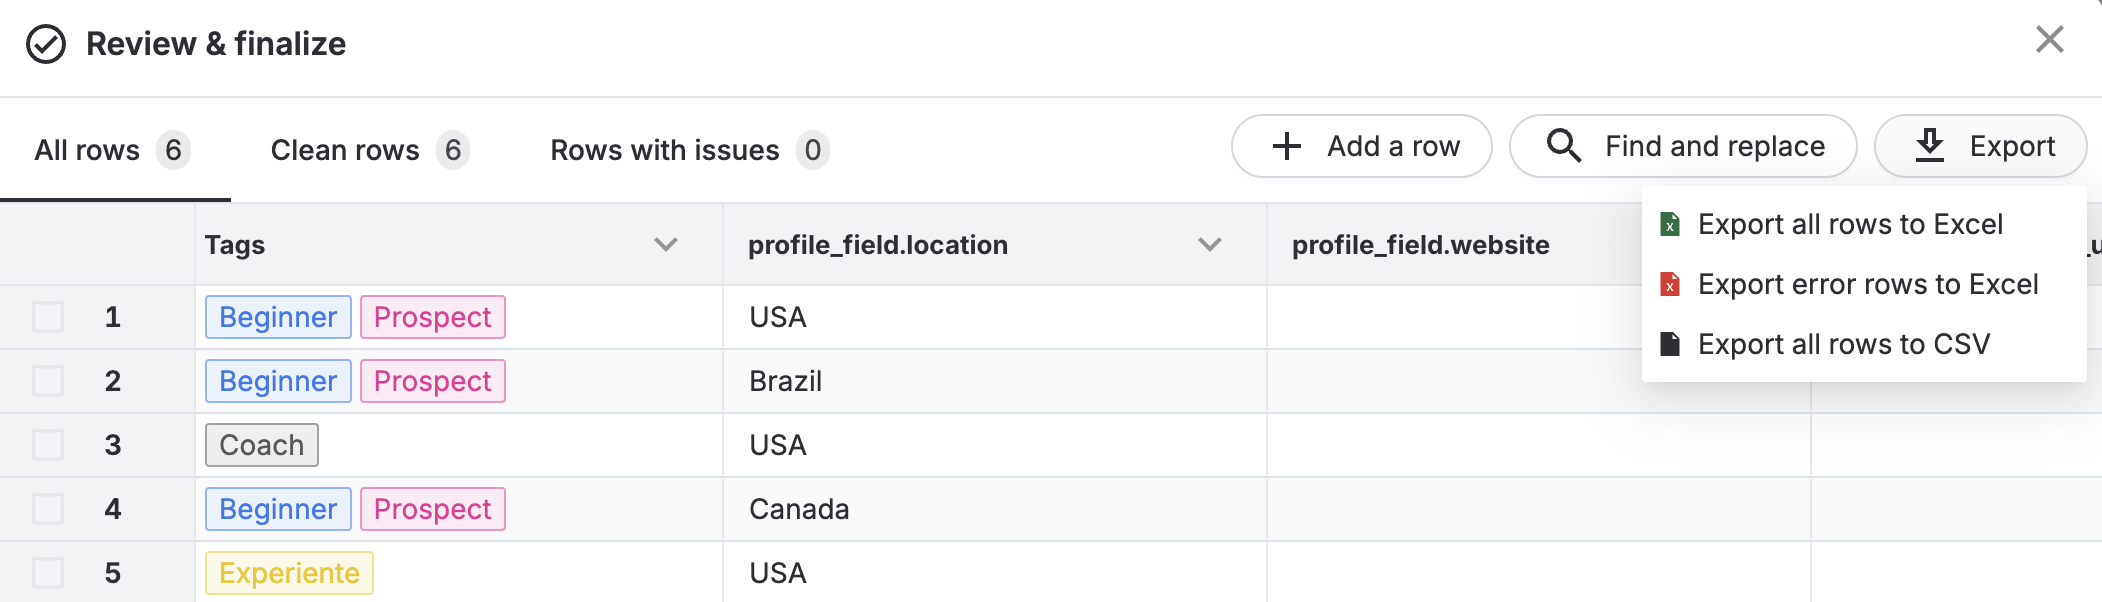
You can save your imported data after reviewing or editing it. To do so, click Export and choose from three export options:
Export all rows to Excel: Downloads the entire dataset, including all rows, as an Excel file.
Export error rows to Excel: Downloads only the rows with issues (if any) as an Excel file, helping you focus on problematic data.
Export all rows to CSV: Downloads the entire dataset as a CSV file.
Assign tags to all contacts
On the Import contacts page, you can add tags that will automatically apply to every contact in your import.
To add a tag, click on the field and select it from the provided list. You can also type the name in the field to quickly search it and then select the appropriate tag from the list.
To remove a tag from the field, click X next to the specific tag.
Tags you add here will be added to all contacts, in addition to any individual tags already assigned within your import file.
Subscribe to marketing emails
Before you can import the contacts, you need to confirm that all the contacts in the import file have provided their explicit consent to receive marketing emails from you.
This is a crucial step to ensure compliance with applicable laws and regulations. Circle has a zero-tolerance spam policy for these email communications. For more details, please refer to Circle's Anti-Spam Policy.
To confirm this, select the Subscribe to marketing emails checkbox.
Confirm the import
Once you’re ready, click Import contacts at the top-right of the page. While it’s in progress, you’ll see a dialog with an import in progress message. Click View progress in the dialog to navigate to the Bulk logs page.
Once the contact import is complete, you can see all your contacts within the Contacts tab on the Manage audience page.
📚 To learn more about contacts, see our guide here.
View bulk logs
When you import contacts, a bulk log is generated to help you track the import progress and review the results.
To view bulk logs, click Audience in the left sidebar, then select Bulk logs.
Here, you can see the following details in various columns:
Type: Refers to the kind of bulk action performed. Contact imports will show up as Bulk contact import.
Status: Indicates if the import is currently processing, successful, partially successful, or failed.
Progress: Displays import progress in real-time. It will show the number of contacts processed out of the total in the import file.
-
Results: For each bulk action, you can check input and output files. Simply click the hyperlinked input or output file text to download it on your computer.
The input file is a copy of the imported file in CSV file format.
The output file contains details of each contact’s import status in CSV file format.
💡 Tip: Check out the Notes and Errors columns of the output file to find information about your contact and any errors that might have occurred during the import process.
-
Message: Provides a quick way to see the import results.
💡 Tip: Hover over the message tooltip to find a detailed summary of the import.
-
Performed: Displays details of when a bulk action was performed.
💡 Tip: Hover over the detail to see the exact timestamp of the import.