Set up a domain redirect using Cloudflare
Last updated: September, 2026
If you’ve changed your community’s custom domain, this guide will explain the steps to create a domain redirect using Cloudflare. This enables you to redirect traffic from your old domain to the new one you have set up for your community.
About domain redirects
If your Circle community is currently on a custom subdomain (e.g., “community.domain.com”) or a root domain, and you switch to a different domain (“domain.com”), any old URLs you previously shared won’t redirect to the new domain URL automatically.
That means anyone who bookmarked or shared links using the old domain (e.g., “community.domain.com/some-page”) would get an error, unless you set up domain redirects.
❗ Important: You only need to set up redirects if you were using your own custom domain (subdomain or root) before, and now you want to redirect it to the new domain set in the community. So that it doesn’t break those old links you may have shared with users.
If you’re moving from Circle’s default domain (like “yourcommunity.circle.so”) to your own custom domain, Circle handles the redirect automatically. For example, visitors to “yourcommunity.circle.so/some-page” will be redirected to the same page on your custom domain automatically (e.g., “domain.com/some-page”).
You can set up domain redirects in the following ways:
Using your domain provider: If your domain provider, where you manage your DNS, offers a redirect option, you can set it up there as well. If you are not sure, we suggest checking their support docs or contacting their support team.
-
Using Cloudflare: You can create a free account on Cloudflare and manage your domain and redirects directly within it. You can easily add your domain purchased from a different provider or registrar to Cloudflare. To learn more about creating an account and adding your existing domain to Cloudflare, please refer to these guides:
Add a site (a guide on how to connect a domain)
Below, we’ll walk through how to set up a redirect from a custom subdomain to a root domain using Cloudflare.
Setting up a redirect in Cloudflare
Using Cloudflare, you can set up a redirect rule to direct all the traffic from your old domain to your current domain, while keeping original paths and query strings.
Let’s say you’re moving from:
community.domain.com → domain.com
After setting up the redirect, here’s how links will work:
“https://community.domain.com/about-us” → “https://www.domain.com/about-us”
“https://community.domain.com/onboarding-guide” → “https://www.domain.com/onboarding-guide”
“https://community.domain.com/audience/manage?page=1” → “https://www.domain.com/audience/manage?page=1”
This helps preserve deep links, guides, or internal pages from the community you’ve already shared with members. Let’s go through the steps to set it up.
📚 To learn more about setting up a redirect, see Cloudflare’s guide here.
💡 Tip: If you want to redirect a specific request URL to a static target URL, you can also do that in Cloudflare. See Examples guide on Cloudflare docs to find out more about your redirect usecase.
Add an A record
To successfully set up redirects, you will need to add an A record to your DNS.
Log in to the Cloudflare dashboard and select an account and domain (choose the domain that has your custom subdomain records, e.g., “domain.com”).
From the sidebar, go to DNS → Records.
-
Select Add record and configure the following details:
Type: Choose A type record.
Name: Add the subdomain for which you are setting up a redirect. For our example, it will be “community”. If you are redirecting from one root domain to another, you may need to add “@” or “www” in the name field instead.
IPv4 address: Enter this value: 192.0.2.1
-
Proxy status: Enable the proxy status toggle.
Click Save.
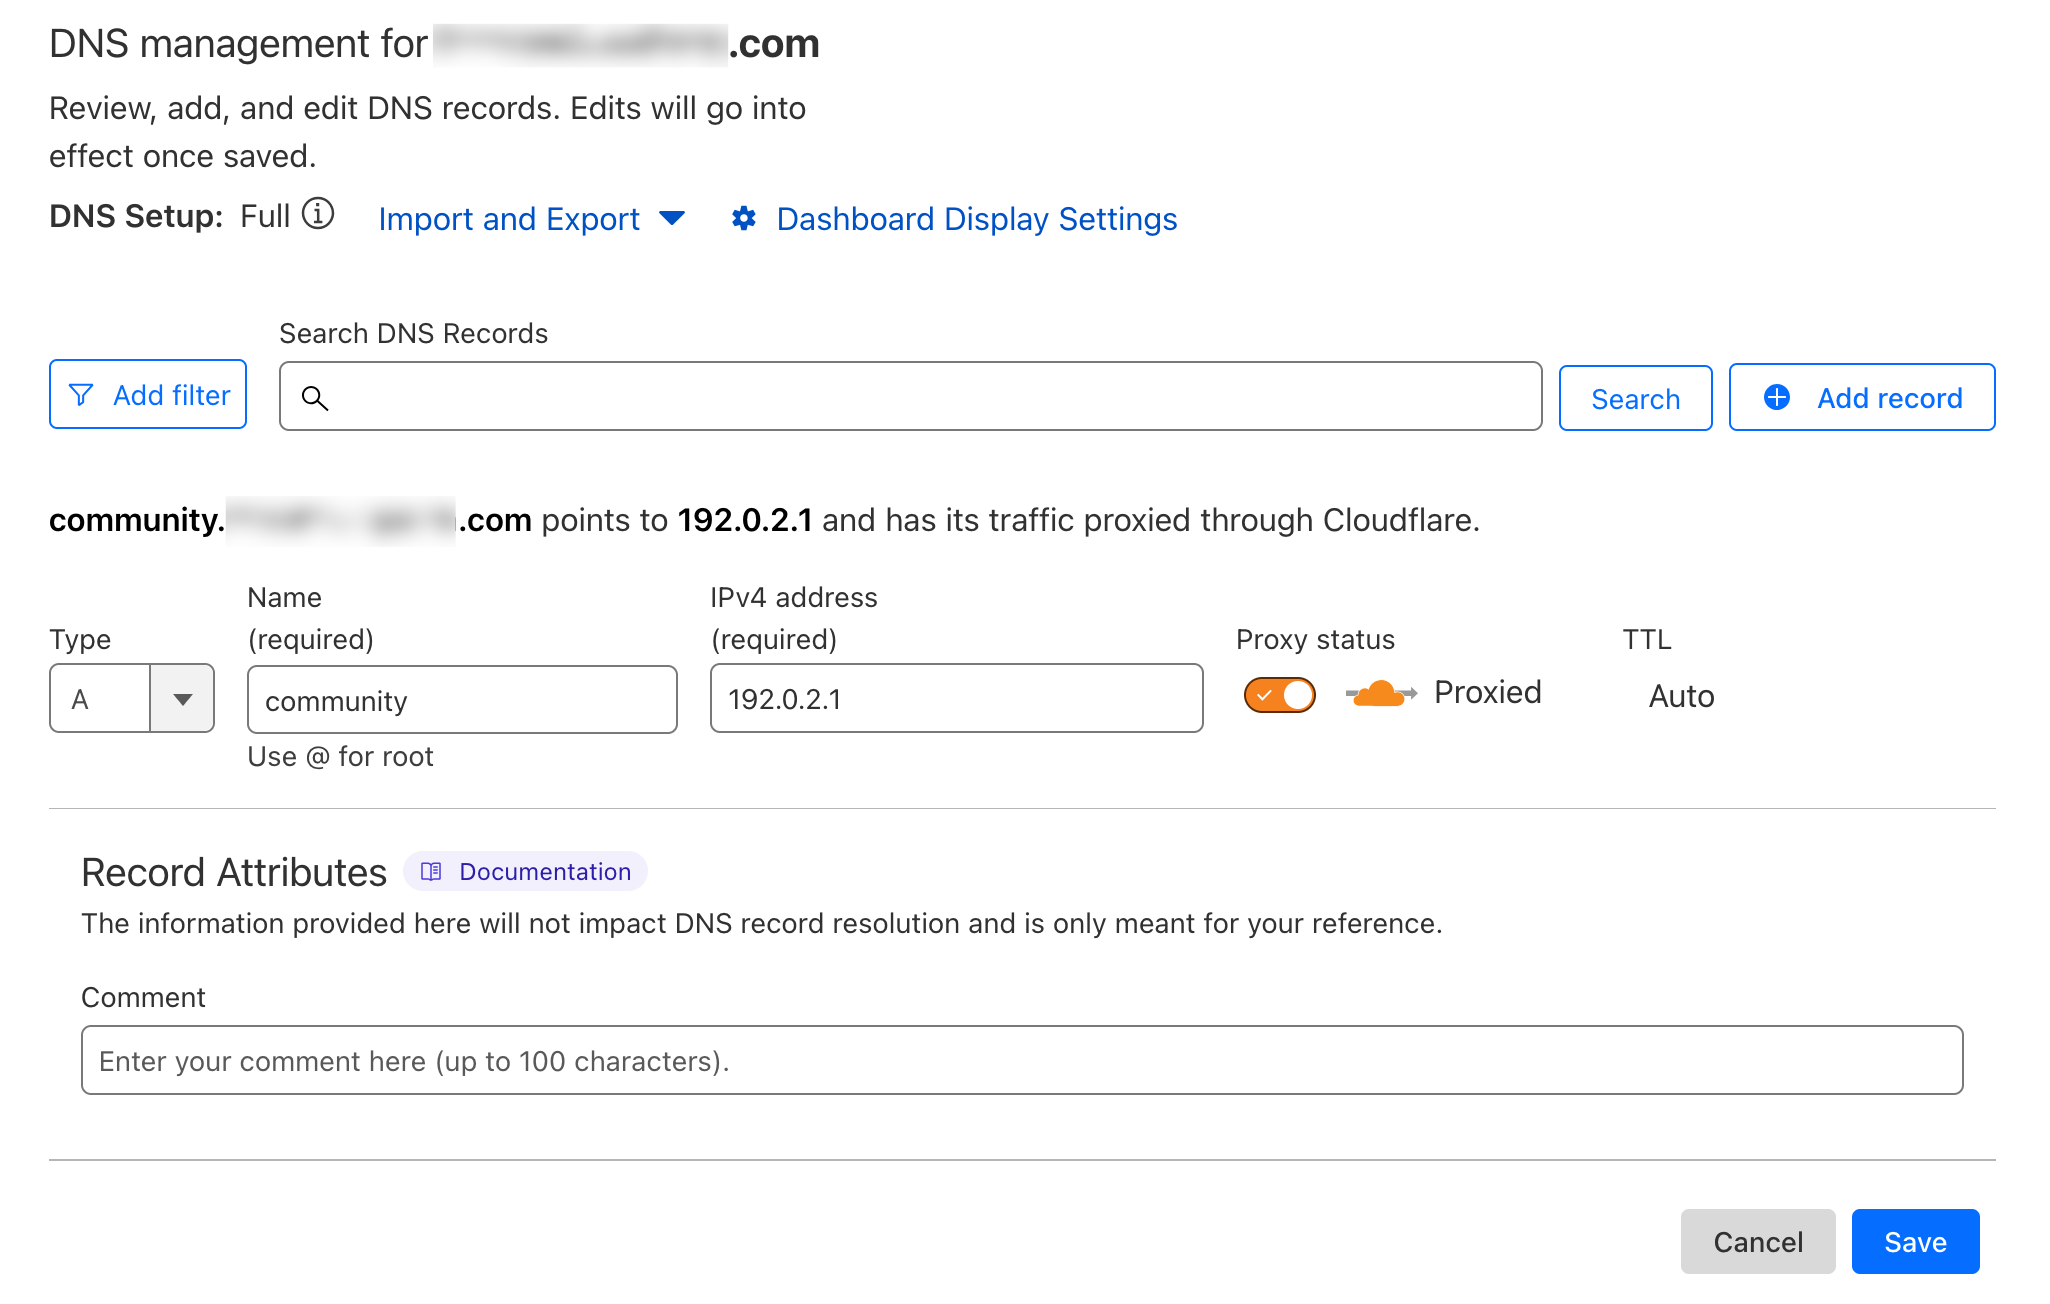
💡 Tip: If you haven’t deleted the CNAME record created when setting up the old domain, please remove it before adding an A record for the same domain. If you leave the CNAME in place and try to add an A record for your redirect, Cloudflare will show an error.
Set up a redirect rule
In the dashboard sidebar, go to Rules.
Click Create rule and select Redirect rule.
Under the Redirect to a different domain option, click Create rule.
-
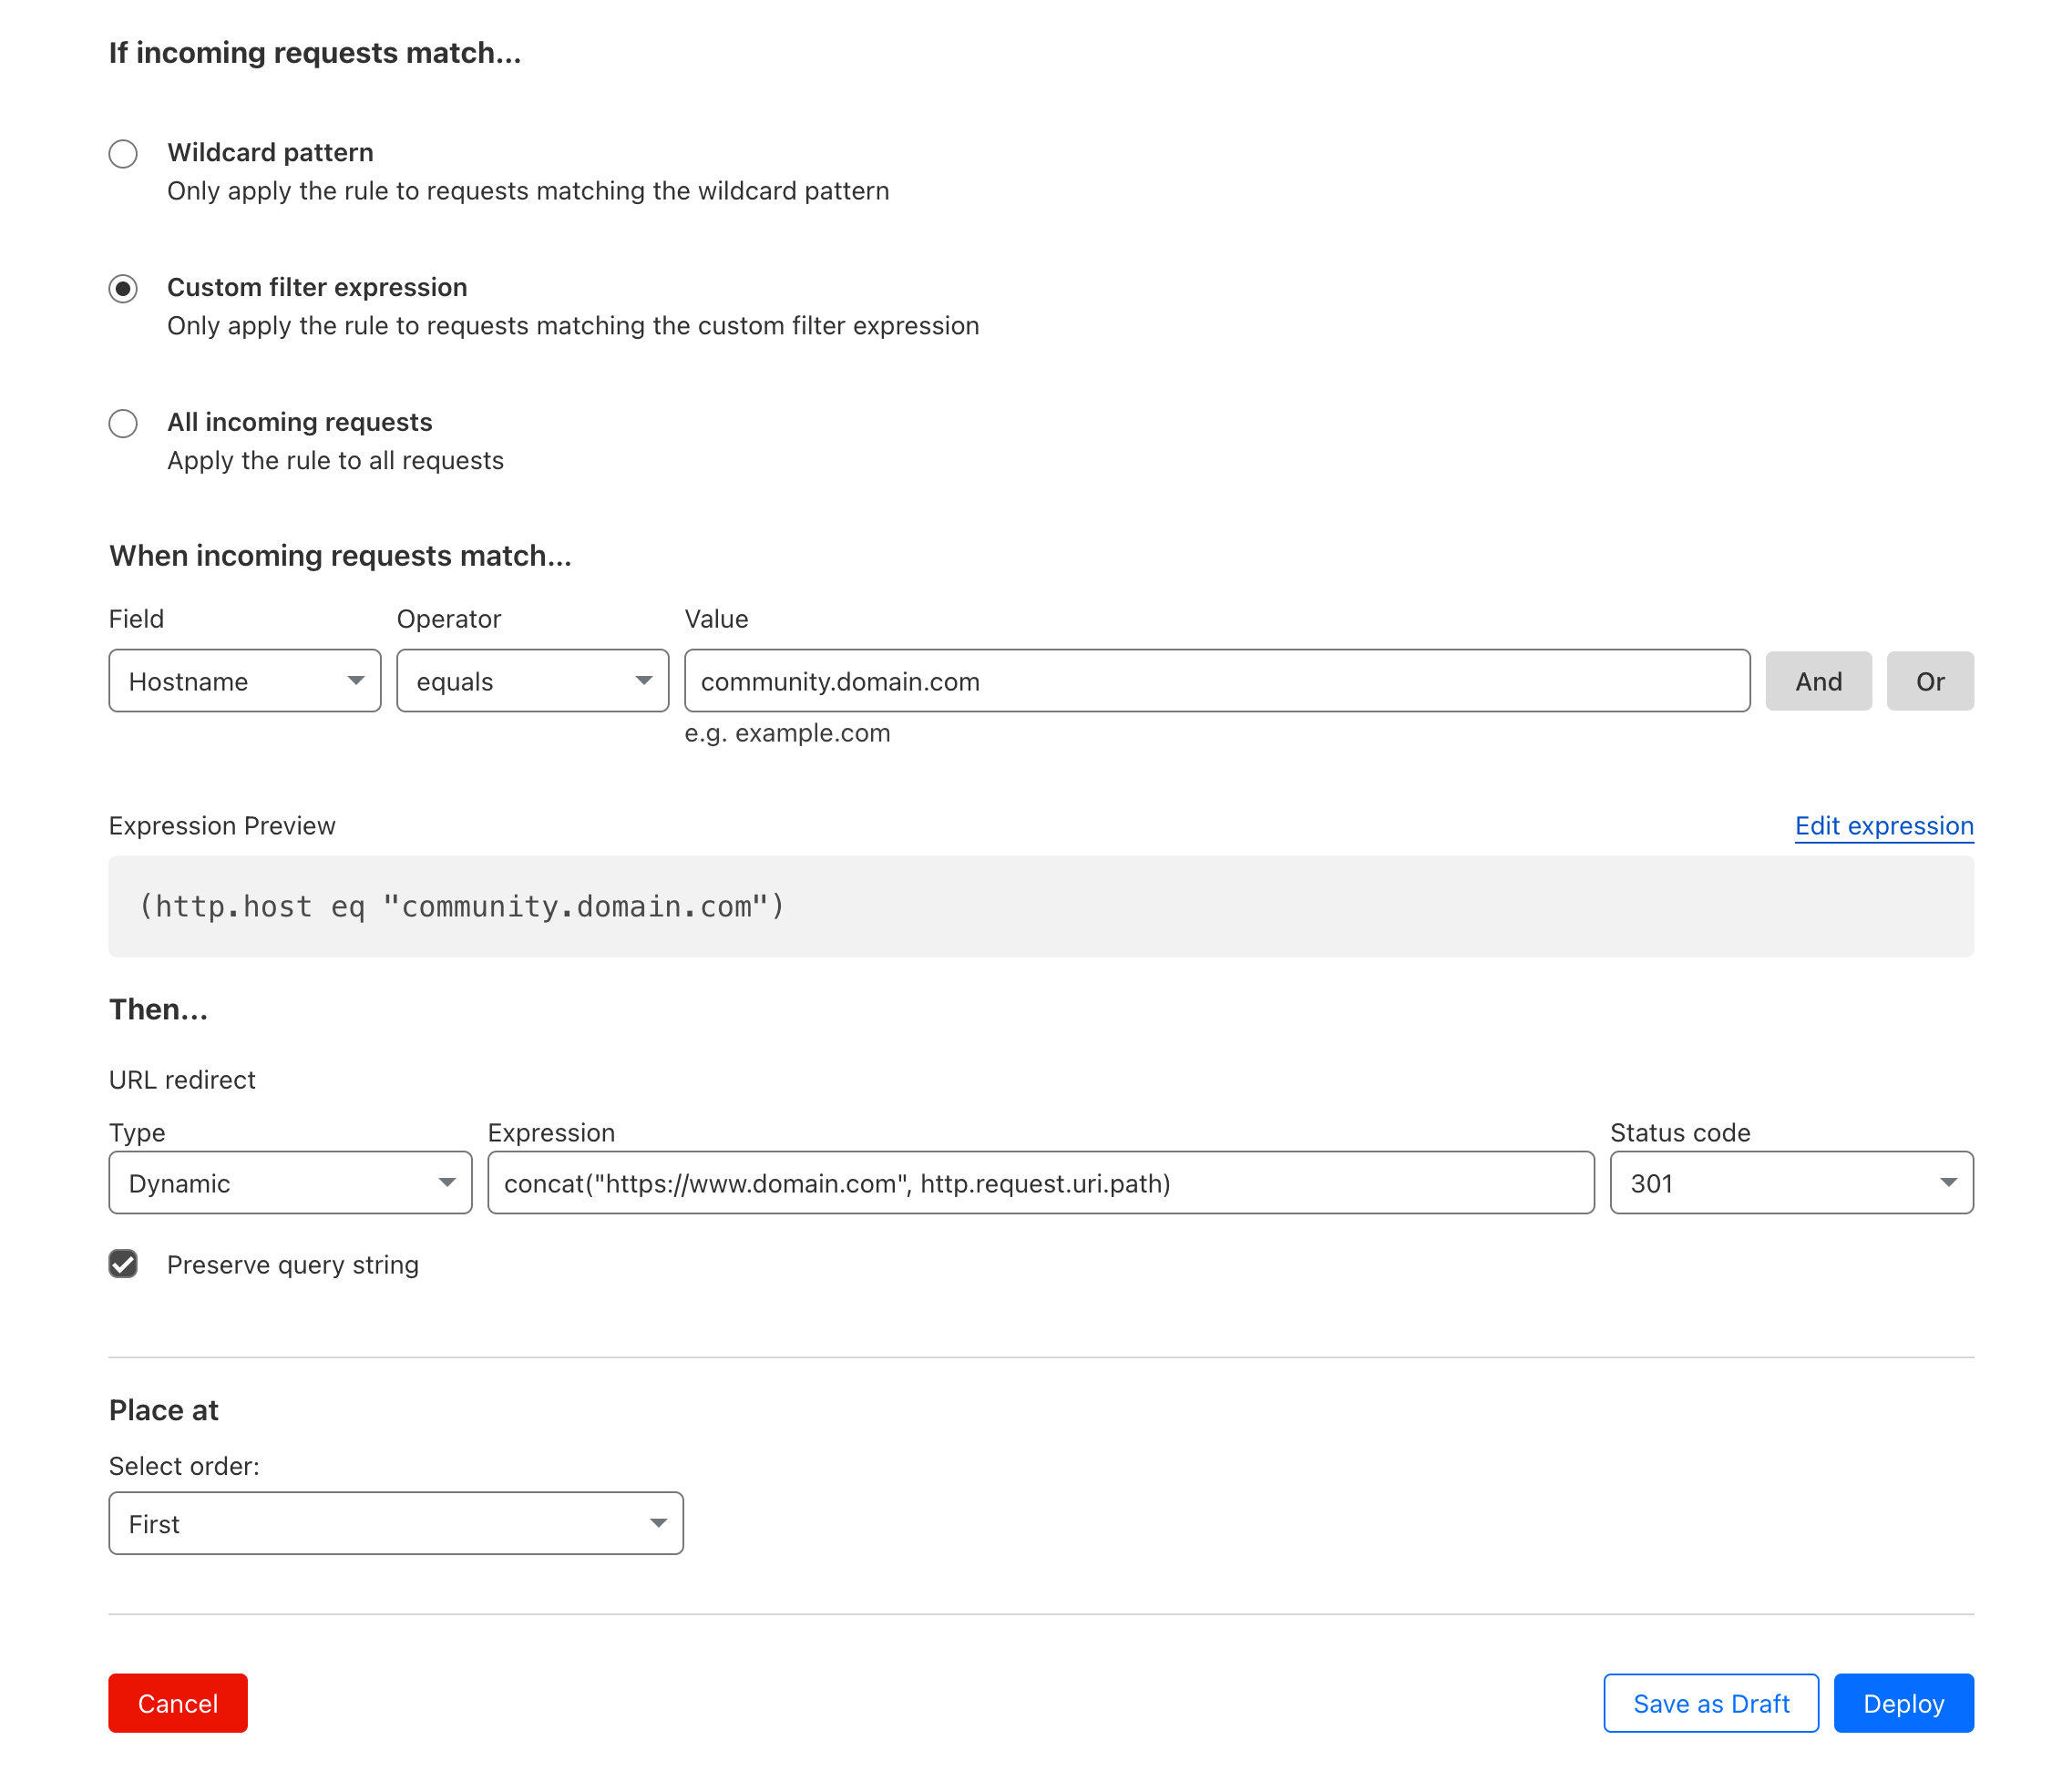
Configure the following sections:
If incoming request match: Keep the Custom filter expression option selected.
-
When incoming request match:
Field: Set to Hostname.
Operator: Set to Equals.
Value: Enter your old domain here. For example, if you want to redirect links from your “community.domain.com” to “domain.com”, enter the “community.domain.com” in the value field.
-
Then:
Type: Set to Dynamic.
-
Expression: Enter “concat("www.YOUR ROOT DOMAIN", http.request.uri.path)”
Here, enter the root domain you have set in your community. In our example, it would be “concat("www.domain.com", http.request.uri.path)”
Status code: Choose 301.
-
Preserve query string: Check this box to enable it.
Click Deploy.
You are all set! Once you deploy, the redirect should take effect within a few minutes. To confirm everything’s working, try visiting a few of your old domain links and check that they redirect correctly.
❗ Important: DNS changes may take longer to appear on devices connected to the same network where the changes were made, as your device, browser, or router might still be using old cached DNS records. To fix this, try clearing your device’s DNS cache, clearing your browser cache, or restarting your router.
If you see errors during testing, try checking from a different network to confirm if the changes have propagated.